
Creating interactive PDF forms doesn’t have to be complicated or expensive. With Microsoft Word and a few simple steps, you can transform any document into a professional, fillable PDF form that saves time and improves data collection. This comprehensive tutorial will walk you through everything you need to know, from setting up your first form field to creating polished, interactive documents that work seamlessly across all devices.
Why Interactive PDF Forms Matter More Than Ever
Interactive PDF forms have become essential tools for modern businesses and organizations. Unlike static documents, these smart forms allow users to click, type, and interact directly with the content, creating a more engaging experience.
Recent studies show that interactive PDFs significantly boost user engagement compared to traditional static documents1. They create an immersive learning experience and keep users actively involved throughout their interaction with the document. Additionally, businesses using digital forms report over 50% efficiency gains and 20-40% reductions in operational costs compared to paper-based processes.
The advantages of PDF forms over other formats are clear: they maintain consistent formatting across devices (known as “What You See Is What You Get”), offer superior security features, and work seamlessly across different platforms. Unlike Word documents that may shift margins when printed, PDF forms print exactly as they appear on screen, ensuring professional results every time.
Enabling the Developer Tab in Microsoft Word
Before you can create interactive forms, you’ll need to unlock Word’s powerful form-building tools through the Developer tab. This hidden feature contains all the controls necessary for creating professional forms.
For Windows Users:
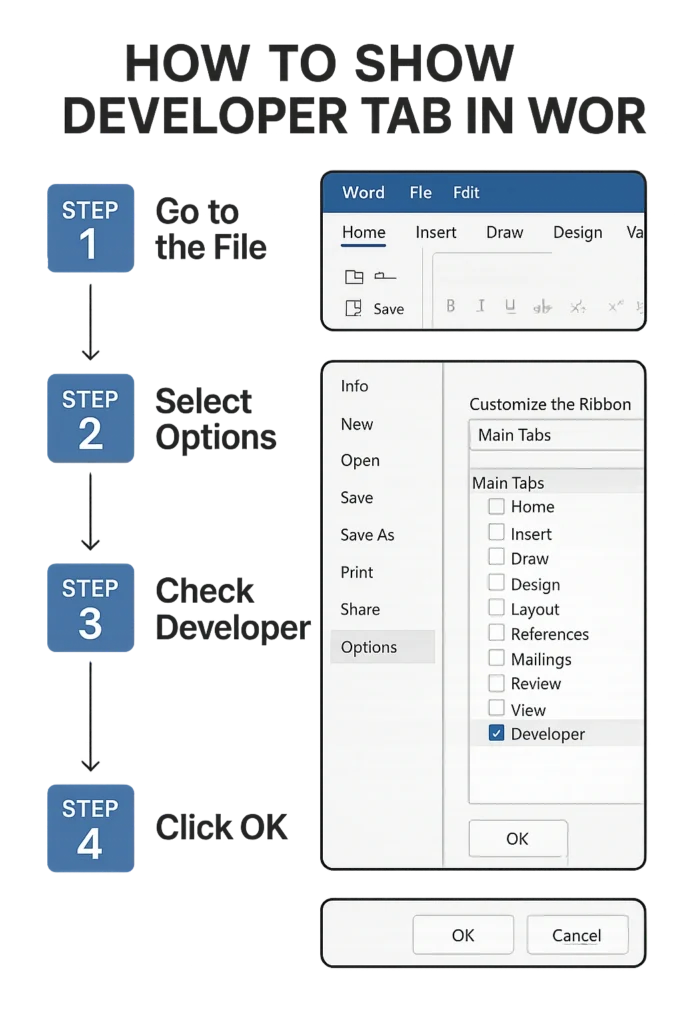
- Click File in the top menu
- Select Options from the left sidebar
- Choose Customize Ribbon from the options list
- Look for “Developer” in the right panel under “Main Tabs”
- Check the box next to Developer
- Click OK to save your changes
For Mac Users:
- Go to Word in the top menu
- Click Preferences
- Select Ribbon & Toolbar
- Find the Developer in the list and check the box
- Click Save to apply changes
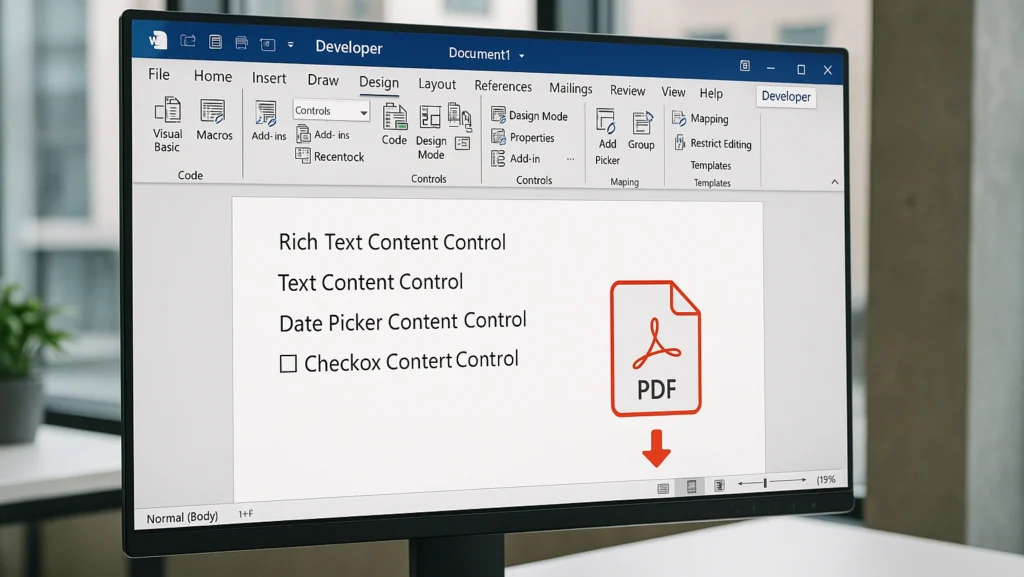
Once enabled, you’ll see the Developer tab appear in your ribbon with various form controls ready to use. This tab gives you access to Rich Text Content Control, Plain Text Content Control, checkboxes, drop-down lists, and many other interactive elements.
Setting Up Your Form Template
Start with a solid foundation by creating or selecting the right template for your form. Microsoft Word offers several approaches to get you started quickly.
Using Pre-Built Templates:
The fastest way to create a form is by using Word’s built-in templates.
Go to File > New, then type “Forms” in the search box and press Enter. You’ll find various professional templates, including registration forms, surveys, and application forms. Simply select one that matches your needs and click Create.
Starting from Scratch:
If you prefer complete control, begin with a blank document. Plan your form layout by adding headers, questions, and spaces where users will input information. Consider using tables to create clean, organized sections that guide users through the form logically.
Remember to prepare all spaces and formatting before adding interactive elements. This includes setting up text areas, checkbox positions, and dropdown menu locations. Having a clear structure makes the form creation process much smoother.
Adding Essential Form Controls
Now comes the exciting part – transforming your static document into an interactive form. The Developer tab provides several powerful controls that cater to different types of data collection.
Text Input Fields:
Text boxes are the backbone of most forms. Position your cursor where you want the input field, then click Plain Text Content Control for basic text entry or Rich Text Content Control for formatted text. Plain text controls work perfectly for names, addresses, and simple responses, while rich text controls allow users to format their input with bold, italics, and multiple paragraphs.
Checkbox Controls:
Perfect for yes/no questions or multiple-choice selections where users can pick several options. Click the Checkbox Content Control button and place it next to your question. You can customize checkboxes by right-clicking and selecting Properties to set default states and appearance.
Drop-Down Lists:
These controls provide users with predefined options, reducing errors and ensuring consistent data entry. After inserting a Drop-Down List Content Control, right-click it and choose Properties to add your options. You can include up to 25 items in each dropdown menu.
Date Picker Controls:
Eliminate confusion about date formats by using the Date Picker Content Control. This tool provides users with a calendar interface, ensuring dates are entered consistently and correctly.
Each control can be customized through the Properties dialog box, where you can set titles, placeholder text, and specific behaviors that make your form more user-friendly.
Converting Your Word Document to PDF
Once your Word form is complete, converting it to PDF format unlocks additional interactive capabilities and ensures consistent formatting across all devices.
Method 1: Save As PDF
The simplest approach is to use Word’s built-in PDF export feature.
Click File > Save As, choose your location, then select PDF from the file type dropdown menu. Make sure to check “Open file after publishing” if you want to see the result immediately.
Method 2: Print to PDF
For users with Adobe PDF installed, go to File > Print and select “Adobe PDF” as your printer. This method often provides better compatibility with Adobe Acrobat’s form recognition features.
The conversion process preserves your document’s layout while creating a foundation for interactive elements. However, Word’s form controls don’t automatically become interactive in the PDF – that’s where Adobe Acrobat comes in.
Enhancing Forms with Adobe Acrobat
To unlock the full potential of your interactive PDF forms, Adobe Acrobat Pro provides powerful tools that transform your converted document into a truly interactive experience.
Automatic Form Recognition:
Open your PDF in Adobe Acrobat Pro and navigate to Tools > Prepare Form. Acrobat will automatically analyze your document and detect potential form fields. The software recognizes lines, boxes, and spaces as likely input areas, converting them into interactive fields.
Manual Form Field Creation:
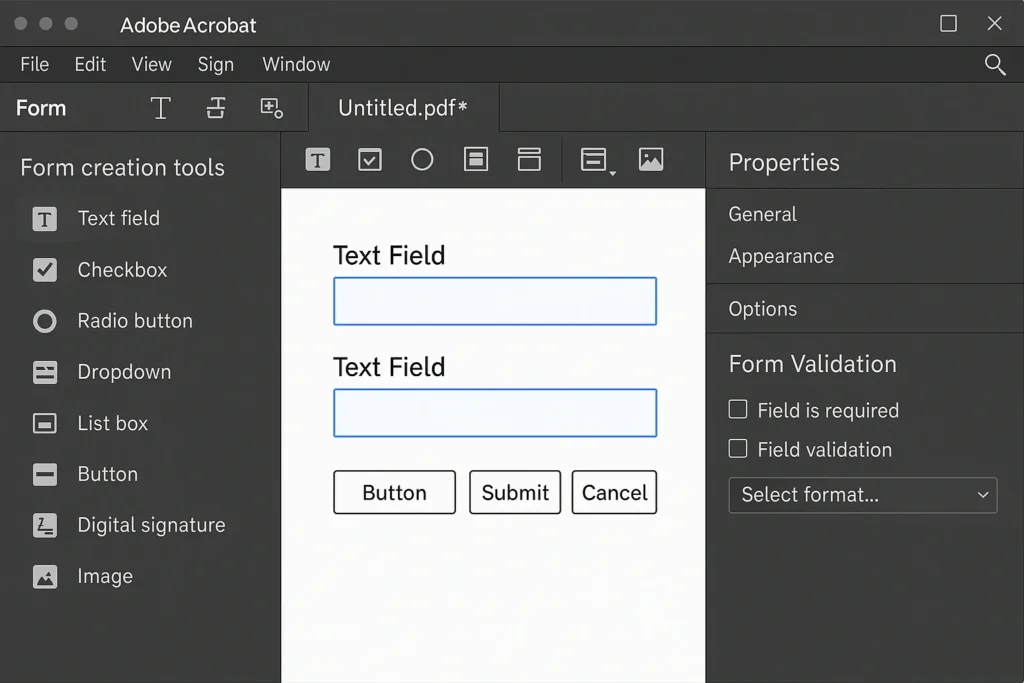
While automatic recognition is helpful, you’ll likely need to make adjustments. Acrobat’s form creation tools allow you to:
- Add new text fields where recognition missed them
- Insert radio buttons for single-choice questions
- Create signature fields for document authentication
- Set up calculation fields for forms involving numbers
Field Customization:
Right-click any form field to access Properties, where you can customize appearance, set validation rules, and add helpful tooltips. For example, you can specify date formats, require certain fields, or limit text length for consistency.
Testing and Preview:
Always use the Preview function to test your form from a user’s perspective. This reveals any usability issues and ensures all interactive elements work as expected before distribution.
Form Protection and Distribution
Protecting your form ensures users can only interact with designated areas while preserving your document’s integrity and professional appearance.
Document Protection in Word:
Before converting to PDF, protect your Word document by going to the Developer tab and clicking Restrict Editing. Choose “Allow only this type of editing: Filling in forms” and optionally set a password to prevent unauthorized modifications.
PDF Distribution Options:
Adobe Acrobat offers multiple ways to share your completed forms:
- Email Distribution: Send forms directly with tracking capabilities
- Web Links: Host forms online for broader access
- Local Distribution: Share files for offline completion
The Distribute feature in Acrobat Pro enables you to track responses, send reminders to non-responders, and automatically collect submitted data in organized formats.
Advanced Features and Customization
Take your forms to the next level with advanced features that enhance user experience and improve data quality.
Conditional Logic:
Create smart forms that adapt to user responses. For example, reveal additional questions based on previous answers or hide irrelevant sections to streamline the user experience.
Data Validation:
Set rules that ensure accurate data entry. You can require specific formats for phone numbers, validate email addresses, or set numerical ranges for quantitative responses.
Multimedia Integration:
Modern interactive PDFs can include embedded videos, audio instructions, or linked resources that provide additional context without cluttering the form.
Mobile Optimization:
Ensure your forms work perfectly on smartphones and tablets by testing responsiveness and adjusting field sizes for touch interfaces.
Troubleshooting Common Issues
Even well-designed forms can encounter challenges. Here are solutions to the most common problems:
Field Recognition Problems:
If Acrobat doesn’t detect form fields correctly, manually add them using the Add New Field button. Sometimes decorative lines are incorrectly identified as form fields – simply select and delete these unwanted elements.
Formatting Inconsistencies:
Maintain consistent appearance by setting uniform field properties. Use the Properties panel to standardize fonts, colors, and sizes across all form elements.
Compatibility Issues:
Test your forms across different PDF readers and devices. While Adobe Acrobat provides the best experience, ensure basic functionality works in free readers like Adobe Acrobat Reader.
Data Collection Problems:
Set up proper data export procedures to easily compile responses. Adobe Acrobat can export form data to Excel or other database formats for analysis.
Best Practices for Professional Forms
Creating effective interactive PDF forms requires attention to both technical details and user experience principles.
Design Principles:
Keep forms clean and uncluttered with plenty of white space. Use consistent formatting throughout and group related questions logically. Clear instructions and labels prevent user confusion and reduce form abandonment.
User Experience Optimization:
Minimize the number of required fields and provide helpful placeholder text where appropriate. Consider the logical flow of questions and make the completion process as intuitive as possible.
Testing and Iteration:
Always test forms with real users before final deployment. Gather feedback on usability issues and make adjustments based on actual user behavior rather than assumptions.
Accessibility Considerations:
Ensure your forms work with screen readers and other assistive technologies by providing proper field labels and maintaining logical tab order.
Conclusion
Creating interactive PDF forms directly in Microsoft Word opens up a world of possibilities for efficient data collection and professional document creation. By following this step-by-step process – from enabling the Developer tab to fine-tuning your final PDF – you can transform static documents into engaging, interactive experiences that save time and improve accuracy.
The combination of Word’s user-friendly form controls and Adobe Acrobat’s advanced PDF capabilities provides a powerful solution that doesn’t require expensive specialized software or extensive technical knowledge. Whether you’re creating simple feedback forms or complex multi-page applications, these tools give you the flexibility to build exactly what you need.
Start with simple forms to practice the process, then gradually incorporate advanced features as you become more comfortable with the workflow. Remember that great forms focus on user experience – make them clear, logical, and easy to complete, and your audience will appreciate the professional touch.
Frequently Asked Questions
Can I create interactive PDF forms without Adobe Acrobat?
While Word can create basic fillable forms, Adobe Acrobat Pro provides the most robust interactive features. However, free alternatives like PDFtk or online tools like JotForm offer limited PDF form creation capabilities for simple projects.
Do interactive PDF forms work on mobile devices?
Yes, modern PDF readers support interactive forms on smartphones and tablets. However, complex forms may be challenging to navigate on small screens, so consider mobile-friendly design principles when creating your form.
How do I collect and analyze data from PDF forms?
Adobe Acrobat Pro allows you to export form responses to Excel, CSV, or database formats for analysis. You can also set up automatic data collection through Adobe’s cloud services for real-time response tracking.
Can I password-protect my PDF forms?
Absolutely. Adobe Acrobat provides robust security options including password protection, digital signatures, and permission controls that determine who can fill out, modify, or print your forms.
What’s the difference between fillable and interactive PDFs?
Fillable PDFs allow basic data entry, while interactive PDFs include advanced features like dropdown menus, calculated fields, conditional logic, and multimedia elements that create a more engaging user experience.