
Do you get tired of spending hours manually formatting documents in Microsoft Word? There’s a faster and easier way to do it! In this guide, you’ll learn how to use Macro to Automate Text Formatting in MS Word to automate text formatting in MS Word. Whether you’re working on reports, letters, or school papers, Macros can help you save time and make your work easier.
We will talk about what Macros are, how they work, and give you a step-by-step guide on how to automate text formatting tasks in MS Word. Get ready to boost your productivity!
What Are Macros in MS Word?
Macros are like recorded sets of instructions that help you do repetitive tasks quickly and easily. Think of them like a set of actions you record once and can play back whenever you need to. This makes them perfect for boring tasks like formatting text. If you’re always adjusting headings, changing fonts, or applying styles, Macros can save you a lot of time.
Macros are especially useful if you need to apply the same formatting rules to many documents, like changing all headings to a certain style or updating the font throughout a document. Instead of repeating these steps manually, you can create a Macro once and use it again whenever you need it.
Learn how to create your first micro in MS Word.
Why Use Macros for Text Formatting in MS Word?
Here are some reasons why using Macro to Automate Text Formatting in MS Word is great:
- Saves Time: Macros let you do repetitive tasks in seconds instead of wasting time doing them manually.
- Consistency: Macros help keep the formatting the same throughout your document.
- Easy to Use: Once you set up a Macro, using it is really simple, even for beginners.
Step-by-Step Guide to Creating a Macro to Automate Text Formatting
Step 1: Enable the Developer Tab in MS Word
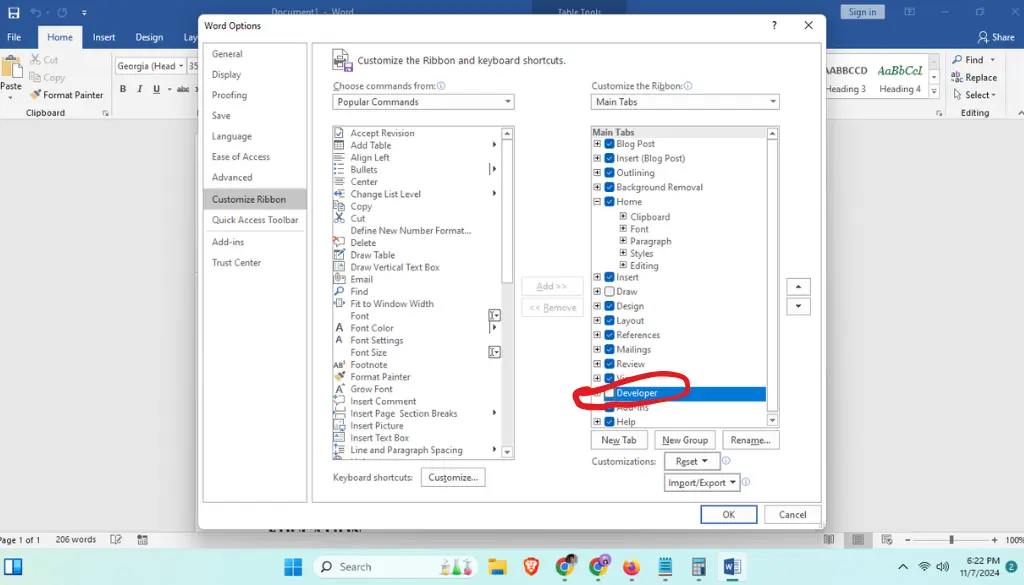
To create and manage Macros, you need to enable the Developer tab in MS Word. Here’s how:
- Open MS Word.
- Click on File → Options.
- In the Word Options window, click on Customize Ribbon.
- Check the box next to Developer under the Main Tabs list.
Now, you should see the Developer tab on your MS Word ribbon.
Step 2: Record Your Macro
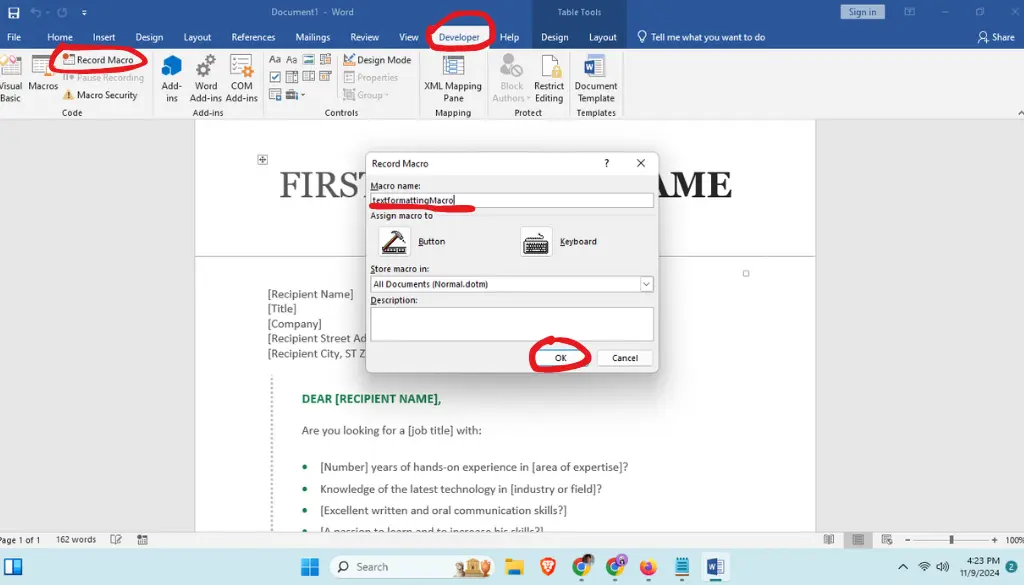
Recording a Macro to Automate Text Formatting in MS Word means doing the formatting actions you want while MS Word “records” them.
- Click on the Developer tab and then click Record Macro.
- Give your Macro a name, like “TextFormattingMacro.” You can assign a button or a keyboard shortcut to easily use it later.
- Click OK to start recording.
- Do the formatting you want to automate. For example, you can change the font to Arial, make it bold, or adjust line spacing.
- When you’re done, click Stop Recording in the Developer tab.
Step 3: Run Your Macro
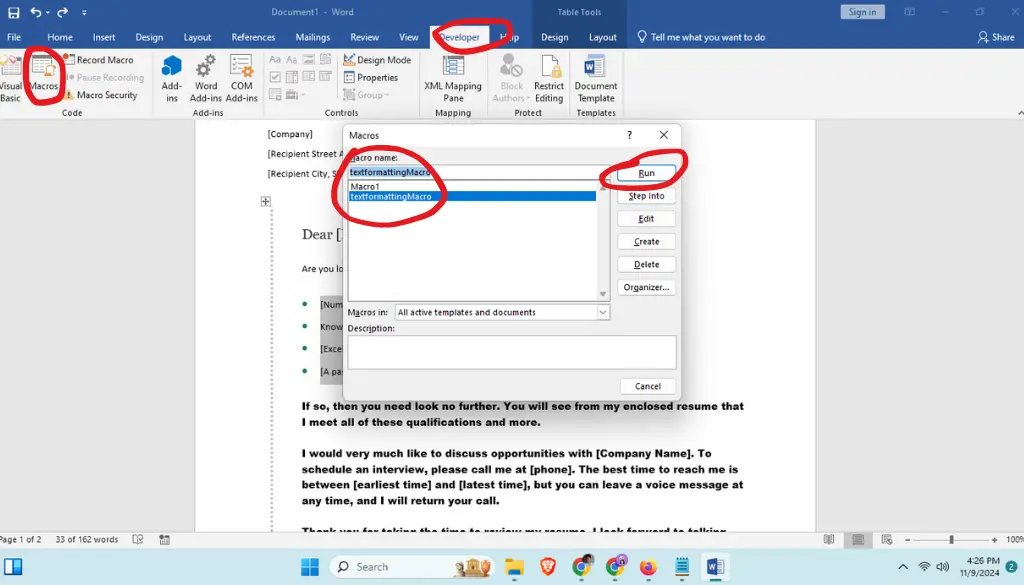
Now that you have created a Macro to Automate Text Formatting in MS Word, you can use it to format any text automatically.
- Select the text you want to format.
- Go to the Developer tab and click Macros.
- Choose your Macro from the list and click Run.
Just like that, the formatting is applied instantly!
Best Practices for Creating Effective Macros
1. Keep It Simple
When you first start recording Macros, stick to simple formatting commands, like changing font style or size. Making it too complicated can make it harder to fix if something goes wrong.
2. Name Your Macros Clearly
Give your Macros names that make sense so you can easily remember what each one does. This way, you won’t have to guess when you have multiple Macros for different tasks.
3. Assign Keyboard Shortcuts
Assigning a keyboard shortcut to your Macro can make things even faster. You can do this when creating the Macro by selecting ‘Keyboard’ in the ‘Assign Macro to’ options and then pressing the keys you want to use. This way, you can run the Macro without touching your mouse.
4. Test Thoroughly
After recording a Macro to Automate Text Formatting in MS Word, test it to make sure it works correctly. If it doesn’t, you may need to edit or re-record it.
Frequently Asked Questions About Using Macros in MS Word
Q1: Is It Safe to Use Macros?
Yes, it is safe to use Macros in MS Word, especially if you create them yourself. Just be careful when running Macros from unknown sources, as they might contain harmful code.
Q2: Can I Edit a Macro After Creating It?
Yes, you can edit a Macro. Go to the Developer tab, click Macros, select the one you want to edit, and click Edit. This will open the Visual Basic for Applications (VBA) editor, where you can change the code.
Q3: How Do I Delete a Macro?
To delete a Macro:
- Go to the Developer tab and click Macros.
- Select the Macro you want to delete and click Delete.
Q4: Can Macros Be Shared?
Yes, you can share your Macros with others. Save them in a Word document template (.dotm) and share that template. When others use it, they’ll have access to your Macro.
Common Macro Use Cases for Text Formatting
Here are some ways you can use Macros to save time:
- Standardizing Headings: Apply the same style to all headings in your document.
- Consistent Font Changes: Change the font style and size throughout your document with one click.
- Line Spacing Adjustments: Set double-spacing or specific line spacing using a Macro.
- Automatic Paragraph Indentation: Indent paragraphs according to set standards automatically.
Troubleshooting Common Macro Issues
1. Macro Doesn’t Run Properly
If your Macro isn’t working as expected, it might be because you recorded it incorrectly or the document has changed. You can edit the Macro in the VBA editor to fix any errors.
2. Macro Not Listed
If you can’t find your Macro, make sure it’s saved in the right document or template. Remember that Macros saved in a specific document aren’t available globally.
3. Macro Security Settings
If MS Word stops you from running a Macro, you may need to change your security settings. Go to File → Options → Trust Center → Trust Center Settings, then adjust the Macro Settings to allow Macros.
Benefits of Using Macros for Text Formatting
- Speed: What could take 15-20 minutes manually can be done in seconds with a Macro.
- Consistency: Macros make sure your documents look the same every time, reducing mistakes.
- Easy Application: You can easily repeat the formatting for different parts of your documents.
Conclusion
Using a Macro to Automate Text Formatting in MS Word has many benefits:
- Saves Time: Automate boring, repetitive tasks in seconds.
- Keep formatting Consistent: Apply the same rules throughout your documents easily.
- Makes Work Faster: Streamline your workflow by cutting out manual formatting steps.
By following the steps above, even beginners can create useful Macros to be more productive. Start with small tasks, try new things, and soon Macros will become a valuable tool in your work. For more information, visit the official Microsoft support page on using Macros.
Try using Macros today and see how much easier working in MS Word can be. If you found this guide helpful, share it with others so they can also enjoy the benefits of automation!