Editing images in Microsoft Word elevates our documents, making them professional and visually appealing. With just a few clicks, we can resize images, apply striking effects, and transform ordinary photos into interesting graphics.
Word offers powerful tools for cropping, text wrapping, and brightness enhancement. By mastering these features, we can create standout documents. Let’s explore techniques to make our images truly shine in Word!
Inserting and Formatting Images in Word
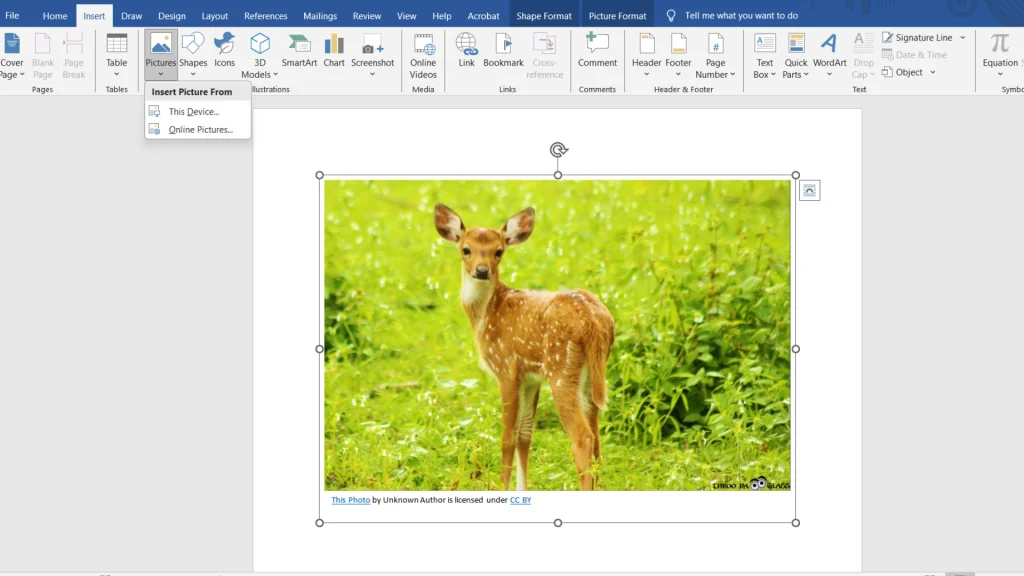
Enhancing your Microsoft Word documents with images can make them more engaging. To insert an image, click the Insert tab, select Pictures, and choose an image from your device or online sources. Resize the image by dragging its corners while holding the Shift key to keep the correct proportions.
Next, crop images to focus on significant details. Select the image, go to the Picture Format tab, and click on Crop to remove unnecessary parts. You can improve your images with effects like shadows or reflections by selecting Picture Effects in the same tab.
Proper text wrapping is necessary for a clean layout. After selecting the image, click the Layout Options icon to choose how text flows around it. Adding captions gives context to your images. At last, compressing images reduces file size without losing quality, making your documents easier to share.
| Feature | Description |
|---|---|
| Image Insertion | Add images from your device or online. |
| Cropping | Trim unwanted parts of the image. |
| Text Wrapping | Control how text flows around images. |
| Image Compression | Reduce file size for easier sharing. |
Image Insertion Techniques
Inserting images into a Word document is easy and greatly improves visual appeal. Click the Insert tab, select Pictures, and choose your image. To maintain the original aspect ratio, adjust the size by dragging the corners.
Cropping images helps focus on key elements by trimming unnecessary parts. Select the image, go to the Picture Format tab, and click Crop. Effective cropping enhances an image’s relevance and impact.
Add creativity with image effects. Apply shadows, reflections, or glows by selecting the image and finding your way to Picture Effects in the Picture Format tab. These options make your graphics stand out.
Text wrapping is critical for integrating images and text smoothly. Click the Layout Options icon to choose how text interacts with images. Options like In Front of Text or Top and Bottom help control text flow and improve layout design.
For further refinement, use image compression to reduce file size without losing quality, especially for electronic sharing. Select the image, go to Picture Format, and click Compress Pictures. Choose your desired resolution to keep documents manageable.
Mastering these editing tools in Microsoft Word enhances your documents and boosts your graphic design skills. Techniques like cropping, applying effects, and managing text wrapping create visually appealing, well-structured documents that engage readers. For advanced features, explore paragraph formatting techniques that complement these image insertion methods.
Adjusting Image Properties
Adjusting image properties in Microsoft Word is necessary for crafting visually appealing documents. Easily insert images and tailor them to your needs. For example, crop images to emphasize key details or resize them for better text alignment. Select the image and steer to the Picture Format options to improve brightness, contrast, and sharpness.
Experiment with artistic effects like shadows and glows to infuse creativity into your documents. Use text wrapping to position images alongside text, creating a dynamic layout. Compress images to reduce file size without losing quality, simplifying document sharing. For more tips on enhancing productivity with images, explore productivity tools.
Proper image alignment greatly improves your document’s visual appeal. Try different picture styles and alignment options to achieve a polished, professional look. Mastering these tools not only hones your graphic design skills but also enhances your document editing expertise.
Editing and Enhancing Images
Editing images in Microsoft Word can greatly improve your documents. Begin by inserting a picture and selecting it to open the Picture Format tab. Here, you can fine-tune brightness, contrast, and apply artistic effects such as shadows and reflections.
Next, crop the image to focus on significant details. Select the image, click the Crop tool, and drag the edges to eliminate unnecessary parts. Resizing is similarly straightforward; hold the Shift key while dragging the corners to keep the proportions intact.
For a polished look, add picture styles and borders. This will make your images stand out and blend seamlessly with your document’s design. Use text wrapping options to creatively position text around images, enhancing your visual storytelling.
At last, remember to compress images to reduce file size without losing quality, especially when sharing documents online. By mastering these techniques, you can lift ordinary documents into interesting visual presentations!
Cropping and Resizing Images
In Microsoft Word, cropping images helps you eliminate unwanted areas and emphasize significant details. To crop, select the image, steer to the Picture Format tab, and click Crop. This tool enhances your visual content, making it more compelling for your audience.
Resizing images is critical for maintaining a clean layout. Adjust the size by dragging the corners of the image or entering specific dimensions in the Picture Format tab. Proper resizing ensures images fit seamlessly within your document, enhancing the in general document design.
Adding artistic effects can infuse creativity into your images. Select the image and explore the Artistic Effects option to apply different filters, giving your graphics a unique touch.
Text wrapping is necessary for aligning images with text. Control how text flows around your pictures by selecting Wrap Text in the Picture Format tab. This feature improves readability and lends a polished look to your document.
At last, compress images to reduce file size without sacrificing quality, simplifying document sharing. Right-click the image, select Compress Pictures, and choose your options. By mastering these techniques, you can effectively edit and improve images in Microsoft Word, resulting in visually striking documents.
Applying Image Effects and Corrections
Enhancing images in Microsoft Word can make your documents stand out. Begin by inserting your picture through the “Insert” tab and selecting “Pictures.” Once your image is in place, you can start enhancing its appearance.
Select the image and go to the Picture Format tab. Click on Corrections to adjust brightness and contrast. Hover over the options to preview their effects, enabling you to make informed adjustments that remarkably improve your image’s visual impact.
Next, explore artistic effects for a unique twist. For instance, applying a blur effect creates a dreamy atmosphere, while a glow effect highlights specific areas. These effects help convey your message and lift your document’s in general design.
Another key technique is cropping images. To focus on a specific part, select the image and use the crop tool in the Picture Format options. This removes unwanted backgrounds or distractions, ensuring your main subject shines.
Resizing images is necessary for a polished layout. Click and drag the corners of your image to adjust its size. Hold the Shift key while dragging to maintain the aspect ratio, preventing distortion and ensuring a seamless fit within your document.
To further improve your visuals, consider adding borders and styles. This adds a professional touch that makes your images pop. Select the image, go to the Picture Format tab, and choose Picture Border to customize the border’s color and thickness.
At last, don’t overlook image compression. This step is critical for reducing file size without sacrificing quality, especially when sharing documents online or via email. Use the “Compress Pictures” option under the Picture Format tab to select the best settings for your needs.
By mastering these editing tools, you can create visually stunning documents that effectively communicate your ideas. Whether for school projects or professional presentations, these techniques in Word will greatly improve your visual content.
Optimizing Document Layout with Images
Optimizing document layout with images in Microsoft Word can lift your work remarkably. Begin by inserting images to improve engagement and effectively communicate your ideas. After insertion, use cropping to highlight necessary elements; for example, cropping a place photo to focus on a striking tree can create a more impactful visual.
Resizing images is critical for a together layout design. Drag the corners to adjust size, ensuring images fit seamlessly. Improve clarity by applying image effects, like brightness adjustments. The Format tab allows you to add borders or styles, making your images stand out.
Use text wrapping to allow text to flow around images, creating a polished look. Experiment with different layout options to find the best fit for your document. At last, compressing images reduces file size, making sharing easier without compromising quality.
Text Wrapping Options
Mastering text wrapping options in Microsoft Word is necessary for enhancing your document’s layout. These settings determine how text interacts with images, boosting both visual appeal and readability.
To adjust text wrapping:
- Open Layout Options: Click on an image, then select the Layout Options icon.
- Choose Your Style: Options like “In Line with Text,” “Square,” and “Tight” help position images effectively.
- Adjust Alignment: Fine-tune the space between text and images for a polished look.
Utilizing these features allows you to create a visually striking document that effectively communicates your message. For more tips on image placement, check out this helpful guide.
Aligning and Compressing Images
Aligning and compressing images in Microsoft Word greatly enhances your document’s visual appeal and layout design. To align images, select the picture, click the Layout Options icon, and choose your preferred alignment. This integration allows images to blend seamlessly with the text.
To compress images, select the image and go to the Format tab. Click on Compress Pictures to reduce file size while maintaining quality. This step is necessary for sharing documents, as it improves file compatibility and speeds up loading times.
- Aligning Images: Use Layout Options for optimal placement.
- Compressing Images: Access the Format tab to reduce size.
By mastering these editing techniques, you can improve your document’s aesthetics and achieve a polished look. For more tips on moving images freely, check out this resource.
Summing up
Editing images in Word remarkably boosts the visual appeal of documents. With simple tools, you can easily resize, crop, and improve pictures. This not only improves layout but also accelerates document loading times. A well-placed image grabs attention and reinforces your message. By mastering these techniques, you can turn ordinary text into engaging documents that truly shine.
Frequently Asked Questions
How to perfectly align images in Word?
To align images in Word, select the image, go to the “Format” tab, and use the “Align” options for precise positioning.
How do I edit images in a Word document?
To edit images in Word, select the image, use the “Format” tab for options like resizing, cropping, and adjusting brightness or compression.
How can I improve the quality of a picture in Word?
To improve picture quality in Word, select the image, go to Picture Format, and adjust settings under Corrections and Picture Styles.
How do I fix text and images in Word?
To fix text and images in Word, use the Layout Options icon to adjust positioning, and anchor images to keep them in place.