Microsoft Word is a critical tool for crafting and editing documents. It empowers users to create reports, letters, and stories with ease. With Word, you can format text, insert images, and build tables effortlessly. This guide dives into into the necessary features and functions of Microsoft Word.
We will explore how to start a document, save your work, and use powerful tools like spell check and track changes. Whether for school assignments or personal projects, these insights will lift your writing experience and simplify the process.
Navigating the Microsoft Word User Interface
When you open Microsoft Word, the initial thing you notice is the Ribbon. This powerful interface contains necessary toolbars and menus for document editing. Each tab, like Home or Insert, groups related features, making your workflow smoother. For instance, the Home tab provides formatting tools to adjust fonts, text alignment, and styles quickly.
To create polished documents, take advantage of templates. These ready-made layouts save time and let you focus on your content. Tools like spell check and grammar check further improve the clarity and professionalism of your writing.
Another key aspect is page layout. Here, you can adjust margins, insert headers and footers, and add page numbers, all critical for organizing information effectively. For collaboration, using reviewing tools allows you to track changes and add comments directly in the document.
By mastering these features, you can create impressive documents. Let’s explore each tool to find how they can improve your writing experience!
Creating and Saving Documents
Creating and saving documents in Microsoft Word is necessary for producing professional content. Start by opening Word and choosing a blank document or a template. Templates provide a structured layout, saving you time and effort. Once your document is open, begin typing and use different text formatting options like bold, italics, and different fonts to highlight key points.
To avoid losing your work, save frequently. Click the File tab, then select Save As to choose a location, whether on your computer or in cloud storage like OneDrive for easy access later. Remember to save often, especially after making significant changes. You can also convert documents to PDF format for easier sharing. For more tips on sharing documents, visit document sharing.
Using the spell check feature ensures your documents are error-free, enhancing professionalism. Collaborate with others through Word’s built-in sharing features, allowing multiple users to edit simultaneously—ideal for group projects or reports. To track changes, use the Review tab, which simplifies viewing edits made by you or others.
Mastering document creation and saving techniques in Microsoft Word boosts productivity and elevates the quality of your work.
Starting a New Document

Starting a new document in Microsoft Word is straightforward. Launch the application to reach the Start Screen, where you can create a blank document or choose from a selection of useful templates.
Once you select a blank document, begin typing your content. Remember to save your work regularly by clicking on File and then Save. This practice is critical, especially after making major edits. For tips on document management, explore this page margins guide.
As you write, take advantage of different editing tools to format your text. Adjust font styles, sizes, and colors to improve readability. Use spell check to identify errors, and consider adding images, tables, or charts to improve your document.
When it’s time to share your work, Microsoft Word offers several options. Save your document to cloud storage like OneDrive for easy access from any device. You can also convert your document to PDF format for seamless sharing. For more details, check out these PDF conversion tips.
At last, take the time to explore the user interface of Word. Familiarizing yourself with the ribbon and its different tabs will make your document creation process more efficient. With practice, you’ll become proficient in creating and managing documents in Microsoft Word!
Opening Existing Documents
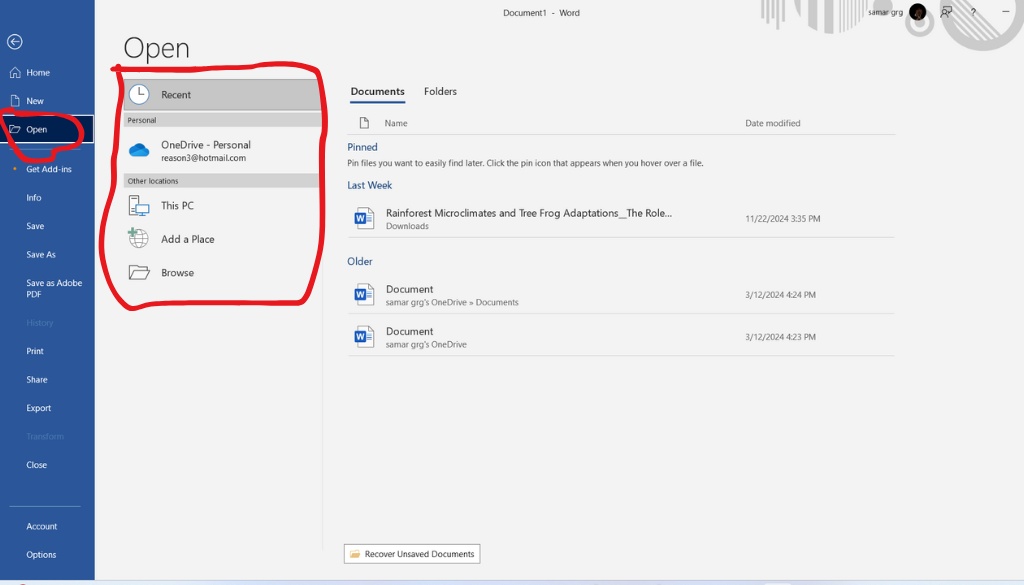
To open existing documents in Microsoft Word, launch the application and click on the File tab. Select Open to browse your saved files, whether on your computer or in cloud storage.
Once you find the document you want, double-click to open it or right-click and choose Open. For editing, Word offers powerful tools for formatting, spell-checking, and collaboration. Don’t forget to save your work often to avoid losing any changes!
If you like using templates, create a document from a pre-designed layout. This approach saves time and enhances your document’s look. Simply select New from the File tab and pick a template that suits your needs.
Opening documents in Microsoft Word is quick and straightforward. With just a few clicks, you can access files, use advanced editing tools, and create professional-quality documents. Explore the diverse formatting options available to lift your work!
Formatting Text and Paragraphs

Mastering text formatting and paragraph formatting in Microsoft Word is necessary for creating polished documents. Adjusting font styles and font sizes makes your text stand out. Using bold, italics, and underline enhances clarity and visual interest.
Pay attention to line spacing and indentation. Proper spacing boosts readability, while well-adjusted paragraph spacing gives your document a neat appearance. Incorporating bullet points and numbering organizes information effectively, making it easier for readers to follow.
Aligning text—left, center, or right—creates a professional look. Adding headers and footers provides necessary context, such as page numbers or document titles. Utilizing styles and themes ensures consistent formatting throughout your document.
At last, inserting tables and lists presents data clearly. By mastering these editing tools, you can create documents that are visually appealing and effectively communicate your ideas.
Using Styles
In Microsoft Word, using styles is a powerful way to format text and paragraphs efficiently. Styles allow you to apply predefined formatting—such as font styles, font size, and line spacing—to headings and body text, saving time and ensuring consistency across your documents.
Benefits of using styles include:
- Uniformity: Achieve a together look throughout your document.
- Efficiency: Apply formatting changes to multiple sections at once.
- Navigation: Easily create a table of contents using styled headings.
To apply a style, select the text and choose a style from the Styles group on the Home tab. For example, highlight a title and select Heading 1 to make it stand out, helping you organize your content effectively.
Customization is also key. Modify text color, paragraph spacing, or create new styles to improve your document’s visual appeal. For more tips on getting started with Word, check out this helpful guide.
Mastering styles in Microsoft Word is necessary for creating professional-quality documents. By utilizing styles, you streamline your workflow and lift the in general presentation of your work.
Adjusting Page Layout
Adjusting the page layout in Microsoft Word is necessary for creating polished, professional documents. You can customize key elements like margins, orientation, and page size to suit your specific requirements. For instance, changing the margins can increase space for text or allow for more content on a single page.
Here are key adjustments you can make:
- Margins: Access this via the Page Layout tab to manage the space surrounding your text.
- Orientation: Choose between portrait (vertical) or place (horizontal) layouts to best fit your content.
- Page Size: Select from different sizes like A4 or Letter based on your printing needs.
Adding headers and footers allows you to display significant information, such as page numbers or document titles. Using bullet points and numbering improves clarity and organization.
For a detailed guide on creating documents in Word, check out this step-by-step tutorial.
By mastering these document formatting techniques, you make sure your work stands out and communicates effectively.
Utilizing Editing Tools
Utilizing editing tools in Microsoft Word can transform your documents into polished, professional pieces. Begin with the spell check and grammar check features to spot and fix errors, ensuring your writing is clear and precise. The track changes tool allows for smooth collaboration by highlighting edits made by others, while adding comments fosters effective communication and feedback.
For formatting, use templates and styles to achieve a unified look. The ribbon toolbar provides quick access to critical functions like page numbering, headers, and footers. Improve your content visually by inserting tables and images, and adjust layouts to present information clearly.
At last, the save as option lets you keep multiple versions of your work, protecting significant changes. Mastering these tools boosts your efficiency and remarkably elevates the quality of your documents.
Spell Check and Grammar Check
In Microsoft Word, the spell check and grammar check tools are necessary for creating polished documents. These features automatically highlight errors, allowing for swift corrections of spelling mistakes and improvements in sentence structure. Utilizing these tools enhances our writing quality, making it clearer and more professional.
- Spell Check: Identifies and suggests corrections for misspelled words.
- Grammar Check: Detects grammatical errors and offers suggestions for improvement.
Employing these editing tools not only saves time but also boosts confidence when sharing documents. A well-edited document reflects our attention to detail!
Inserting Hyperlinks and Images
Inserting hyperlinks and images in Microsoft Word remarkably enhances your documents. To add a hyperlink, simply highlight the text, right-click, and choose “Link.” This action connects your text to websites or other documents effortlessly. For images, steer to the Insert tab, click “Pictures,” and select your desired image from your computer. This not only boosts visual appeal but also provides critical context.
- Hyperlink: Highlight text, right-click, and select “Link.”
- Image: Go to the Insert tab, click “Pictures,” and choose an image.
These features improve document formatting and improve collaboration. When sharing documents, hyperlinks allow readers to access additional resources, while images vividly illustrate your points, making your content more engaging and informative.
Collaborating and Sharing Documents
In Microsoft Word, collaborating and sharing documents is both simple and effective. By saving files to OneDrive or SharePoint, you gain access to real-time editing, allowing you to see changes as they happen. Imagine working on a school project with friends—everyone can contribute their ideas instantly!
Features like track changes and comments provide necessary feedback and help monitor edits, ensuring every voice is heard. You can also set user permissions to control who can edit or view your documents, testing your work secure and organized.
Start by selecting a document template that fits your project. With tools like Office 365, online collaboration is easier than ever. Let’s harness these collaborative tools to improve productivity and create outstanding documents together!
Using Track Changes
Using Track Changes in Microsoft Word is necessary for effective document collaboration. This powerful feature highlights all edits, simplifying the review and approval process. With Track Changes enabled, additions, deletions, and formatting changes are clearly marked, illustrating the document’s evolution.
- Real-time collaboration: Work together on shared documents and view each other’s edits instantly.
- Comments and feedback: Add notes for clarification or suggestions to improve communication.
- Version control: Easily track document history and revert to previous versions when needed.
To activate Track Changes, click on the Review tab and select Track Changes. This feature organizes your collaborative efforts, enhancing productivity!
Printing and Exporting Files
In Microsoft Word, printing and exporting files are necessary for effective communication. You can print documents directly or export them as PDFs for enhanced accessibility. Saving files to OneDrive or SharePoint enables real-time editing and collaboration, allowing everyone to see changes instantly.
- Print: Go to ‘File’, select ‘Print’, and choose your printer while adjusting settings as needed.
- Export: Click ‘File’ > ‘Export’ to save your document as a PDF or in other formats.
- Collaborate: Use Office 365 to share your document for smooth teamwork.
These features improve your productivity and make sure everyone stays aligned during team collaboration.
Summing up
Collaborating in Microsoft Word transforms our workflow and boosts enjoyment. With shared documents, we can edit and view changes in real-time, testing everyone aligned and maximizing productivity. Whether drafting a report or planning a project, these features allow seamless teamwork. Let’s use Word to create exceptional documents together!
Frequently Asked Questions
What shortcuts can help improve efficiency for new users in Microsoft Word?
en: Use Ctrl+C to copy, Ctrl+V to paste, Ctrl+Z to undo, and Ctrl+B to bold text. These shortcuts increase your efficiency in Word!
How to work on MS Word for beginners?
Start with templates, learn basic formatting, use the toolbar, save to OneDrive for collaboration, and explore help resources for guidance.
What is the basic introduction of MS Word?
Microsoft Word is a powerful word processor for creating, editing, and collaborating on documents with ease and professionalism.
How can I format text in Microsoft Word?
To format text in Microsoft Word, select the text, then use the Home tab to adjust font, size, color, and styles like bold or italics.