Last Updated: January 23, 2025
Mail Merge in Microsoft Word enables you to craft personalized letters for multiple recipients at once. Picture sending a letter that feels distinctively tailored to each individual. By pulling names and details from an Excel file, you can achieve this effortlessly.
It’s like magic! Start with a letter template, then easily insert specific information, such as names and addresses, for each recipient. This approach not only saves time but also adds a personal touch to your correspondence. Let’s explore how to set this up and improve your communication!
Table Of Contents
Setting Up Mail Merge in Microsoft Word
Using Mail Merge in Microsoft Word enables you to create personalized letters quickly and efficiently. Begin by opening a blank document and finding your way to the Mailings tab. Click on Start Mail Merge and select Letters to establish your letter template.
Next, select your recipient data by clicking Select Recipients and choosing Use Existing List. This list is usually stored in an Excel spreadsheet. Once your data source is ready, insert merge fields for personalized details, such as names and addresses.
After drafting your letter, click Preview Results to check for accuracy. If everything looks good, finalize the process by selecting Finish & Merge, allowing you to print your letters or send them via email.
Mail Merge not only saves time but also enhances business communication by making each letter feel unique. With just a few simple steps, you can automate the tedious task of sending bulk letters, remarkably improving your workflow.
Creating a New Document
Creating a new document for mail merge in Microsoft Word is straightforward. Begin by opening a blank document. Go to Mailings > Start Mail Merge and choose your document type, such as letters or labels. This sets the stage for your personalized letters.
Next, link your document to a data source, usually an Excel spreadsheet containing recipient information. By incorporating merge fields like {{firstname}} or {{address}}, you can automatically tailor each letter. This automation not only saves time but also enhances workflow efficiency.
After configuring your template, preview it to check formatting. When you’re satisfied, click on finish & merge. This step enables you to print or email your personalized documents directly from Word. The intuitive interface makes document automation accessible to all users.
To lift your skills, find secret tips that can optimize your mail merge process!
Accessing the Mail Merge Wizard
Accessing the Mail Merge Wizard in Microsoft Word is quick and easy. Begin by opening a blank document and finding your way to the Mailings tab. Click on Start Mail Merge and select Step by Step Mail Merge Wizard. This user-friendly interface walks you through each step, allowing you to create personalized letters or labels efficiently.
Next, select the type of document you want to create, such as letters or envelopes. The wizard connects to a data source, like an Excel spreadsheet, where your recipient information is stored. By inserting merge fields, you can automatically customize each document, saving time and enhancing your business communication.
Once your template is ready, preview the results to make sure all letter formatting is correct before finalizing the merge. At last, print or send your personalized documents directly from Word, making the entire process seamless. For additional tips to improve your workflow, explore automation techniques to streamline your tasks.
Preparing Recipient Data
To create personalized letters using Mail Merge in Microsoft Word, you need to prepare your recipient data. This data is usually stored in a spreadsheet, like Excel, with each column dedicated to specific details such as names and addresses.
Follow these steps to get started:
- Open Word: Start a new document in Microsoft Word.
- Access Mail Merge: Go to Mailings > Start Mail Merge > Letters.
- Prepare Your Letter: Draft the body of your letter, leaving spaces for merge fields where personalized data will appear.
- Select Recipients: Click on Select Recipients and choose Use an Existing List to link your Excel file.
- Insert Merge Fields: Place your cursor where you want the recipient’s name or address, then select Insert Merge Field to add the necessary fields.
Once you’ve completed these steps, preview your letters to make sure everything is accurate. This approach not only saves time but also enhances customer engagement through personalized communication.
Using Excel as a Data Source

Using Excel as a data source for Mail Merge in Microsoft Word allows you to create personalized letters quickly and effectively. By linking an Excel spreadsheet to a Word document, you can effortlessly pull specific information for each recipient, enhancing workflow efficiency and increasing customer engagement.
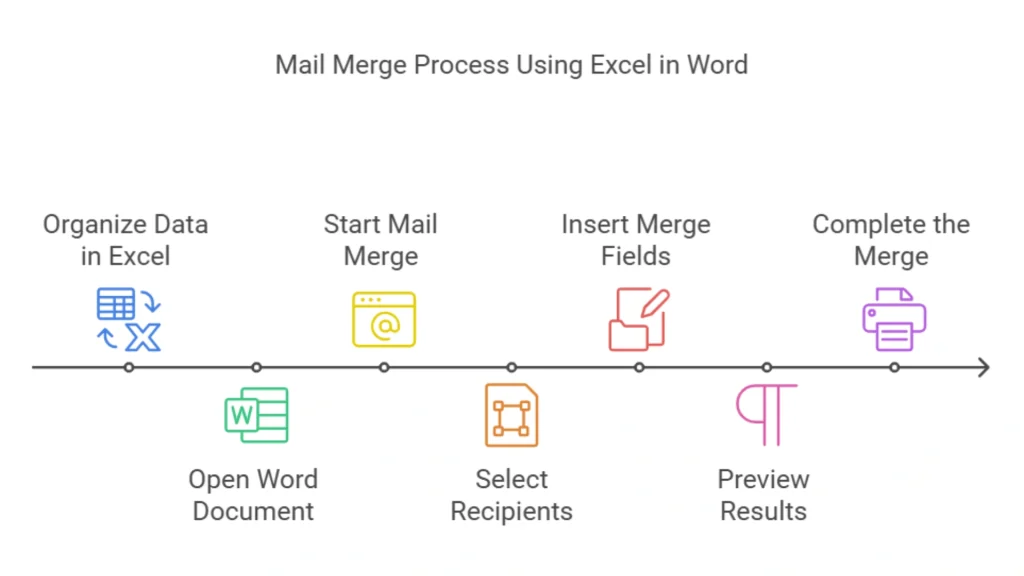
Start by organizing your recipient data in Excel, including names, addresses, and any additional details needed for your letters. Once your data is ready, follow these steps:
- Open Word: Create a new document or open an existing one.
- Start Mail Merge: Go to Mailings > Start Mail Merge > Letters.
- Select Recipients: Click Select Recipients and choose Use an Existing List. Find your Excel file.
- Insert Merge Fields: Click where you want to add data, then select Insert Merge Field to include fields like names and addresses.
- Preview Results: Click Preview Results to see how your letters will look.
- Complete the Merge: Click Finish & Merge to print or email your letters.
This method saves time and ensures each letter is customized for the recipient. For more tips on integrating Excel with Word, check out this helpful guide on Excel integration.
Using merge fields enhances customization, making your letters more engaging. This technique is especially valuable for bulk mailing campaigns, where personalization is key. In general, leveraging Excel as a data source in Mail Merge remarkably streamlines business communication.
Formatting Data for Mail Merge
To format recipient data for a Mail Merge in Microsoft Word, start by preparing your data source, usually an Excel spreadsheet. This list should include critical fields like names, addresses, and other personalized information.
Next, create your template letter by selecting Mailings > Start Mail Merge > Letters. Insert merge fields for personalized data, such as an address block or a greeting line, to improve the personal touch of your letters.
After drafting your letter, use the Mail Merge Wizard to link your data source. This wizard will help you choose which records to include. Preview the results to confirm accuracy before printing or sending your letters.
For greater efficiency, explore advanced features in Word to optimize your workflow.
Using Mail Merge not only saves time but also improves business communication, making it easier to connect effectively with your audience.
Customizing and Finalizing Letters
Customizing and finalizing letters using Mail Merge in Microsoft Word elevates standard communication to personalized messages. This powerful feature connects a template letter to a data source, like an Excel spreadsheet, containing recipient information. So, you can quickly generate letters for multiple recipients, streamlining your workflow.
Start by finding your way to Mailings and selecting Start Mail Merge, then choose Letters. Compose your letter’s body and insert merge fields for names and addresses, ensuring each letter feels unique. Use placeholders such as «FirstName» and «LastName» to automate personalization.
Once your letter is ready, preview it with the Mail Merge Wizard. This feature lets you visualize how each letter will look with actual data. At last, print the letters or save them as individual documents. This document automation not only saves time but also enhances customer engagement through tailored communication. For detailed steps, refer to this official guide.
Mastering Mail Merge in Word remarkably improves your business communication by enabling efficient and personalized letters.
Inserting Merge Fields
Inserting merge fields in Microsoft Word allows you to personalize letters with ease. Start by drafting your letter’s body, then go to Mailings > Insert Merge Field. Here, you can select fields such as names and addresses from your data source. This automation streamlines bulk mailing and enhances your business communication.
- Step 1: Open your letter template.
- Step 2: Click on Mailings > Insert Merge Field.
- Step 3: Select the merge fields to customize your letter.
By following these steps, you can create professional correspondence that feels personal. For detailed instructions, check out this mail merge tutorial.
Previewing and Printing Letters
To preview and print letters using Mail Merge in Microsoft Word, follow these simple steps. Start by finding your way to Mailings > Start Mail Merge > Letters. After drafting your letter, insert merge fields for personalized details like names and addresses.
Next, click on Preview Results to review the layout and content. If everything appears correct, finalize the process by selecting Finish & Merge > Print Documents. This feature enhances the printing of personalized letters, improving your business communication efficiency.
For detailed instructions, check out this Mail Merge guide.
Summing up
Personalized letters crafted with Mail Merge in Microsoft Word strengthen connections with recipients. By utilizing data from Excel, each letter is unique and tailored to the individual. The Mail Merge Wizard simplifies the process, saving time while delivering a professional look. Perfect for both business and personal correspondence, this tool enhances communication. Let’s create memorable letters that brighten our recipients’ day!
Frequently Asked Questions
What is the process for setting up a mail merge in Word?
To set up a mail merge in Word, go to Mailings > Start Mail Merge > Letters, then follow the prompts to select your data source and customize your letter.
To create personalized letters in Word, use Mail Merge under the Mailings tab, select Letters, and follow the prompts to customize your content.
What types of data sources can be used for mail merge in Word?
You can use Excel spreadsheets, Access databases, Outlook contacts, or CSV files as data sources for mail merge in Word.
To create personalized letters in Word, use Mail Merge under the Mailings tab, select Letters, and follow the wizard for customization.


