Are you staring down a massive report, thesis, or manuscript, dreading the thought of manually creating an index? Flipping through hundreds of pages, tracking terms, and meticulously noting page numbers is a recipe for frustration and errors.
In today’s fast-paced world, that kind of manual work is not just tedious—it’s inefficient. A poorly constructed index can make an otherwise brilliant document feel unprofessional and inaccessible. But what if you could generate a perfect, accurate, and beautifully formatted index in a matter of minutes?
With Microsoft Word’s powerful built-in tools, you can. This definitive 2025 guide will walk you through everything you need to know. We’ll cover the simple three-step process to create an index in Word, show you how to customize its appearance for a professional finish, and even reveal an advanced technique to automate the entire process for maximum efficiency.
Why Bother with an Index? The Key to Professional Documents
Before we dive into the “how,” let’s touch on the “why.” A well-crafted index is the hallmark of a professional long-form document. It acts as a roadmap for your readers, allowing them to quickly locate specific information, concepts, and names. For academic papers, legal documents, and non-fiction books, an index isn’t just a nice-to-have; it’s an essential tool for usability and credibility.
According to a study by the Nielsen Norman Group, users often scan documents for specific keywords before committing to reading. An index directly serves this behavior, improving user experience and making your content significantly more accessible.
The 3-Step Process to Create Your First Index in Word
Creating an index in Word boils down to a simple workflow: you tell Word which terms to include, and then you tell it where to build the index.
Step 1: Marking Your Index Entries (The Foundation)
This is the most hands-on part of the process, but it’s straightforward. You need to go through your document and mark every word or phrase you want to appear in your index.
- Highlight the Term: Select the word or phrase you want to include in your index.
- Open the Tool: Go to the References tab on the ribbon and click Mark Entry.
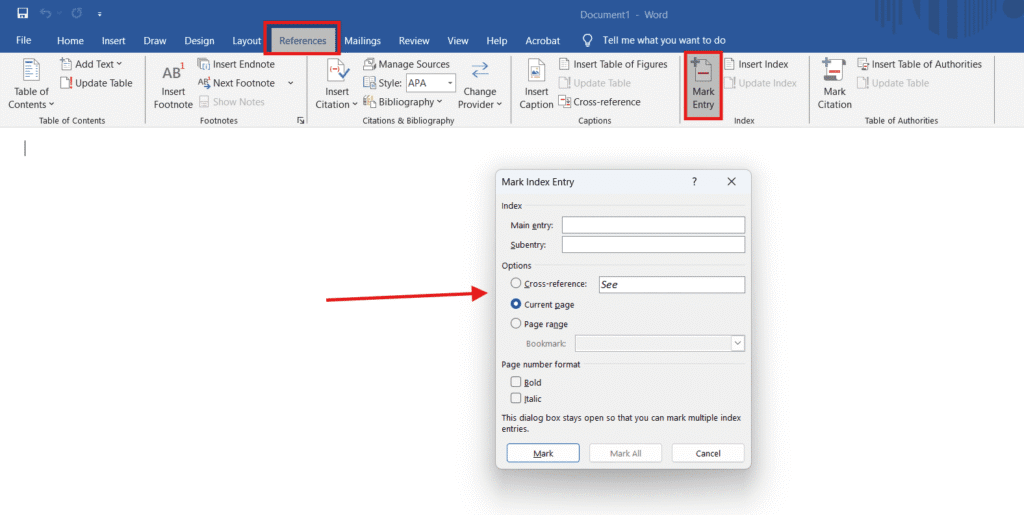
- Confirm the Entry: In the “Mark Index Entry” dialog box, the text you highlighted will appear in the “Main entry” field. You can customize it here if needed. For now, just click Mark. To mark every instance of this exact term in the document, click Mark All.
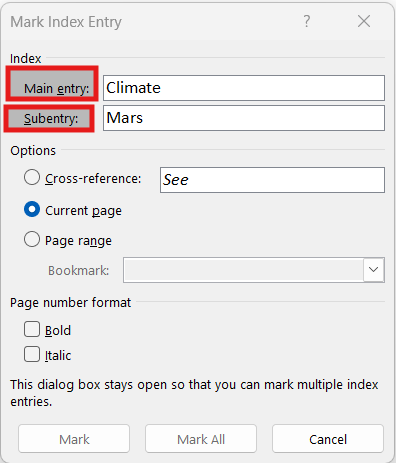
- Repeat: The dialog box stays open, so you can move through your document, highlight new terms, and click back into the box to mark them. Repeat this process for all your desired entries.
Pro Tip: When you mark your first entry, Word will turn on paragraph marks (¶). This is normal! It’s showing you the hidden
{ XE "Your Term" }field codes. You can hide these at any time by clicking the ¶ symbol on the Home tab.
Step 2: Generating the Index (The Big Reveal)
Once you’ve marked all your entries, it’s time for the magic.
- Place Your Cursor: Go to the end of your document (or wherever you want the index to appear) and click to place your cursor. It’s good practice to insert a page break (
Ctrl + Enter) to start your index on a fresh page. - Insert the Index: Go back to the References tab and click Insert Index.
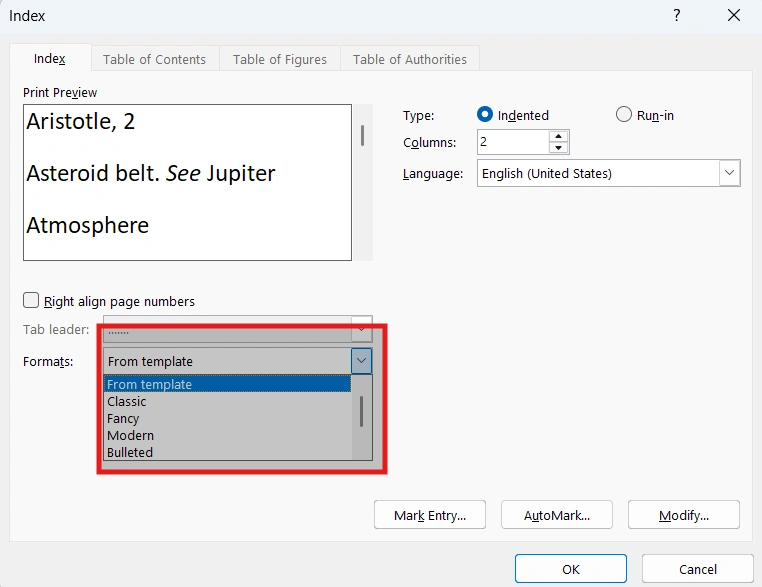
- Choose Your Format: A dialog box will appear. Here, you can choose the number of columns, the format (from a template like “Classic” or “Modern”), and the alignment of page numbers. For now, the default settings are fine.
- Click OK: Word will now scan your entire document for all the entries you marked and generate a complete, alphabetized index with the correct page numbers.
Step 3: Updating Your Index (Keeping it Current)
Documents evolve. You’ll add pages, edit text, and move sections. Thankfully, you don’t need to rebuild your index from scratch.
If you add more index entries or if pagination changes, simply right-click anywhere on the generated index and select Update Field. Word will automatically rescan your document and update all page numbers and new entries.
Beyond the Basics: Customizing Your Word Index
A default index is functional, but a custom index is professional. Word gives you plenty of control over the final look.
Changing the Look: From Columns to Formats
To make broad changes, right-click your index and choose Edit Field. This will bring back the “Index” dialog box. From here, you can easily:
- Adjust Columns: Change the number of columns from two to one (or three, for dense text).
- Select a Format: Experiment with different built-in formats under the “Formats” dropdown. “Formal” and “Classic” are excellent, clean choices.
- Use “Run-in” vs. “Indented”: The “Type” option lets you choose between an “Indented” style (subentries on a new line) or a “Run-in” style (subentries on the same line), which can save space.
Advanced Style Modification for a Polished Finish
For complete control over fonts, spacing, and more, you need to modify the index styles directly.
- Go to the Home tab and open the Styles pane by clicking the small arrow in the corner of the Styles gallery.
- In the Styles pane, scroll down to find the styles named Index 1, Index 2, etc. (You may need to change the options at the bottom to “All Styles”).
- Hover over “Index 1” (which controls the main entries), click the dropdown arrow, and select Modify.
- From here, you can change the font, size, color, paragraph spacing, and more, just like any other text. Your changes will automatically apply to the entire index.
The Pro-Level Secret: Automating Entries with a Concordance File
Imagine you need to index 50 different terms that appear hundreds of times throughout a 400-page book. Marking them one by one is out of the question. This is where a concordance file comes in.
A concordance is a separate Word document where you create a simple two-column table.
- Column 1: List the exact text Word should search for in your main document.
- Column 2: List how you want that text to appear in the index.
For example:
| Text to Find | Index Entry |
| financial planning | Planning: financial |
| risk management | Management: risk |
| market analysis | Analysis: market |
After creating and saving this file, open your main document, go to References -> Insert Index, and click the AutoMark… button. Select your concordance file, and Word will automatically read through your entire document and mark every single instance of the terms you listed. It’s an incredibly powerful time-saver.
“The difference between an amateur and a professional document is often in the details. Automating your index with a concordance file not only saves hours of work but also ensures 100% consistency.” – D.A. Carlson, Professional Editor
Troubleshooting Common Indexing Problems
Even the best tools can have hiccups. Here are fixes for the two most common indexing issues.
Help! I See “{ XE “FirstName” }” Everywhere!
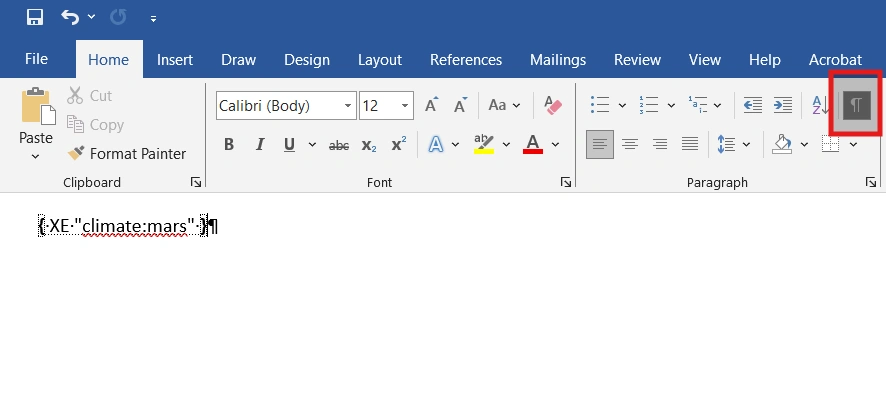
This is the number one issue users face. You see these weird bracketed codes all over your text.
- The Cause: You have paragraph marks (hidden formatting symbols) turned on.
- The Fix: Go to the Home tab and click the paragraph symbol (¶). This will toggle the symbols off, and your XE field codes will disappear, leaving your text clean.
Why Does Word Say “No Index Entries Found”?
You’ve generated your index, but this error message appears instead.
- The Cause: This almost always means that you clicked “Insert Index” before you marked any entries.
- The Fix: The solution is simple. Go back through your document and follow Step 1 to Mark Entry for all the terms you want to include. Once you’ve marked at least one, go back to your index, right-click, and Update Field. Your index will now appear correctly.
Conclusion: You’ve Mastered the Index
You now have the knowledge to move beyond basic document creation and into the realm of professional formatting. By following the core process of Mark, Generate, and Update, you can reliably create an index in Word every time. And by leveraging customization options and advanced tools like concordance files, you can produce polished, user-friendly documents that stand out.
The next step is to practice. Open a long document and try it for yourself. Experiment with different formats and styles until you find a look you love.
Frequently Asked Questions (FAQ)
1. What is the difference between a table of contents and an index?
A Table of Contents (TOC) is a list of a document’s chapters and headings, showing the overall structure, and appears at the beginning. An index is an alphabetized list of specific keywords, names, and concepts from within the text and appears at the end.
2. How do I update the index in Word after making changes?
Simply right-click on the existing index and select “Update Field.” Word will automatically rescan the document for new entries and adjust page numbers for any content that has shifted.
3. Can I create a multilevel index in Word?
Yes. In the “Mark Index Entry” dialog box, you can type your main term in the “Main entry” field and a sub-term in the “Subentry” field. This will automatically create an indented, multilevel index when you generate it.
4. How do I remove an index from a Word document?
To remove the generated index, simply select the entire index with your mouse and press the Delete key. To remove the individual entry marks ({ XE } codes), you must use the Find and Replace tool. Press Ctrl + H, click “More >>”, then “Special,” and select “Field.” Leave the “Replace with” box empty and click “Replace All.”
5. Why are my index page numbers wrong?
This usually happens when you’ve edited the document but forgotten to update the index. Right-click the index and click “Update Field.” If that doesn’t work, ensure that “Track Changes” is turned off before updating, as it can sometimes interfere with page number calculation.

