
Getting around long documents in Microsoft Word can be tough, especially if you’re working on long reports or research papers. But there’s an easier way to move around quickly and easily. The answer is using macros to automate your work. In this guide, you’ll learn how to use macros to make document navigation in MS Word faster and save time in your everyday tasks.
Whether you’re a student, writer, or office worker, automating repetitive navigation tasks with macros can boost your productivity a lot. Keep reading to learn how macros can change the way you work with big documents in Microsoft Word.
What Are Macros, and Why Should You Use Them for Document Navigation?
Macros are automated sets of actions that help you do repetitive tasks in Microsoft Word. With macros, you can record a set of commands and save them for later use. This way, you can replay these actions with just one click or a keyboard shortcut. When it comes to working with large documents, macros can be very helpful—they can help you quickly jump to specific sections, headings, bookmarks, or even tables and charts.
Benefits of Using Macros for Document Navigation
- Increased Efficiency: Automating navigation means you can jump to important sections instantly without scrolling for a long time.
- Custom Shortcuts: You can set custom shortcuts for navigation macros so you can go exactly where you need to with one quick keystroke.
- Consistency: Macros help you navigate consistently across different documents, making it easier to find important information quickly.
Now, let’s learn how you can create these navigation macros. For more information on using macros to insert text blocks, check out this guide.
Step-by-Step Guide to Using Macros for Document Navigation
1. Setting Up the Developer Tab in Microsoft Word
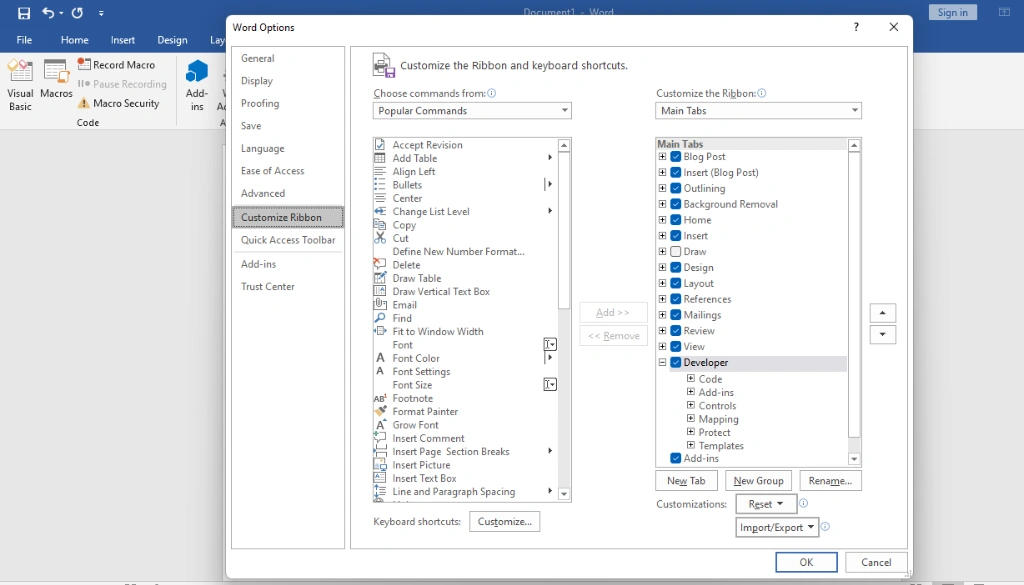
Before creating macros, you need to make sure the Developer Tab is available in your Microsoft Word. Here’s how you do it:
- Go to File > Options: In Microsoft Word, click on “File” and then “Options.”
- Customize the Ribbon: Under “Customize Ribbon,” check the box next to “Developer” to add it to your Word ribbon.
- Click OK: Once added, the Developer tab will show up at the top of your Word window.
2. Recording a Macro to Jump to Specific Headings
One of the best uses of macros for document navigation is creating shortcuts to go directly to specific headings. Here’s how to record a macro like this:
- Click on the Developer Tab: Now that it’s enabled, click on the “Developer” tab.
- Record a Macro: Click “Record Macro,” name it something like “GoToIntroduction,” and set a keyboard shortcut, for example,
Ctrl + Alt + I. - Navigate to the Heading: Do the action you want to automate—in this case, press
Ctrl + F, type the heading name, and press “Enter.” - Stop Recording: Click on “Stop Recording” under the Developer tab.
Now, every time you press Ctrl + Alt + I, you’ll go straight to the Introduction section of your document.
3. Using VBA to Automate Navigation to Bookmarks
For more advanced document navigation, you can use Visual Basic for Applications (VBA), a programming language in Microsoft Office that helps you automate tasks, to create macros that jump to specific bookmarks. If you need more help with the VBA editor, check out this detailed guide. Here’s a quick guide on how to do it:
- Open the VBA Editor: Press
Alt + F11to open the VBA editor. - Insert a New Module: Right-click on any open space in the left pane and select “Insert” > “Module.”
- Add VBA Code for Navigation:
   Sub GoToBookmark()
       Selection.GoTo What:=wdGoToBookmark, Name:="BookmarkName"
End Sub- Save and Run the Macro: Replace “BookmarkName” with the name of your bookmark, save the module, and set a keyboard shortcut to quickly jump to this location.
4. Creating Macros for Navigating Between Sections
If your document is divided into different sections, creating macros to jump between these sections can save a lot of time. Here’s how:
- Record a New Macro: Click on “Record Macro” under the Developer tab and name it “NextSection.”
- Navigate to the Next Section: Press
Ctrl + Page Downto go to the next section. - Stop Recording: Click “Stop Recording.”
You can now use this macro to quickly move between sections in your document without having to scroll.
Practical Use Cases for Macros in Document Navigation
1. Jumping to Frequently Used Sections
If you often need to go to the same sections of a document, macros can help you create shortcuts to these parts. For example, in a long report, you could create macros to quickly jump to the “Executive Summary” or “Conclusion.”
2. Navigating Between Comments and Revisions
Macros can also help you move between comments or tracked changes in a document. For example, you can create a macro to jump to the next comment by recording the action of using the ‘Next Comment’ button in the Review tab. This makes reviewing changes much faster.
3. Moving Between Headings or Tables
If your document has multiple headings or tables, a macro can help you move between these elements. This is especially helpful for technical writers or researchers who need to check different tables and charts without losing their place.
FAQs About Using Macros for Document Navigation in MS Word
Q1: How do I edit a macro if I make a mistake?
You can edit a macro by opening the VBA editor (Alt + F11). Find your macro under “Modules,” make the necessary changes, and save it.
Q2: Can I share macros with others?
Yes, you can export macros and share them with others. Just save them in a Word template (.dotm file), and others can use your macros.
Q3: Are macros safe to use?
Macros are safe if you create them or get them from a trusted source. Be careful when using macros from unknown sources, as they could have harmful code.
Q4: Can I use macros on different devices?
Macros saved in your document or template will work on any device with Microsoft Word, as long as macros are enabled on that device.
Tips for Optimizing Macros for Document Navigation
1. Assign Shortcut Keys Thoughtfully
Assign shortcut keys that are easy to remember but don’t conflict with existing shortcuts. This will make sure your macros are easy to use without causing confusion.
2. Test Macros Before Using Them Extensively
Always test macros on a sample document before using them on important work. This helps you find any errors and ensures the macro works as expected. For more tips on troubleshooting macro errors, visit this guide. For example, a common error could be the macro jumping to the wrong section if the heading text changes a bit.
3. Save Macros in a Template for Reuse
If you use certain macros a lot, save them in a Word template so they’re available in all future documents. This can make your workflow much faster.
Conclusion: Make Document Navigation Easy with Macros
Learning how to use macros to automate document navigation in MS Word can greatly boost your productivity. By recording simple macros or using VBA for advanced tasks, you can navigate large documents effortlessly. Whether you’re a student, writer, or office worker, using macros helps you focus more on your content and less on tedious navigation. For more official information, visit the Microsoft Office support page.
Try setting up some simple navigation macros today and see the difference in your workflow. Have questions or want to share your experience? Leave a comment below—we’d love to hear from you!