

Creating professional booklets in Microsoft Word has become an essential skill for business professionals, educators, event planners, and content creators. Whether you’re designing an event program, company brochure, instruction manual, or educational material, Word’s powerful Book Fold feature can transform your ordinary document into a professionally formatted booklet ready for printing and binding.
What Is a Booklet? Understanding Word’s Book Fold Layout
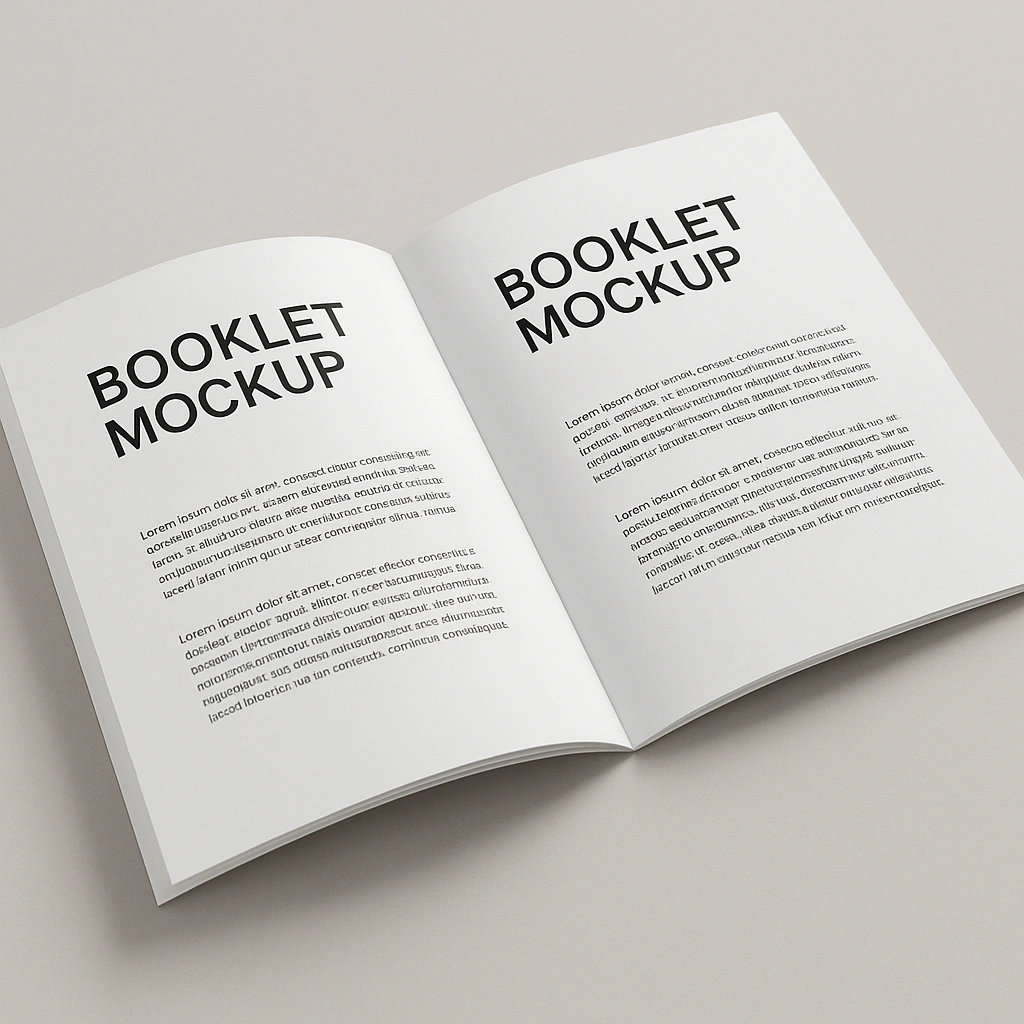
A booklet is a multi-page document designed to be printed on both sides of paper, folded in half, and bound along the fold to create a compact, professional publication. Unlike regular documents that read from top to bottom, booklets use a Book Fold layout that arranges pages in a specific sequence so they appear in the correct order after folding.
Microsoft Word’s Book Fold feature automatically handles the complex page ordering and formatting required for booklet creation. When you select this option, Word changes the orientation to landscape and arranges your content so that when printed double-sided and folded, pages appear in the correct sequential order.
The Book Fold layout is particularly valuable because it:
- Automatically reorders pages for proper booklet sequencing
- Adjusts margins to accommodate binding space
- Optimizes layout for a folded presentation
- Ensures professional appearance without manual page arrangement
Preparing Your Document: Essential Page Setup for Booklets
Before diving into content creation, proper page setup forms the foundation of a successful booklet. Setting up your booklet layout before adding content prevents formatting issues and saves significant time later.
Choosing Paper Size & Orientation
The paper size you select determines your booklet’s final dimensions. Remember that your finished booklet will be half the width of your chosen paper size. Here are common configurations:
- Letter size (8.5″ x 11″) creates a 5.5″ x 8.5″ booklet
- A4 (210mm x 297mm) produces a 105mm x 210mm booklet
- Legal size (8.5″ x 14″) results in a 7″ x 8.5″ booklet
When you enable Book Fold, Word automatically switches to landscape orientation. This landscape setting accommodates the side-by-side page layout essential for proper booklet formatting.
Setting Margins, Gutter & Section Breaks
Gutter margins represent the most critical aspect of booklet setup. The gutter provides extra space along the inner edge where pages will be bound, ensuring text remains readable after binding.
Recommended gutter settings:
- Small booklets (20-50 pages): 0.5 inches (5mm)
- Medium booklets (50-150 pages): 0.75 inches (8mm)
- Large booklets (150+ pages): 1.0 inches (10mm) or more
The gutter space prevents text from disappearing into the binding fold and maintains equal visual margins on both left and right sides of your booklet. For booklets exceeding 300 pages, consider increasing the gutter to 10mm or consulting your printing service for specific recommendations.
Creating a Booklet Manually in Word (Windows & Mac)
Windows Walkthrough with Screenshots
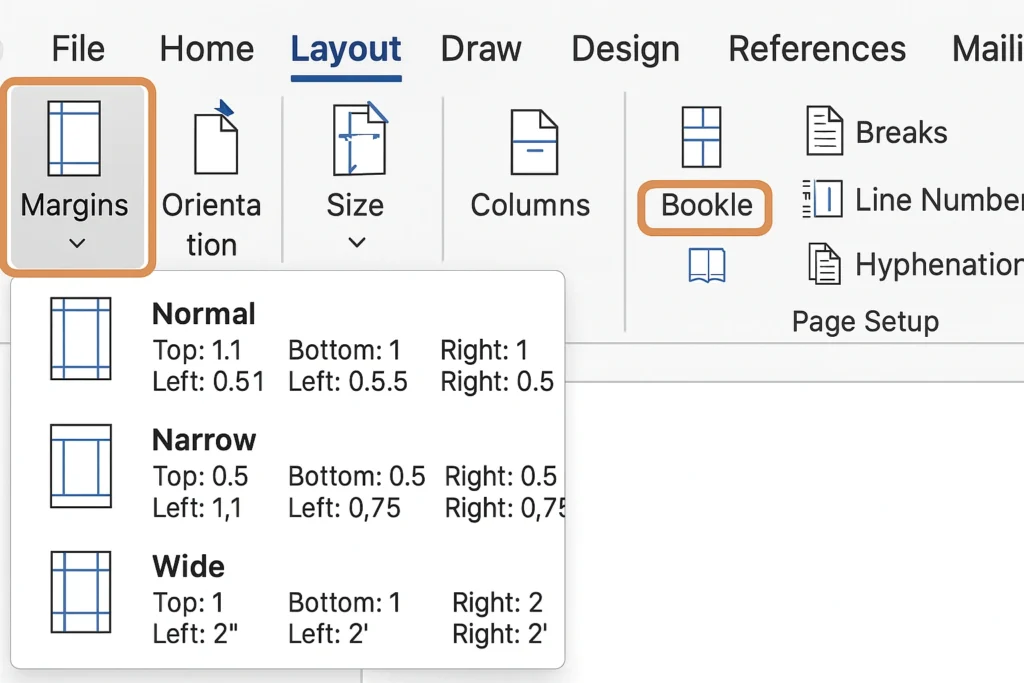
Step 1: Access Page Setup
- Open Microsoft Word and start with a blank document
- Navigate to the Layout tab in the ribbon
- In the Page Setup group, click the dialog box launcher (small arrow in bottom-right corner). For additional guidance on page layout basics, refer to Microsoft’s official booklet creation guide
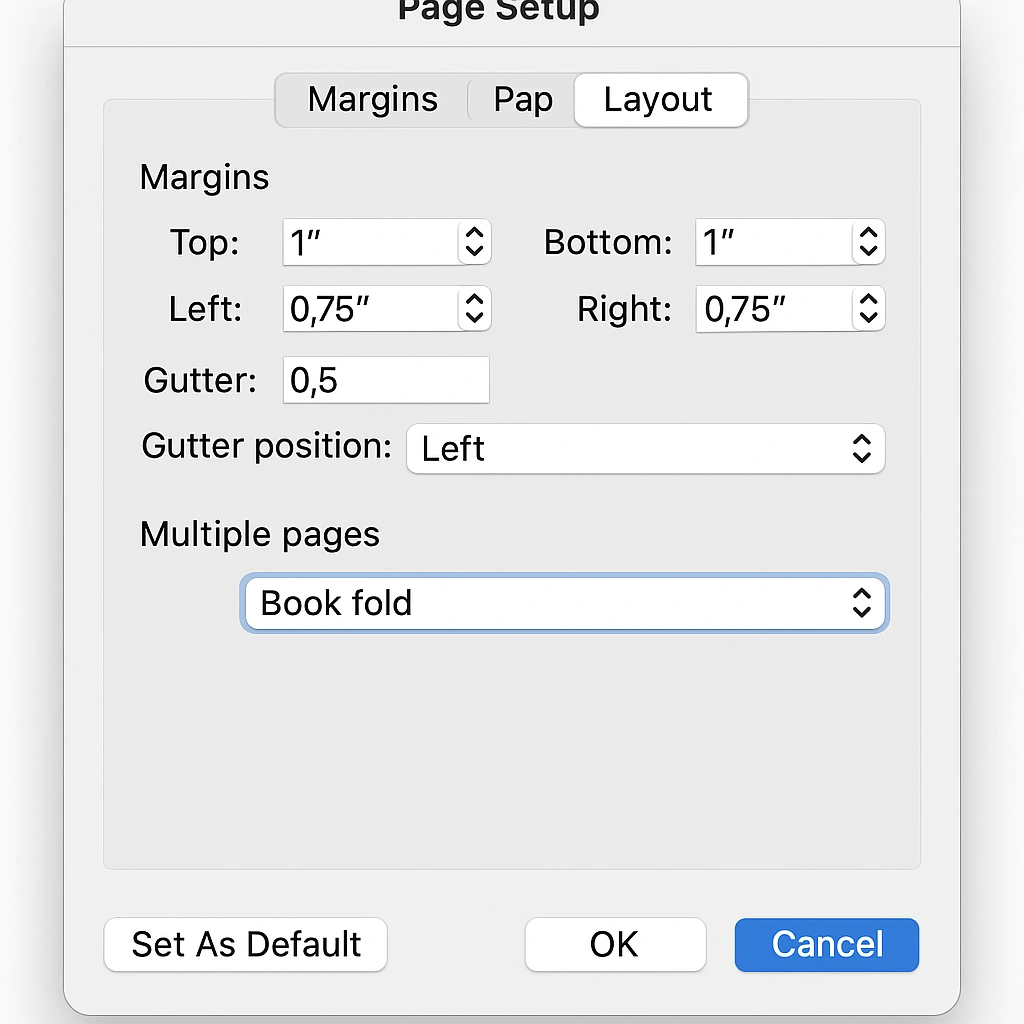
Step 2: Configure Book Fold Settings
- In the Page Setup dialog box, ensure you’re on the Margins tab
- Under the Pages section, click the Multiple pages dropdown
- Select Book fold
- Notice that orientation automatically changes to Landscape
Step 3: Adjust Gutter and Margins
- In the Gutter field, enter your desired binding space (typically 0.5″ to 1.0″)
- Set standard margins (usually 0.5″ to 1.0″ for top, bottom, left, and right)
- The preview pane shows how your booklet layout will appear
Step 4: Set Paper Size
- Click the Paper tab
- Select your desired paper size from the dropdown
- Remember: final booklet size will be half the paper width
Step 5: Apply Settings
- Click OK to apply all settings
- Your document now displays the booklet layout with alternating left/right page alignment
Mac Walkthrough with Screenshots
The process on Mac follows similar steps with slight interface differences:
Step 1: Access Document Settings
- Open Word for Mac and create a new document
- Go to Layout in the ribbon
- Click Margins, then select Custom Margins
Step 2: Configure Book Fold
- In the Document dialog box (Mac equivalent of Page Setup), select the Margins tab
- Change Multiple pages to book fold
- Adjust Gutter spacing as needed
Step 3: Finalize Settings
- Switch to the Paper Size tab to select dimensions
- Click OK to apply the booklet layout
- Begin adding your content to the properly formatted document
Using Word’s Built-In Booklet Templates
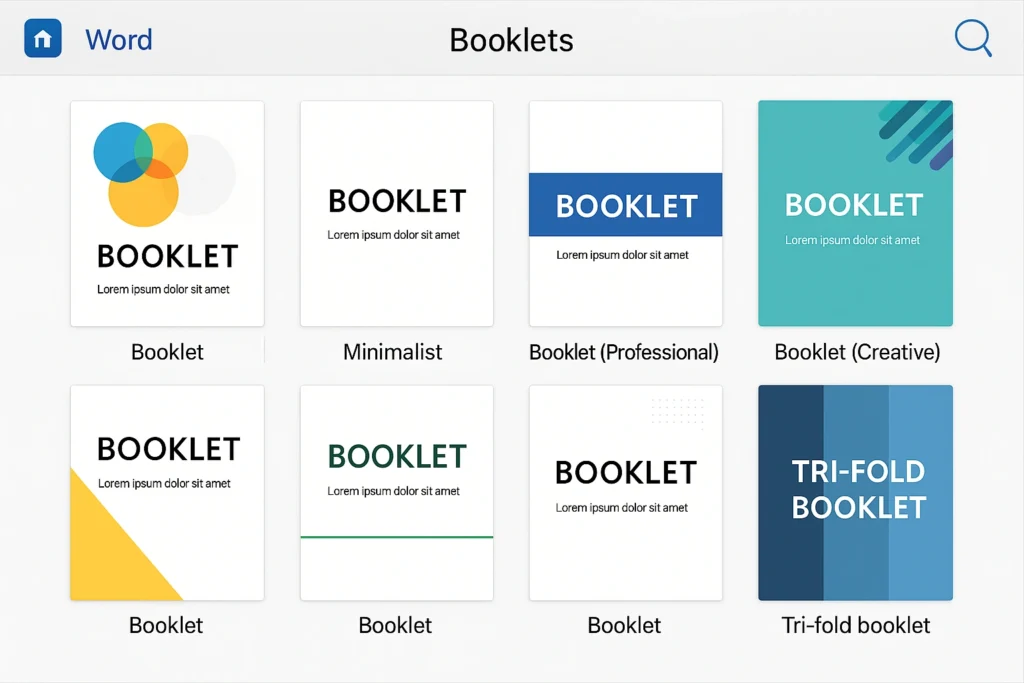
Finding & Customizing Templates
Word offers numerous pre-designed booklet templates that can significantly speed up your creation process. Templates provide professional layouts with consistent styling, making them ideal for users who want polished results without extensive design work.
To access booklet templates:
- Click File > New
- Type “booklet” in the search box and press Enter
- Browse available templates, including:
- Event program booklets
- Business brochures
- Educational handbooks
- Product catalogs
- Wedding programs
Template customization steps:
- Select your preferred template and click Create
- Replace placeholder text with your content
- Substitute template images with your own graphics
- Modify colors, fonts, and styling to match your brand
- Save your customized booklet with a descriptive filename
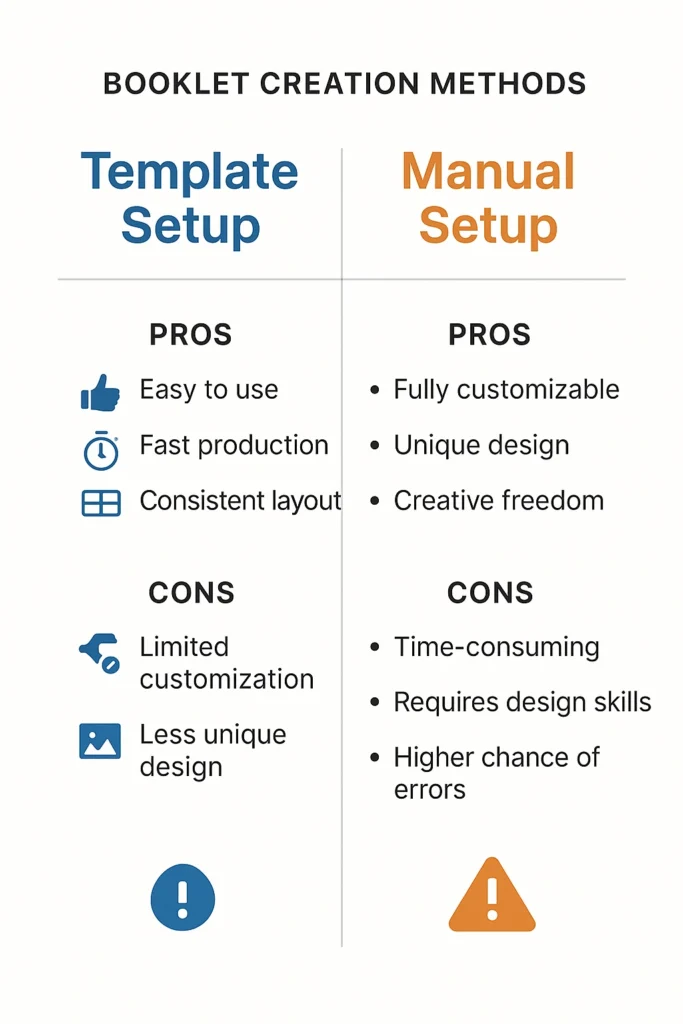
Template vs. Manual: Pros & Cons
Advanced Design Tips & Troubleshooting
Adding Trim Marks & Borders
Professional booklets often benefit from trim marks and decorative borders to enhance their appearance and assist with printing. Trim marks help commercial printers cut your booklet to exact specifications.
You are interested in custom Word themes and brand style sets?
To add borders in Word:
- Go to the Layout tab in Page Setup
- Click Borders to access border options
- Select border style, color, and width
- Apply to the entire document or specific pages
Border design considerations:
- Keep borders at least 0.125″ from page edges
- Use consistent border styling throughout the booklet
- Consider how borders will appear across the fold line
- Test print borders to ensure they don’t interfere with binding
Exporting to PDF & Print Settings
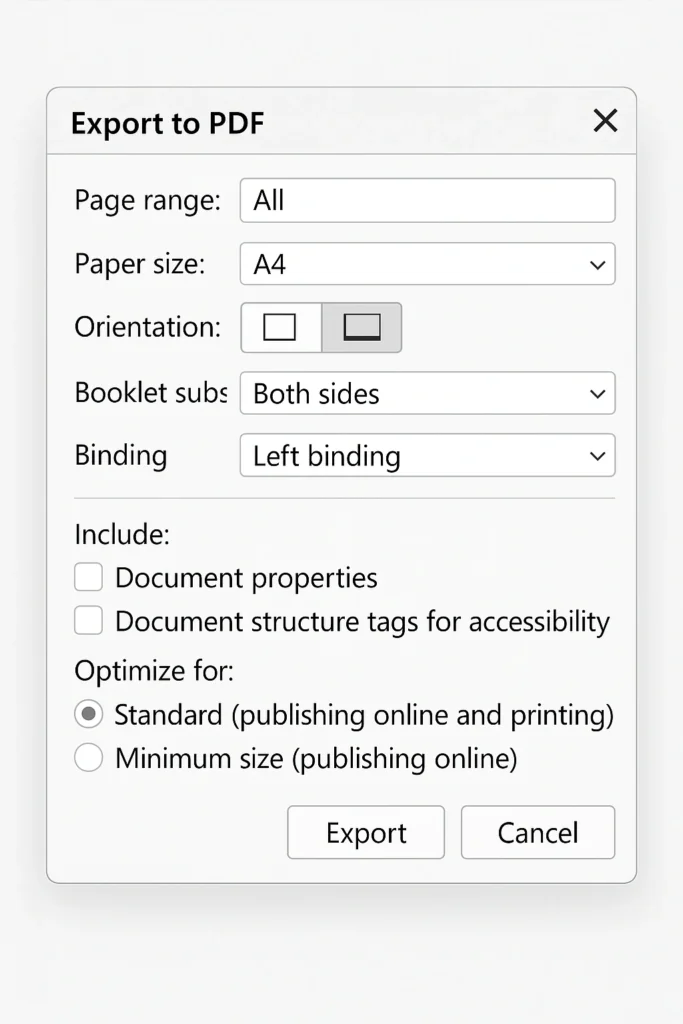
Creating print-ready PDFs ensures your booklet maintains formatting consistency across different systems and printers. Professional printing often requires specific PDF settings for optimal results.
PDF export best practices:
- Go to File > Export > Create PDF/XPS
- Click Options and select:
- Ensure the Print range is set to All pages
- Click Publish to create your PDF
Duplex printing configuration:
- Select Print on Both Sides in print settings
- Choose Flip pages on short edge for proper booklet orientation
- Test print 4 pages first to verify correct folding before printing the entire booklet
Handling Multi-Chapter Booklets
Large booklets with multiple chapters require section breaks to maintain proper formatting and allow different headers/footers for each section.
Section break implementation:
- Position cursor at the end of a chapter
- Go to Layout > Breaks > Next Page
- This allows different formatting for each section
- Configure unique headers, footers, and page numbering per section
Multi-chapter considerations:
- Use the “Sheets per booklet” setting to divide long documents into multiple booklets
- Plan chapter breaks to fall on right-hand pages when possible
- Consider the table of contents placement and page numbering schemes
Real-World Case Studies & Expert Insights
Event Program Booklet Example
Challenge: A conference organizer needed to create a 16-page event program booklet containing schedules, speaker bios, and sponsor information for 500 attendees.
Solution: Using Word’s Book Fold layout with a custom gutter of 0.75″ and A4 paper size, the organizer created a professional program in under 4 hours. Key features included:
- Consistent header/footer design with event branding
- Two-column layout for easy reading of speaker information
- Strategic use of borders to separate different sections
- PDF export for commercial printing with duplex settings
Results: The final booklet cost 60% less than outsourcing to a design agency while maintaining a professional appearance. The Book Fold feature eliminated page ordering errors that had occurred in previous manual layouts.
Desktop Publishing Expert Insights
According to Sarah Mitchell, Microsoft Office MVP and desktop publishing specialist with over 15 years of experience, “Word’s Book Fold feature has evolved significantly and now rivals dedicated desktop publishing software for small to medium booklet projects. The key is understanding gutter spacing and testing your print settings before committing to large print runs. I always recommend printing a 4-page test booklet first.”
Professional design recommendations:
- Maintain consistent margins throughout your booklet
- Use hierarchy with larger fonts for headings and smaller fonts for body text
- Implement white space effectively to avoid a cluttered appearance
- Choose readable fonts like Arial, Calibri, or Times New Roman for body text
- Test readability by printing and folding a sample before final production
Frequently Asked Questions
How do I fix pages that print in the wrong order?
Answer: Ensure you’ve selected “Flip pages on short edge” in your duplex printing settings. This setting is crucial for booklet printing. If pages still print incorrectly, verify that your printer supports automatic duplex printing, or manually flip and reinsert pages for the second side printing.
What’s the maximum number of pages for a Word booklet?
Answer: Word can handle booklets with hundreds of pages, but for documents over 150 pages, consider using the “Sheets per booklet” option to divide into smaller sections. This prevents binding issues and makes folding easier. Many commercial printers recommend keeping individual booklet sections under 64 pages (16 sheets) for optimal binding.
Why does my text appear too close to the fold?
Answer: Increase your gutter margin in the Page Setup dialog. Start with 0.5″ and increase as needed based on your binding method. Spiral binding requires less gutter space than perfect binding or saddle stitching.
Can I create a booklet with different page orientations?
Answer: Word booklets must maintain consistent orientation throughout. For mixed content, consider using section breaks to accommodate different layouts within the landscape booklet format, or create separate documents for different orientations.
How do I ensure my images print clearly in the booklet?
Answer: Use high-resolution images (300 DPI minimum) and save your document as a PDF with image optimization. Position images carefully considering the gutter area and test print to verify image placement doesn’t interfere with binding.
What paper weight works best for booklets?
Answer: 20lb (75gsm) paper works well for most booklets, while 24lb (90gsm) provides a more premium feel. Avoid paper heavier than 28lb for booklets over 20 pages, as folding becomes difficult. Always test fold a sample sheet before committing to large quantities.
How do I add page numbers to my booklet?
Answer: Use Word’s page numbering feature through Insert > Page Numbers. For booklets, place numbers on the outside corners of the pages. Remember that in the Book Fold layout, odd pages appear on the right and even pages on the left after folding.
Can I convert an existing Word document to booklet format?
Answer: Yes, but create a backup first, as formatting may shift significantly. Apply Book Fold layout to your existing document, then manually adjust any displaced images, tables, or formatting elements.
Conclusion & Next Steps
Creating professional booklets in Microsoft Word combines technical setup with creative design principles. The Book Fold feature transforms ordinary documents into polished publications suitable for business, educational, and personal use. Success depends on proper initial setup, understanding gutter spacing, and testing print settings before final production.
Your next steps:
- Practice with a short 8-page booklet to master the basic techniques
- Experiment with different paper sizes to find your preferred format
- Create templates for frequently used booklet types to streamline future projects
- Explore commercial printing options for larger quantities or premium finishes
Ready to create your first professional booklet? Start with Word’s built-in templates, apply these techniques, and don’t forget to test print before finalizing your project. Share your booklet creation experiences in the comments below, or subscribe to our newsletter for more Microsoft Office productivity tips and advanced tutorials.