
Have you ever felt frustrated because your document doesn’t look quite right? It might be something as simple as the page margins. Page margins are the empty spaces around the edges of your page, and they affect how your document looks and how easy it is to read. In this guide, we’ll show you how to adjust page margins for different document types and layouts to make sure your work looks great every time.
Whether you’re writing a business report, designing a flyer, or working on a school paper, knowing how to adjust page margins can make a big difference. Let’s get started!
What Are Page Margins and Why Are They Important?
Page margins are the blank spaces around the edges of a page. They are important because they frame your text and keep everything looking clean and easy to read. Adjusting margins helps you format your documents for different purposes—whether it’s for printing, creating booklets, or submitting assignments.
Why Setting the Right Page Margins Matters
- Readability: Proper margins make reading easier by providing enough white space.
- Professional Look: Balanced margins give your document a neat, professional appearance.
- Printing: Correct margins make sure none of your text gets cut off when printing.
Now that we understand why margins are important, let’s learn how to set them for different types of documents.
How to Adjust Page Margins in Microsoft Word
Most people use Microsoft Word for their documents, and adjusting margins in Word is easy. If you’re new to Microsoft Word, you might want to check out learning Microsoft Word for beginners for more help. Here’s how you can do it:
1. Using Preset Margins
Microsoft Word has a set of preset margin options you can use. Preset margins are great if you need a quick solution or aren’t sure what settings to use.
- Open Your Document: Start by opening the document you want to edit.
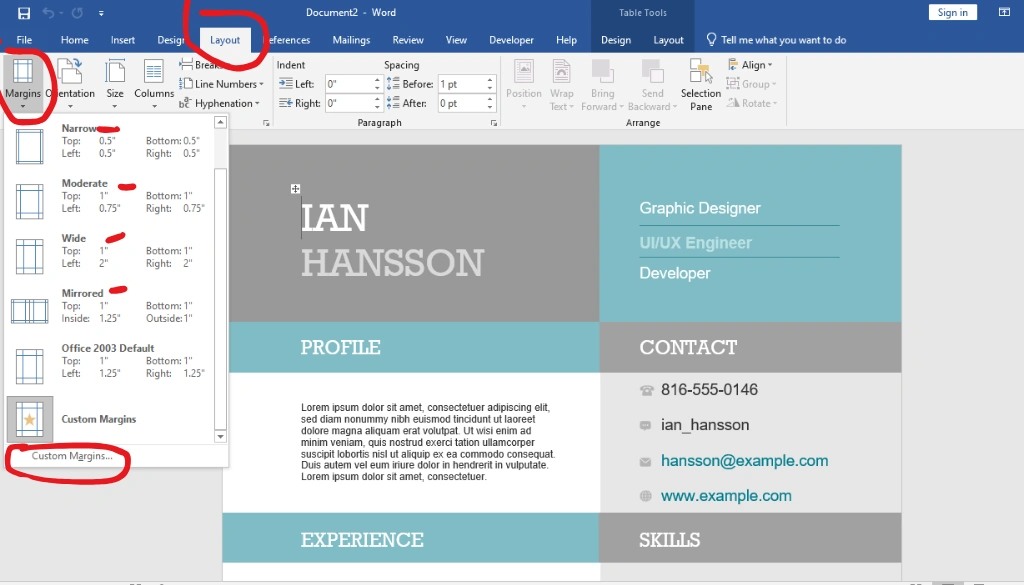
- Go to the Layout Tab: Click on the “Layout” tab at the top of the screen.
- Select Margins: Click on “Margins” to see a list of preset options like Normal, Narrow, Moderate, or Wide.
- Choose a Preset: Pick the preset that works best for your document.
2. Customizing Margins
If the preset options don’t fit your needs, you can set custom margins:
- Click on Margins > Custom Margins: At the bottom of the dropdown list, select “Custom Margins.”
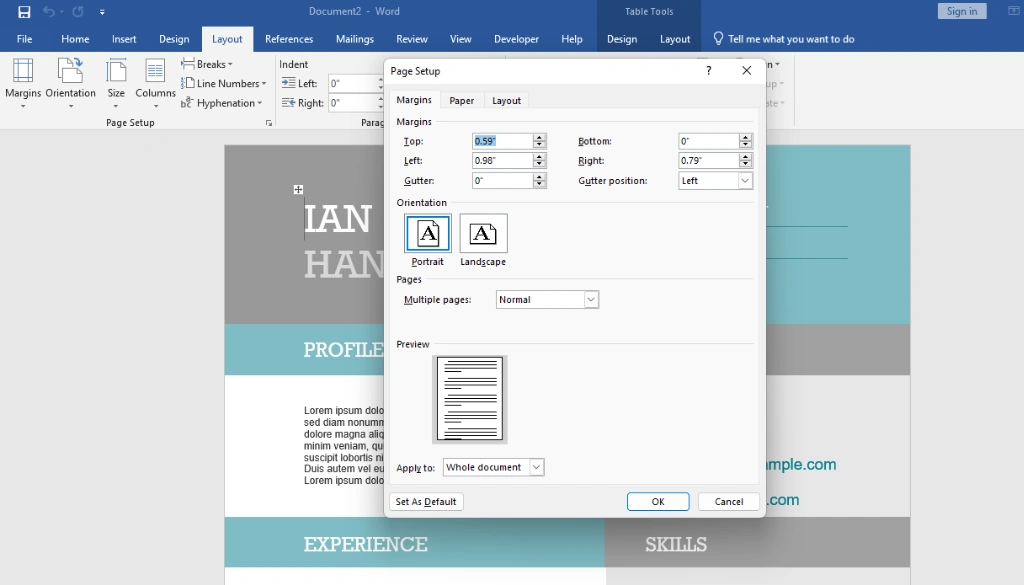
- Adjust the Values: In the “Page Setup” box, set the margin values for the top, bottom, left, and right.
- Click OK: When you’re happy with the settings, click “OK” to apply the margins.
3. Setting Margins for Double-Sided Printing
If you’re printing a document on both sides (like a book or report), you need to set different margins for the left and right pages. You can learn more advanced margin settings in our guide on Microsoft Word advanced layout options:
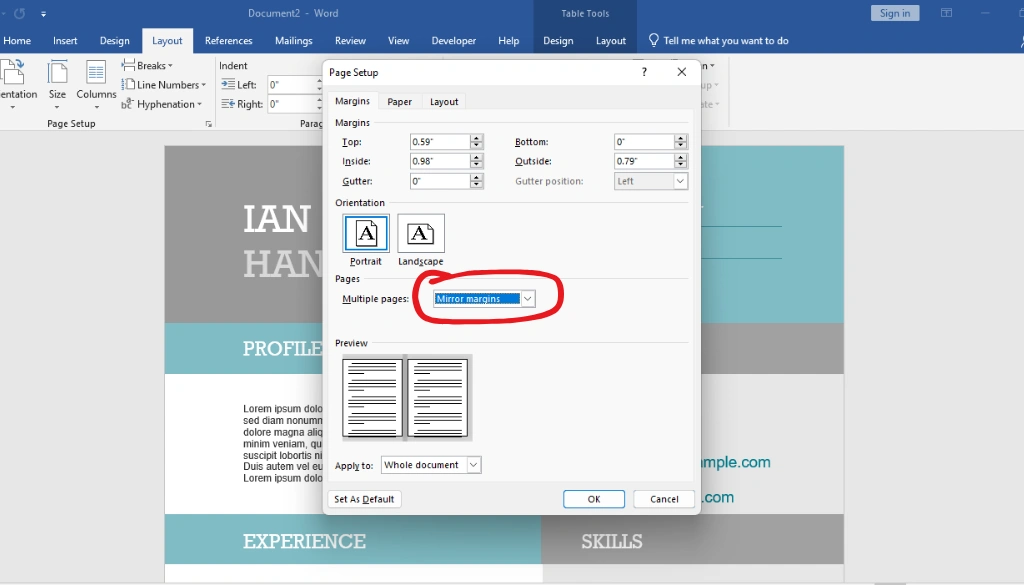
- Go to Layout Tab > Margins > Custom Margins.
- Choose Mirror Margins: In the “Multiple Pages” section, select “Mirror Margins.” This will set wider inner margins for binding.
Choosing the Right Margins for Different Document Types
Using the right margin settings helps meet specific guidelines and makes your document look better. Different document types need different margins. Here are some examples:
1. Academic Papers
Academic papers often have specific margin requirements, like APA or MLA formats, which usually need 1-inch margins on all sides.
- 1-inch Margins: Open your document and set all margins to 1 inch using the “Custom Margins” feature.
- Tip: Always check your school’s guidelines to be sure you’re following the rules.
2. Business Documents
Business documents, like reports or letters, need clean, professional margins.
- Standard Margins (1-inch or Moderate): Use either 1-inch margins or “Moderate” margins (1 inch on top and bottom, 0.75 inches on the sides) for a polished look.
3. Flyers and Brochures
For flyers or brochures, you might want to narrow margins to use more space.
- Narrow Margins (0.5-inch): Go to “Custom Margins” and set all sides to 0.5 inches to maximize space.
- Tip: Don’t make the margins too narrow—printers need some space to grip the paper.
4. Book Layouts
If you’re creating a book, make sure there’s enough inner margin so text doesn’t get lost in the binding.
- Mirror Margins: Set your margins to “Mirror Margins” and make the inner margin at least 1 inch for better readability.
How to Set Margins in Google Docs
If you’re using Google Docs, adjusting margins is also easy. Compared to Microsoft Word, Google Docs has a simpler interface for margin adjustments, making it great for quick edits. If you’re interested in boosting your productivity, consider exploring top free Microsoft Word add-ins for editing. Here’s how you do it:
- Open Your Document: Open the document where you want to change the margins.
- Click on File > Page Setup: Go to the menu, click “File,” then “Page Setup.”
- Enter Custom Margins: Type in the margin values for the top, bottom, left, and right.
- Click OK: When done, click “OK” to save the changes.
Adjusting Margins with the Ruler
Google Docs also lets you change margins using the ruler at the top:
- Find the Ruler: Look at the top of the document.
- Drag the Margins: Click and drag the blue bar on the ruler to change the left or right margin.
FAQs About Adjusting Page Margins
Q1: What Are Standard Margin Sizes?
Standard margin sizes for most documents are 1 inch on all sides. This keeps your document readable and professional.
Q2: Can I Set Different Margins on Different Pages?
Yes, you can set different margins for specific pages by adding section breaks and customizing each section’s margins.
Q3: What Margin Size Should I Use for Printing a Book?
For printing a book, use mirror margins with at least 1-inch inner margins to make sure the text is readable after binding.
Tips for Perfect Margin Settings
- Always Check Guidelines: Whether you’re writing a school paper or a business report, always check if there are specific margin requirements.
- Use Mirror Margins for Binding: For double-sided printing, mirror margins make sure nothing gets lost in the binding.
- Avoid Narrow Margins: Narrow margins can fit more text, but they might make your document look crowded and harder to read.
Conclusion: Mastering Page Margins for Perfect Documents
Adjusting page margins is a small but important part of making your documents look good. Whether you’re working on a school paper, a business report, a flyer, or a book, knowing how to set the right margins can make a big difference. Good margins improve appearance, make reading easier, and ensure your printed documents look great. For more detailed instructions, you can visit the Microsoft Office support page on page setup.
Try experimenting with different margin settings today to see how they enhance readability and give your documents a professional touch. For more secret tips and tricks, check out MS Word secret tips, tricks, and hacks. If you have any questions or tips about setting margins, feel free to share them in the comments below!