Do you find it hard to make your Microsoft Word documents look neat and professional? Use section breaks to manage different layouts effectively. Section breaks are a helpful tool that can make it easier to manage different layouts. Whether you’re working on a report, a business proposal, or a school project, section breaks can really improve how your content looks. This guide will show you how to use section breaks to manage different layouts to make your documents look better and easier to read.
What Are Section Breaks in MS Word?
Section breaks in MS Word let you divide your document into different sections, each with its own formatting and layout. This means you can have different headers, footers, margins, page orientations, or even columns in one document. For example, you can switch from portrait to landscape for a page with a graph without changing the rest of the document. That’s what section breaks can do!
For more details on different Microsoft Word terms, check out our Glossary of Essential Microsoft Word Terms and Their Functions.
Types of Section Breaks in MS Word
There are four main types of section breaks in Microsoft Word:
- Next Page Section Break: Starts a new section on the next page.
- Continuous Section Break: Starts a new section on the same page.
- Even Page Section Break: Starts a new section on the next even-numbered page.
- Odd Page Section Break: Starts a new section on the next odd-numbered page.
Understanding these types will help you decide how to use section breaks to manage different layouts effectively.
Why Are Section Breaks Important?
Using section breaks in MS Word is important if you want to use section breaks to manage different layouts and keep documents organized and looking professional. Here are some reasons why section breaks are so useful:
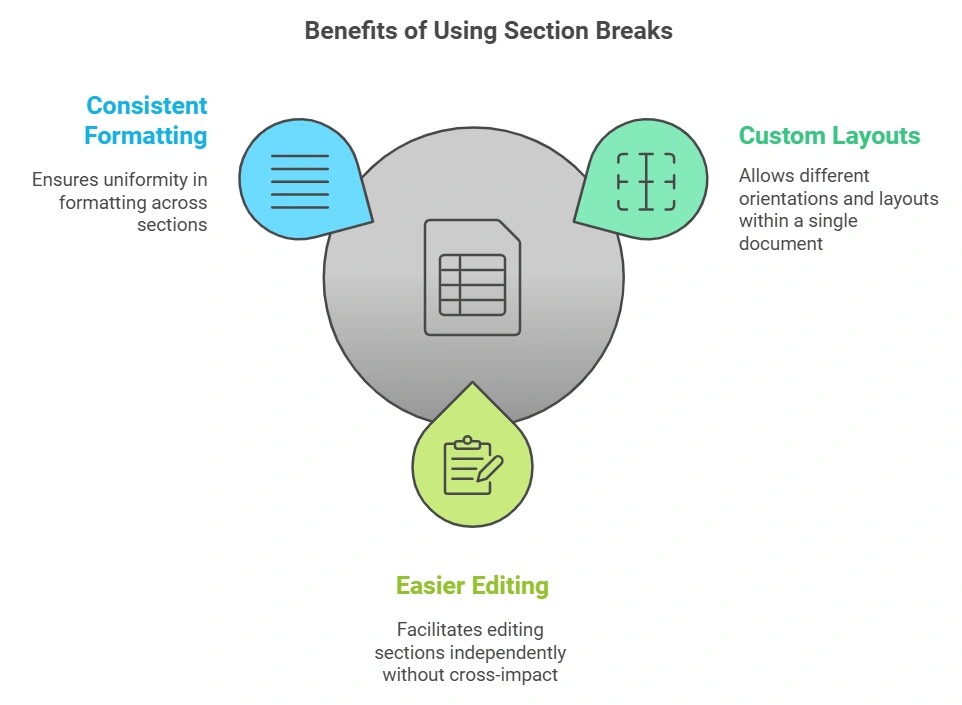
- Custom Layouts: Section breaks let you have different layouts in one document. For example, you can have part of your document in portrait orientation and another part in landscape.
- Easier Editing: With section breaks, you can edit one part of your document without affecting others. Need different headers for different sections? Section breaks make that easy.
- Consistent Formatting: Section breaks make it easier to keep the formatting consistent where it matters most.
Section breaks help simplify complex formatting needs. By using these features, you can create documents that look nice, are well-organized, and are easy for readers to follow.
Step-by-Step Guide to Inserting Section Breaks in MS Word
Step 1: Identify the Layout Changes Needed
Before you add section breaks, think about where you need different formatting in your document. For example, you might want different headers or footers, change page orientation, or use columns for specific sections.
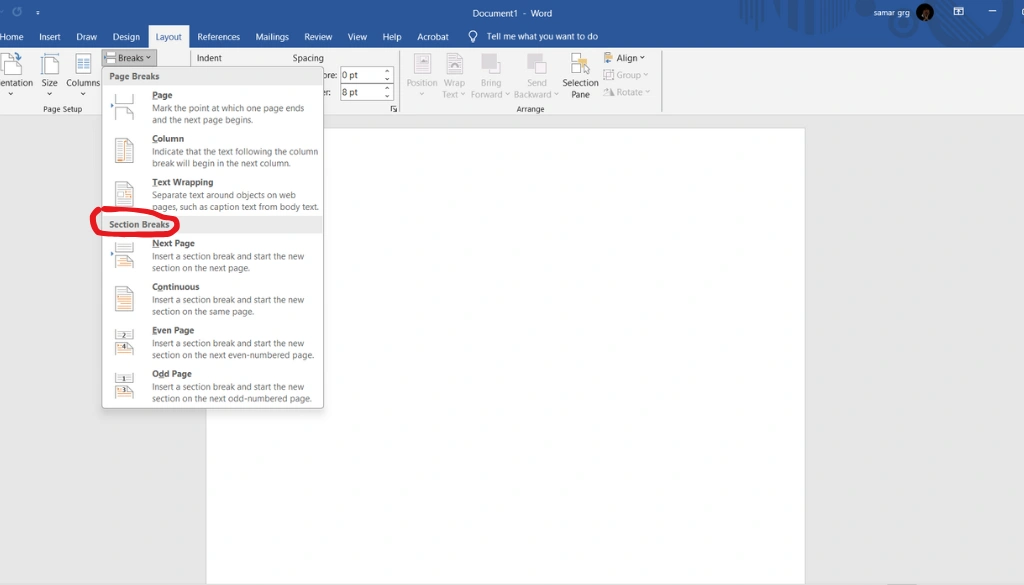
Step 2: Insert a Section Break
To insert a section break:
- Position Your Cursor: Place your cursor where you want to create the new section.
- Go to the Layout Tab: Click on the Layout tab in the toolbar.
- Select Breaks: Click Breaks and choose the type of section break you need, like Next Page or Continuous.
For more help with these steps, you can get help with Microsoft Word’s built-in support.
Step 3: Adjust Formatting for Each Section
After inserting section breaks, you can start customizing the formatting for each section. Here are some key changes you can make:
- Page Orientation: You can change the page orientation of each section separately. This is useful when adding charts or images that need landscape orientation.
- Headers and Footers: Different sections can have different headers and footers, which is helpful if you want different titles or page numbers for each section.
- Columns: If you want one section to have one column and another to have two columns, section breaks make this possible.
Practical Uses for Section Breaks in Documents
1. Combining Different Page Orientations
One of the most common uses for section breaks is to mix portrait and landscape pages. This is helpful for technical reports or research papers where tables or charts need extra horizontal space. For example, if you need to add a wide chart, you can use a Next Page Section Break to switch that page to landscape orientation while keeping the rest in portrait.
Consider adding a step-by-step guide:
- Place your cursor where you want to start the new layout.
- Go to the Layout tab, click on Breaks, and choose Next Page.
- Change the page orientation by clicking on Orientation in the Layout tab and selecting Landscape.
Adding visuals, like screenshots, could make these instructions even clearer. You might also want to explore how to adjust page margins for different document types.
2. Managing Different Headers and Footers
Section breaks make it easy to have different headers and footers in each part of your document. For example, if you are writing a book, each chapter could have its own title in the header, while the footer could have different page numbers. By adding a Next Page Section Break at the end of each chapter, you can change the header or footer for each new section.
3. Varying Page Number Formats
If your document has a title page, a table of contents, and multiple chapters, you might want different numbering formats. For example, you could use Roman numerals for the table of contents and Arabic numbers for the chapters. Section breaks let you assign these different page number styles in the same document.
FAQs About Using Section Breaks in MS Word
1. Can I Remove Section Breaks Easily?
Yes, you can remove a section break by placing your cursor just before it and pressing Delete. But be careful: removing a section break will merge the formatting of both sections, which might affect your layout.
2. What Is the Difference Between Page Breaks and Section Breaks?
A Page Break moves content to the next page without allowing any layout changes. A Section Break creates a new section where you can apply different formatting, like page orientation, margins, and more.
For more on improving your MS Word documents, consider exploring our MS Word Secret Tips, Tricks, and Hacks.
3. How Do I Make Section Breaks Visible?
To see section breaks in your document, click the Show/Hide (¶) button on the Home tab. This will show all non-printing characters, including section and page breaks, which helps you manage your document layout more easily.
Best Practices for Using Section Breaks
1. Plan Your Layout in Advance
Before adding section breaks, plan your document’s structure. This will help you avoid extra formatting changes and reduce the risk of layout issues.
2. Keep Formatting Consistent
While section breaks let you use different formatting, keeping some things consistent will make your document look professional. For example, use the same fonts and font sizes in all sections.
3. Use the Right Type of Section Break
Choose the right section break for your needs. Use a Continuous Section Break if you need different formatting but want to keep everything on the same page. This is helpful for adding columns in the middle of a page.
Troubleshooting Common Issues with Section Breaks
1. Unexpected Layout Changes
Sometimes adding or deleting a section break can cause unexpected changes to your layout. Use the Show/Hide (¶) feature to see hidden formatting marks that might be affecting your layout.
2. Headers and Footers Not Matching
If your headers and footers don’t look right, check if the Link to Previous setting is on or off. This setting controls whether headers and footers in different sections are linked.
3. Page Numbering Problems
Page numbering problems can happen when working with multiple sections. Make sure each section has its own page numbering settings by double-clicking the footer or header and adjusting the numbering options.
Advanced Tips: Taking Section Breaks to the Next Level
1. Create Unique Page Borders for Different Sections
Using section breaks, you can add unique page borders to different sections. This is useful for documents that have both formal and creative sections, like a report with an appendix.
2. Apply Different Margin Sizes
If parts of your document need different margin sizes—like an appendix with larger tables—use section breaks to make these changes. Section breaks make it easy to apply different margins to specific sections.
Real-World Examples of Section Breaks in Action
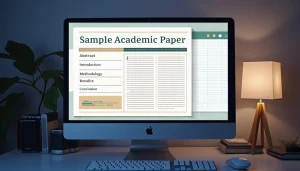
Example 1: Writing an Academic Thesis
Imagine you’re writing an academic thesis with multiple chapters, an introduction, a table of contents, and an appendix. Each part has different formatting needs. You can use section breaks to:
- Table of Contents: Insert a Next Page Section Break to use Roman numerals for page numbers.
- Chapters: Use Next Page Section Breaks to separate chapters and create unique headers.
- Appendix: Use a Continuous Section Break to change the margin size for detailed tables without adding a new page.
Example 2: Creating a Business Proposal
In a business proposal, you might need different sections with different formatting:
- Cover Page: No header or footer, clean look.
- Executive Summary: Portrait orientation, with a custom header including the company logo.
- Financial Data: Use a Next Page Section Break to switch to landscape orientation, making tables easier to read.
Using section breaks ensures each part of the proposal looks clean, organized, and professional, ensuring clarity and professionalism.
Conclusion: Master Section Breaks for Better Layout Control
Section breaks are an important feature in MS Word that can greatly improve the formatting and readability of your documents. Whether you’re creating a business proposal, an academic thesis, or a report, section breaks help you manage different layouts easily. Start using section breaks today to make your documents look more professional and easier to navigate. For more detailed guidance, refer to the official Microsoft support page on section breaks.
Take control of your document’s layout and see how section breaks can simplify complex formatting. Try them in your next project—you’ll be surprised at how much more organized your documents can be!