Creating personalized documents for multiple recipients can be time-consuming and prone to errors when done manually. Mail merge in Microsoft Word transforms this tedious process into an efficient, automated solution that saves hours while ensuring accuracy and professionalism. Whether you’re sending business correspondence, creating invitations, or generating certificates, this comprehensive guide will teach you everything you need to know about mail merge in Word.
This tutorial covers fundamental concepts, step-by-step instructions, advanced techniques, and troubleshooting solutions to help you master mail merge functionality. By the end of this guide, you’ll be creating personalized documents like a professional, regardless of your current skill level.
What is Mail Merge and Why Should You Use It?
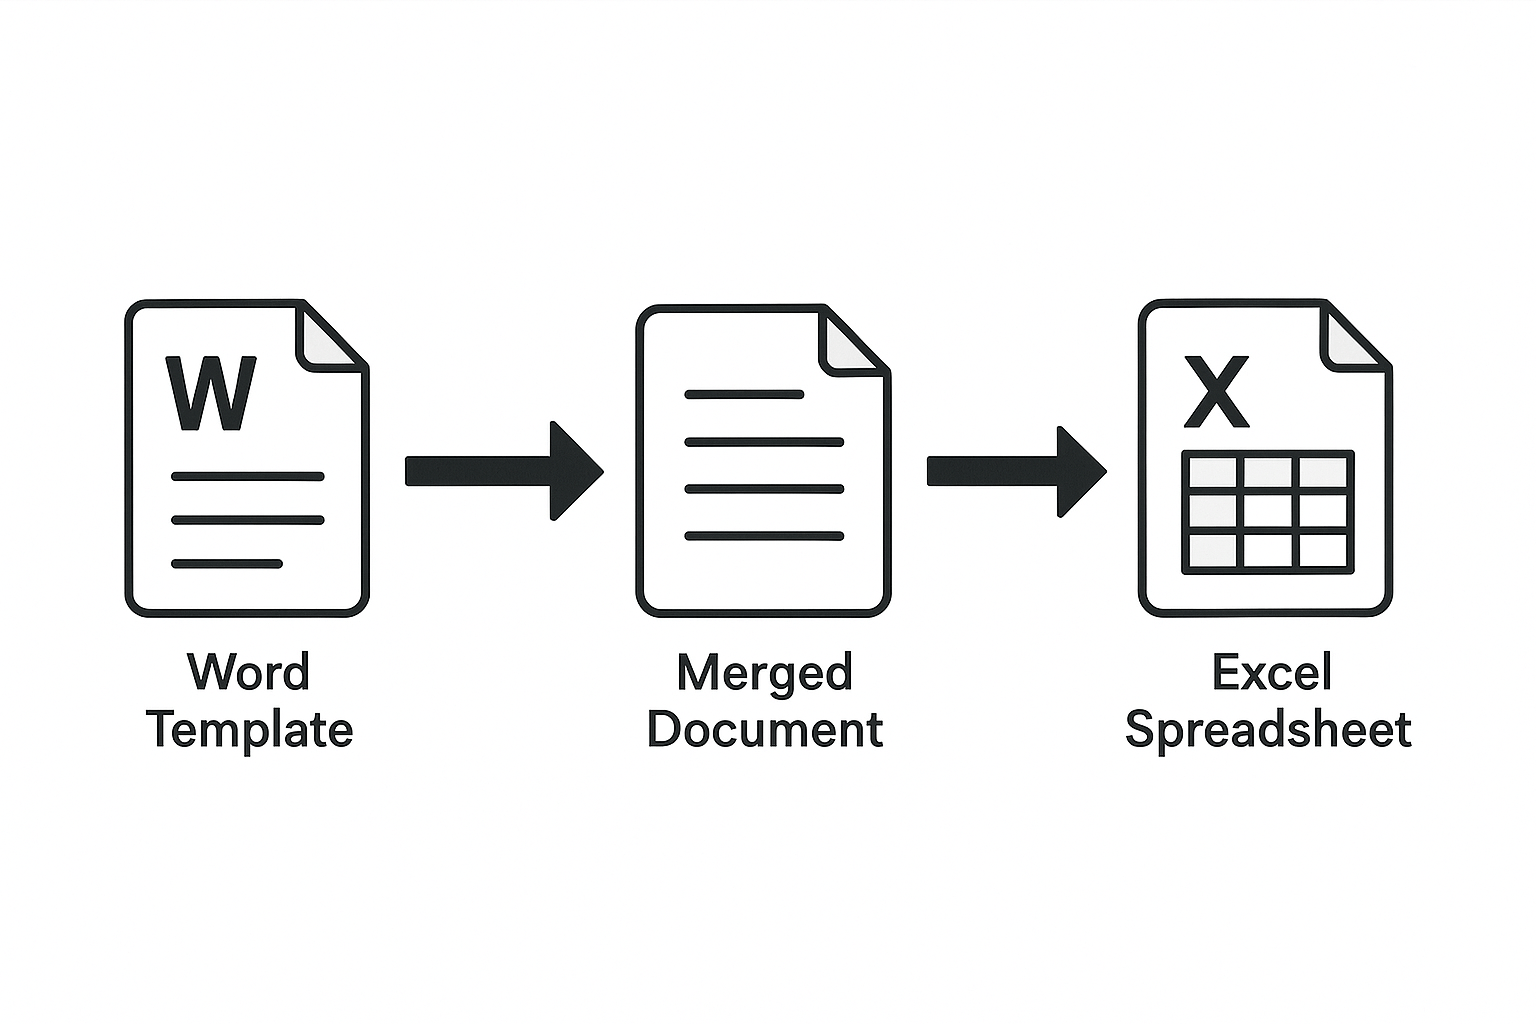
Mail merge is a powerful Microsoft Word feature that combines a template document with data from an external source to create multiple personalized documents automatically. Instead of manually typing each recipient’s information, mail merge pulls data from sources like Excel spreadsheets, Outlook contacts, or databases to generate customized letters, emails, labels, or envelopes.
The process involves three essential components:
- Main Document: Your Word template containing static text and placeholder fields
- Data Source: External file (Excel, CSV, database) containing recipient information
- Merged Document: Final personalized documents combining template and data
Key Benefits of Using Mail Merge
Time Efficiency: Mail merge can reduce document preparation time by up to 70% compared to manual methods. What once took hours can now be completed in minutes.
Error Reduction: Automated data insertion significantly reduces typing errors, with studies showing error rates dropping from 60% to just 5% when using mail merge.
Professional Consistency: All documents maintain identical formatting and structure while incorporating personalized elements seamlessly.
Scalability: Whether you’re creating 10 or 10,000 documents, the process remains equally efficient and manageable.
Cost Effectiveness: Reduced labor time and improved accuracy translate to significant cost savings for businesses and organizations.
Essential Preparations Before Starting Mail Merge
Setting Up Your Data Source
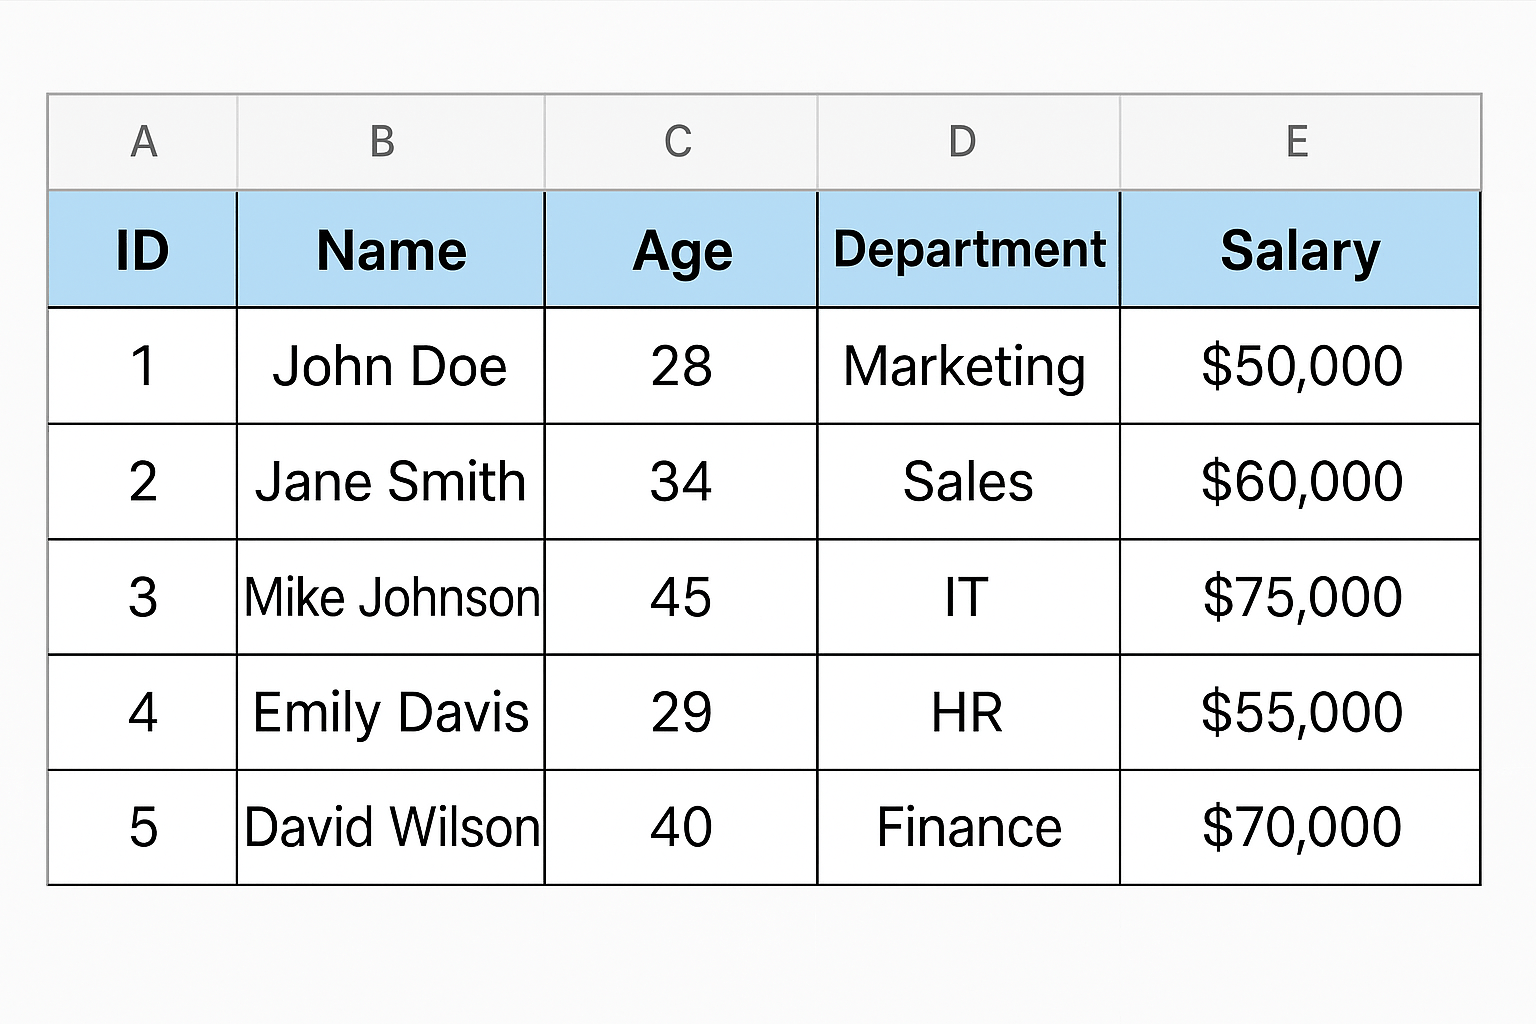
Proper data source preparation is crucial for successful mail merge operations. Your Excel spreadsheet or data file must follow specific formatting requirements to ensure compatibility with Word.
Data Source Requirements:
- Store all data on the first worksheet of your Excel file
- Use clear, descriptive column headers without spaces (FirstName, LastName, EmailAddress)
- Ensure each row represents one complete record
- Remove empty rows or columns that could disrupt the merge process
- Format special data types (ZIP codes, phone numbers) as text to preserve leading zeros
Common Data Source Formats:
- Excel spreadsheets (.xlsx, .xls): Most popular and user-friendly option
- CSV files (.csv): Universal format compatible with most systems
- Access databases (.mdb, .accdb): For complex data relationships
- Outlook contacts: Direct integration with your contact list
Creating Your Main Document Template
Your main document serves as the foundation for all merged documents. Design it with both static content and placeholder areas where personalized data will be inserted.
Template Best Practices:
- Write complete sentences and paragraphs around merge fields
- Use consistent formatting throughout the document
- Include your organization’s branding elements (logos, colors, fonts)
- Leave adequate space for variable-length data fields
- Test the layout with sample data before full merge execution
Step-by-Step Mail Merge Tutorial
Step 1: Prepare Your Data in Excel
Begin by organizing your recipient information in a properly formatted Excel spreadsheet. Each column represents a data field, and each row contains one recipient’s complete information.
Example Data Structure:
textFirstName | LastName | Company | EmailAddress | Address | City | State | ZipCode
John | Smith | ABC Corp | john@abc.com | 123 Main St | Seattle | WA | 98101
Sarah | Johnson | XYZ Inc | sarah@xyz.com | 456 Oak Ave | Portland | OR | 97201
Critical Formatting Tips:
- Format ZIP codes and phone numbers as text to prevent Excel from dropping leading zeros
- Use consistent date formats (MM/DD/YYYY or DD/MM/YYYY)
- Avoid special characters in column headers
- Ensure no blank rows interrupt your data sequence
Step 2: Create Your Main Document in Word
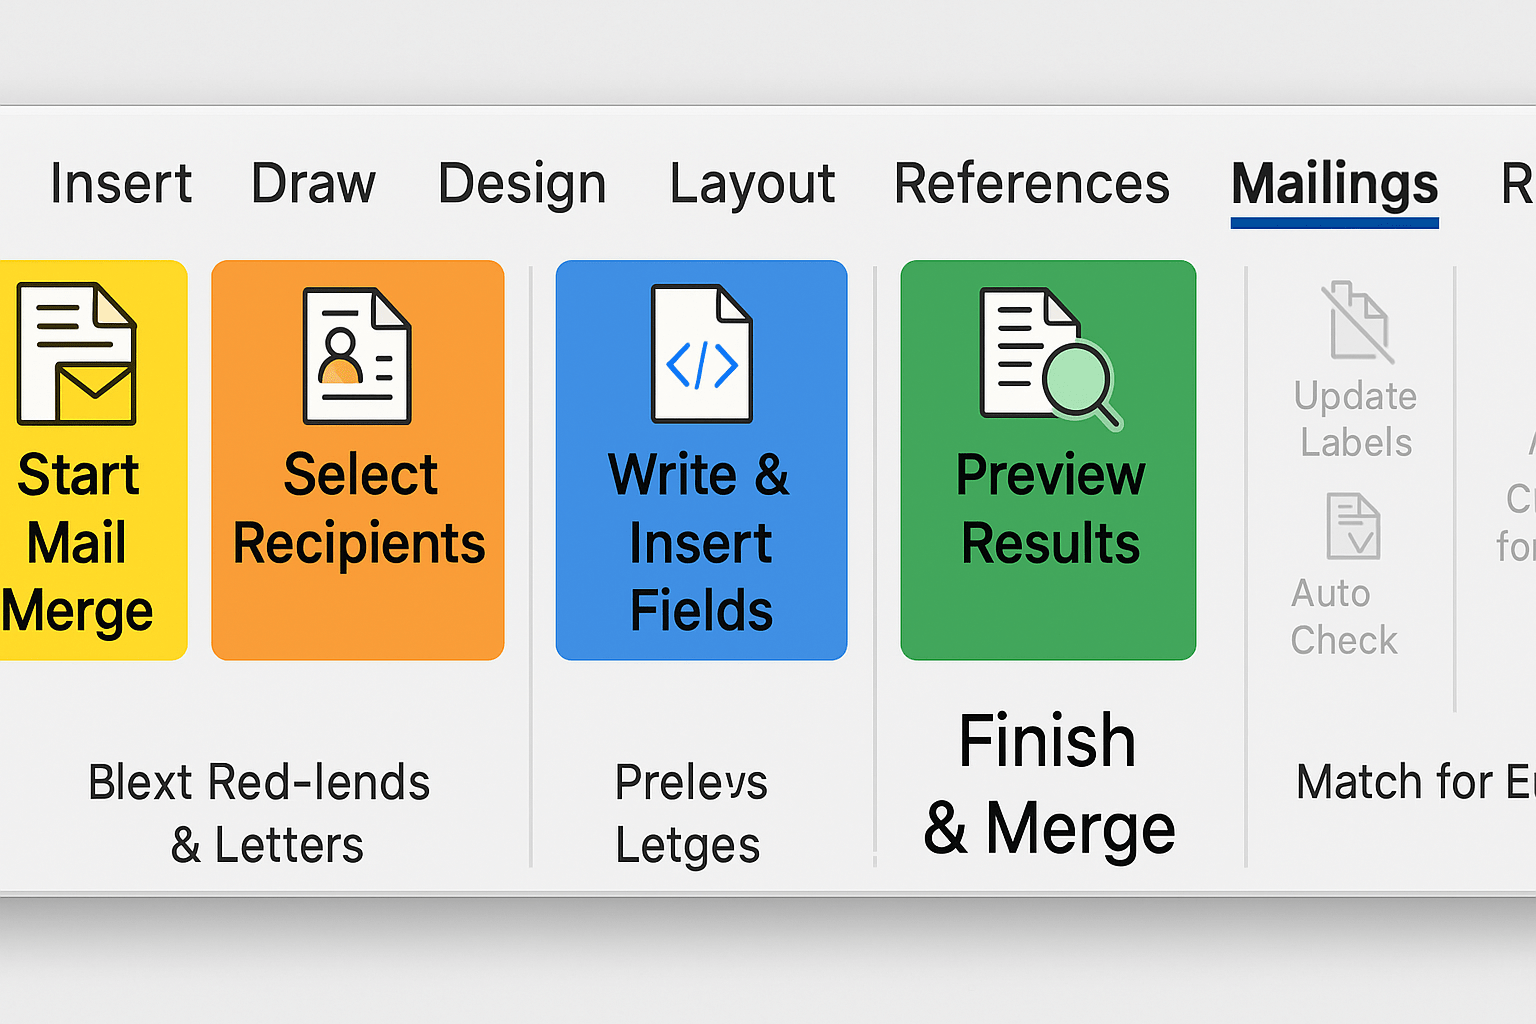
Open Microsoft Word and create a new document that will serve as your mail merge template. Navigate to the Mailings tab and click Start Mail Merge to begin the process.
Document Type Selection:
- Letters: Individual personalized letters (most common)
- Email Messages: Direct email distribution through Outlook
- Envelopes: Address formatting for envelope printing
- Labels: Multiple addresses on label sheets
- Directory: Multiple records displayed in a single document
Choose Letters for this tutorial, as it’s the most versatile option for learning mail merge fundamentals.
Step 3: Connect Your Data Source
In the Mailings tab, click Select Recipients and choose Use an Existing List. Navigate to your prepared Excel file and select it. Word will prompt you to choose the specific worksheet containing your data.
Data Connection Process:
- Browse to locate your Excel file
- Select the correct worksheet (usually Sheet1)
- Verify that column headers appear correctly in the preview
- Click OK to establish the connection
If you encounter connection issues, ensure your Excel file is saved and closed before attempting to connect it to Word.
Step 4: Design Your Document and Insert Merge Fields
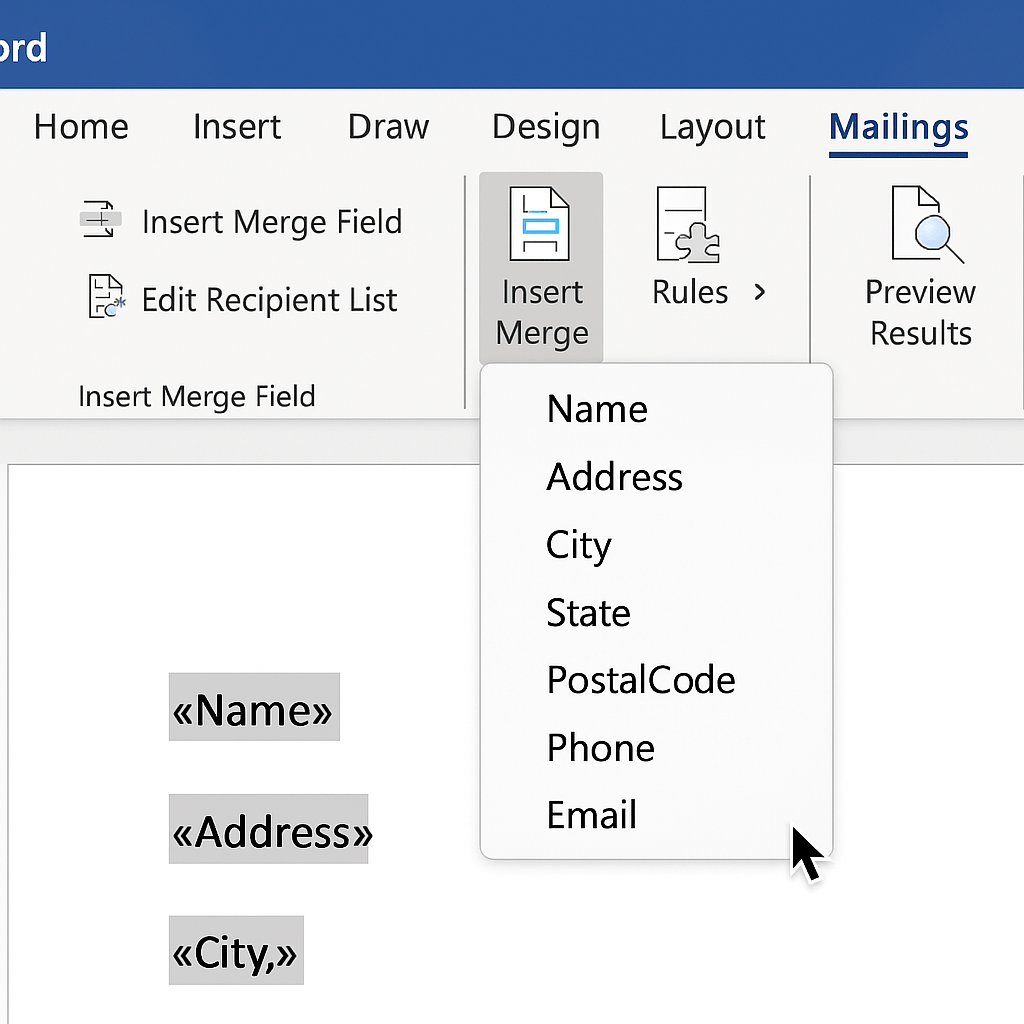
Type your document content, leaving spaces where personalized information should appear. To insert merge fields, position your cursor at the desired location and click Insert Merge Field in the Mailings tab.
Essential Merge Fields:
- Address Block: Automatically formats complete addresses
- Greeting Line: Creates personalized salutations (Dear Mr. Smith,)
- Individual Fields: Specific data elements (FirstName, Company, EmailAddress)
Sample Letter Structure:
text[Insert Date]

<<AddressBlock>>

<<GreetingLine>>

Thank you for your interest in our services, <<FirstName>>. We appreciate <<Company>>'s partnership with us.

Sincerely,
[Your signature]
Step 5: Preview Your Results
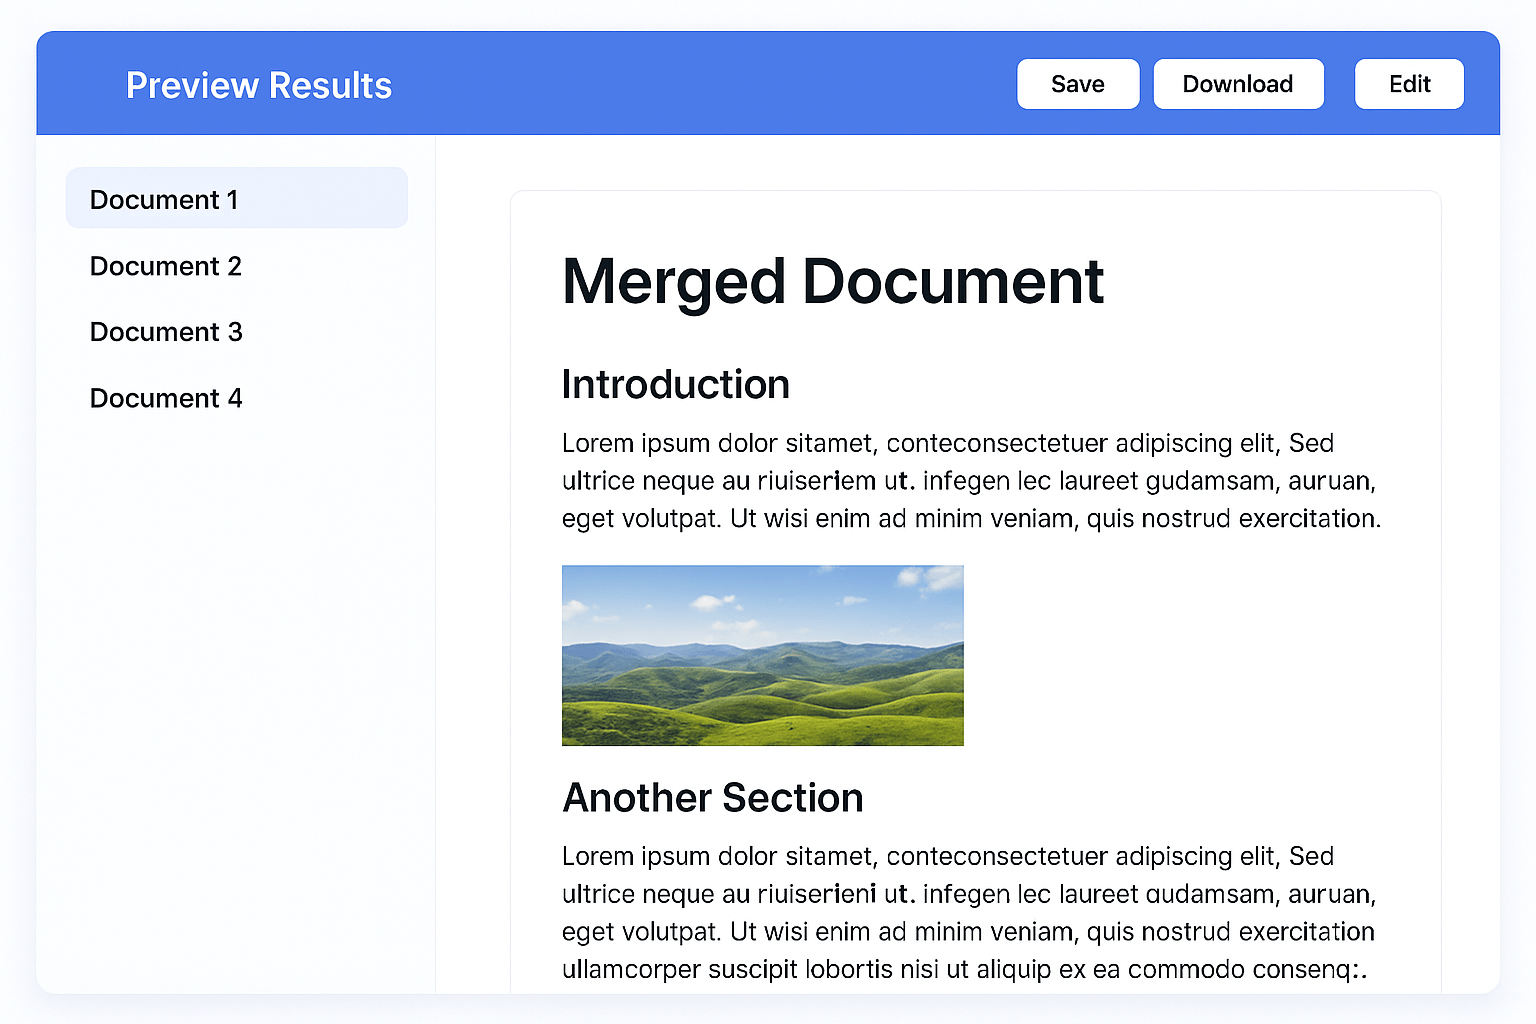
Before completing the merge, click Preview Results to see how your documents will appear with actual data. Use the navigation arrows to review different records and verify that all merge fields populate correctly.
Preview Checklist:
- Verify proper spacing around merge fields
- Check address block formatting
- Ensure greeting lines appear natural
- Confirm all data displays correctly
- Review for any formatting inconsistencies
Step 6: Complete the Mail Merge
Once satisfied with the preview, click Finish & Merge to generate your final documents. You have several completion options:
Merge Options:
- Edit Individual Documents: Creates a new Word document with all merged letters
- Print Documents: Sends directly to your printer
- Send Email Messages: Distributes via Outlook (requires proper email field mapping)
For first-time users, selecting Edit Individual Documents allows you to review all merged documents before printing or sending.
Advanced Mail Merge Features
Conditional Merge Fields and Rules
Advanced mail merge includes conditional formatting capabilities that display different content based on data values. Access these features through Rules in the Mailings tab.
Available Rules:
- If…Then…Else: Display different text based on field values
- Merge Record #: Include record numbers in documents
- Next Record: Control record progression in directories
- Skip Record If: Exclude records meeting specific criteria
Example Conditional Field:
text{ IF { MERGEFIELD State } = "CA" "California residents receive free shipping" "Shipping charges apply" }
Working with Multiple Data Sources
Complex mail merge projects may require data from multiple sources. You can combine information from different Excel worksheets or databases using Word’s Data Connection Wizard.
Multi-Source Strategy:
- Prepare primary data source with core recipient information
- Create secondary sources for supplementary data
- Use common fields (like ID numbers) to link data sources
- Test connections thoroughly before full merge execution
Creating Professional Envelopes and Labels
Envelope Setup:
Navigate to Mailings > Start Mail Merge > Envelopes. Word automatically configures standard envelope sizes, but you can customize dimensions through Envelope Options.
Label Configuration:
Select Labels from the mail merge options and choose your specific label product number. Word includes templates for major label manufacturers like Avery, ensuring proper alignment and spacing.
Troubleshooting Common Mail Merge Issues
Merge Fields Not Populating
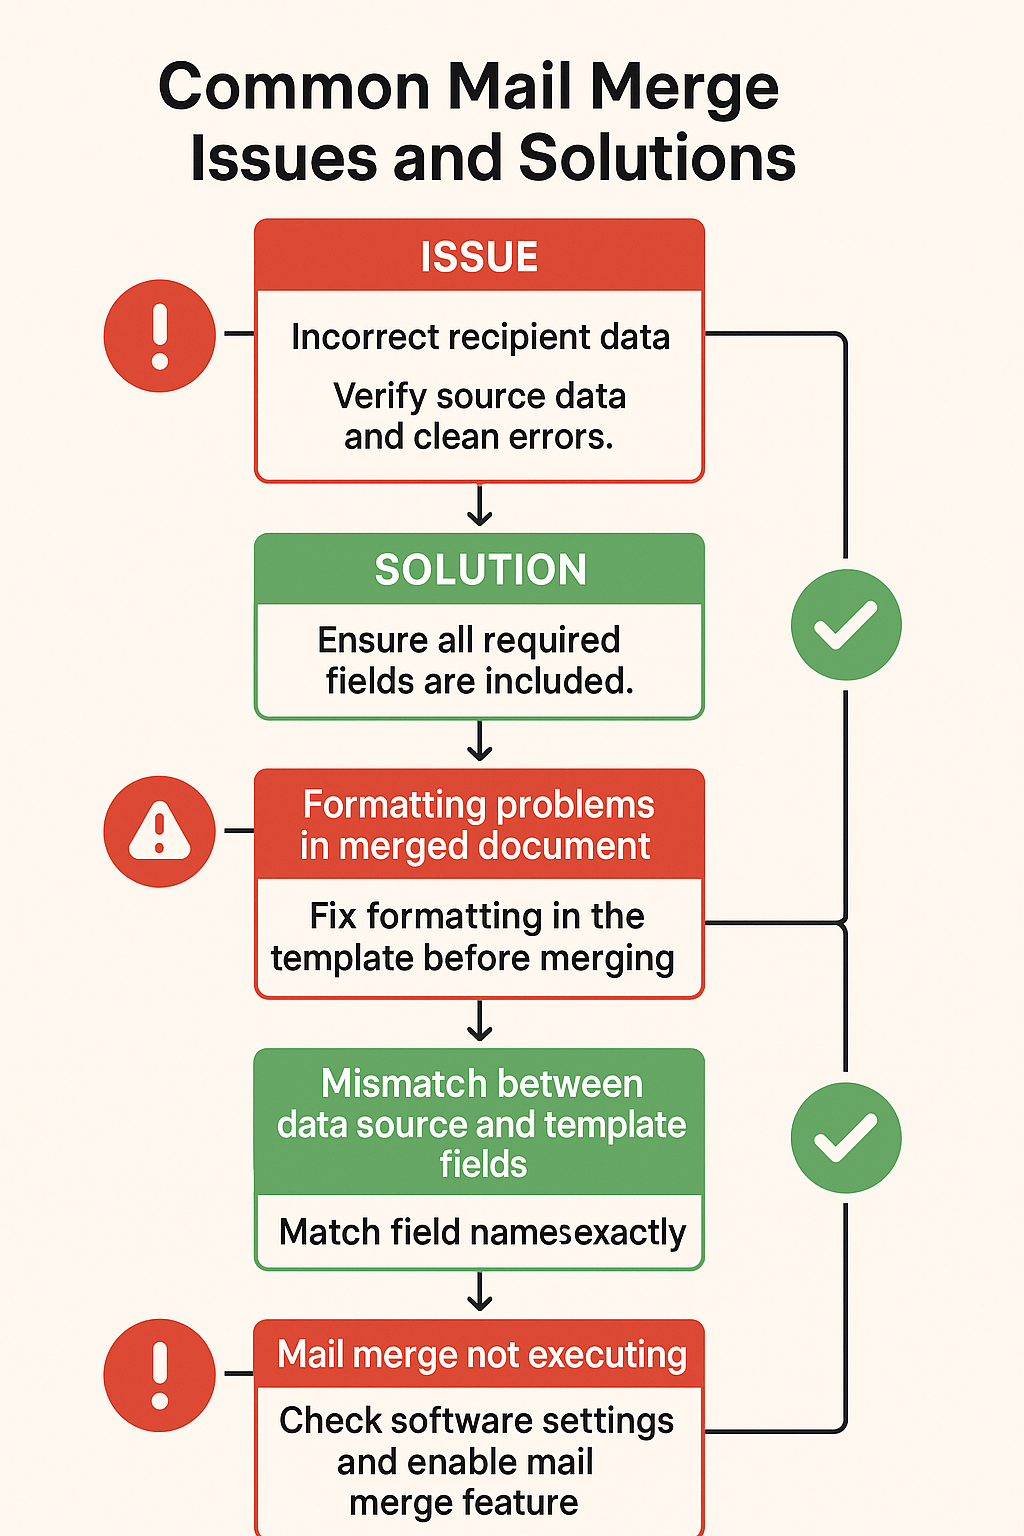
This represents the most common mail merge problem, typically caused by mismatched field names or formatting issues.
Solutions:
- Verify exact spelling match between Excel headers and merge field names
- Remove spaces and special characters from column headers
- Ensure data source file remains open and unmodified during merge
- Check for hidden characters or formatting in field names
Formatting Problems
When merge fields display incorrectly (wrong currency symbols, date formats, or number precision), the issue usually stems from data source formatting.
Formatting Fixes:
- Format Excel columns as text for ZIP codes and phone numbers
- Apply currency formatting in Excel before merging
- Use consistent date formats throughout your data source
- Preview results frequently to catch formatting issues early
Data Source Connection Errors
Connection problems often occur when data sources are moved, renamed, or modified after initial setup.
Resolution Steps:
- Verify data source file location and accessibility
- Ensure Excel file is closed during Word connection attempts
- Check file permissions and sharing restrictions
- Recreate connection if file path has changed
Performance Issues with Large Datasets
Large mail merge operations (1000+ records) may experience slowdowns or memory issues.
Performance Optimization:
- Close unnecessary applications to free system memory
- Simplify document formatting and reduce image file sizes
- Process large datasets in smaller batches
- Save work frequently during extended merge operations
Real-World Mail Merge Applications
Business Communications
Customer Correspondence: Create personalized thank-you letters, service updates, or promotional materials that address each customer by name and reference their specific account details.
Invoice and Statement Generation: Combine financial data with professional letterhead to produce consistent, personalized billing documents.
Contract and Agreement Templates: Generate customized contracts with client-specific terms, dates, and pricing information automatically populated from your database.
Educational Institutions
Student Certificates: Create graduation certificates, course completion awards, or achievement recognition documents with individual student names and accomplishments.
Parent Communications: Generate personalized letters to parents regarding student progress, event invitations, or school policy updates.
Administrative Documents: Produce customized enrollment forms, grade reports, or scheduling information for large student populations.
Event Management
Invitation Creation: Design elegant event invitations with personalized recipient information, custom messages, and event-specific details.
Name Badge Production: Generate professional name tags for conferences, meetings, or workshops with attendee information and organizational logos.
Certificate Distribution: Create participation certificates, achievement awards, or completion documents for event attendees.
Non-Profit Organizations
Donor Appreciation: Craft personalized thank-you letters that reference specific donation amounts, dates, and impact statements.
Volunteer Coordination: Generate customized volunteer schedules, assignment letters, or recognition documents.
Membership Communications: Create renewal notices, welcome letters, or program updates tailored to different membership categories.
Best Practices for Professional Mail Merge
Data Quality Management
Maintain Clean Data: Regularly review and update your contact databases to ensure accuracy and completeness. Remove duplicate entries and standardize formatting conventions.
Backup Strategy: Always maintain backup copies of both your data sources and mail merge templates. This prevents data loss and enables easy recovery from errors.
Version Control: Use consistent naming conventions for templates and data files. Include dates or version numbers to track document evolution.
Template Optimization
Mobile-Friendly Design: Consider how your documents will appear when viewed on different devices. Use readable fonts and appropriate spacing for various screen sizes.
Brand Consistency: Incorporate your organization’s visual identity elements consistently across all mail merge templates. This reinforces professional image and brand recognition.
Accessibility Compliance: Design templates that meet accessibility standards, including appropriate color contrast and readable font choices.
Quality Assurance Process
Test Runs: Always perform test merges with small data samples before executing full production runs. This identifies potential issues without affecting your entire recipient list.
Peer Review: Have colleagues review both your template design and sample merged documents. Fresh eyes often catch errors that creators miss.
Final Verification: Double-check critical information like dates, contact details, and legal disclaimers before final document distribution.
Integration with Other Microsoft Office Applications
Outlook Email Distribution
Direct integration between Word mail merge and Outlook enables seamless email distribution of personalized messages. This feature requires proper email field mapping and Outlook configuration.
Email Setup Requirements:
- Configure Outlook as your default email client
- Map email addresses to the correct data field
- Set appropriate subject lines and message formats
- Test email delivery with small batches initially
Excel Data Management
Advanced Excel features enhance mail merge capabilities by providing sophisticated data manipulation options before merging.
Excel Enhancement Techniques:
- Use Excel formulas to create calculated fields (full names from first/last name columns)
- Apply data validation to ensure consistency across records
- Utilize Excel’s filtering capabilities to create targeted recipient lists
- Implement conditional formatting to identify data quality issues
PowerPoint Integration
While not directly integrated, you can use mail merge principles to create personalized PowerPoint presentations by copying merged content from Word documents.
Mail Merge Security and Privacy Considerations
Data Protection
When working with sensitive recipient information, implement appropriate security measures to protect personal data.
Security Best Practices:
- Store data files in secure, password-protected locations
- Limit access to mail merge templates and data sources
- Use encrypted file formats when transmitting sensitive information
- Regularly audit access logs and user permissions
Compliance Requirements
Organizations must consider regulatory compliance when processing personal information through mail merge operations.
Compliance Considerations:
- GDPR requirements for European recipients
- CAN-SPAM compliance for email communications
- Industry-specific privacy regulations
- Data retention and disposal policies
Conclusion
Mastering mail merge in Microsoft Word transforms time-consuming document creation into an efficient, professional process. This comprehensive guide has covered everything from basic setup to advanced techniques, providing you with the knowledge to create personalized documents confidently and efficiently.
The key to successful mail merge lies in proper preparation, attention to detail, and understanding the relationship between your data source and template design. Start with simple projects to build your skills, then gradually incorporate advanced features as your comfort level increases.
Remember that mail merge is more than just a time-saving tool—it’s a gateway to more professional, consistent, and personalized communication with your audience. Whether you’re managing business correspondence, educational communications, or personal projects, these skills will serve you well throughout your professional journey.
Take the next step by implementing these techniques in your own projects. Start small, practice regularly, and don’t hesitate to experiment with advanced features as you become more comfortable with the fundamentals. Your investment in learning mail merge will pay dividends in improved efficiency and professional presentation.
Frequently Asked Questions
How do I fix mail merge fields that show codes instead of data?
This issue typically occurs when field codes are displayed instead of field results. Press Alt + F9 to toggle between field codes and results, or right-click the field and select Toggle Field Codes.
Can I use mail merge with Google Sheets instead of Excel?
While Word doesn’t directly connect to Google Sheets, you can export your Google Sheets data as an Excel file (.xlsx) or CSV format, then use that file as your mail merge data source.
Why are my ZIP codes losing leading zeros during mail merge?
Leading zeros disappear when Excel treats ZIP codes as numbers instead of text. Format the ZIP code column as text in Excel before connecting it to your Word document.
How can I exclude certain records from my mail merge?
Use the Edit Recipient List option in the Mailings tab to filter your data source. You can uncheck specific recipients or apply filters based on field values to exclude unwanted records.
What’s the maximum number of records I can process in a single mail merge?
While Word doesn’t impose a strict limit, performance issues may occur with very large datasets (10,000+ records). For optimal performance, consider processing large datasets in smaller batches.
How do I create conditional text that changes based on recipient data?
Use the Rules feature in the Mailings tab to insert If…Then…Else statements. This allows you to display different text based on conditions in your data fields.
Can I save my mail merge setup for future use?
Yes, save your Word document with the mail merge setup intact. When you reopen the file, Word will remember your data source connection and field mappings, allowing you to quickly perform the merge again with updated data.
