
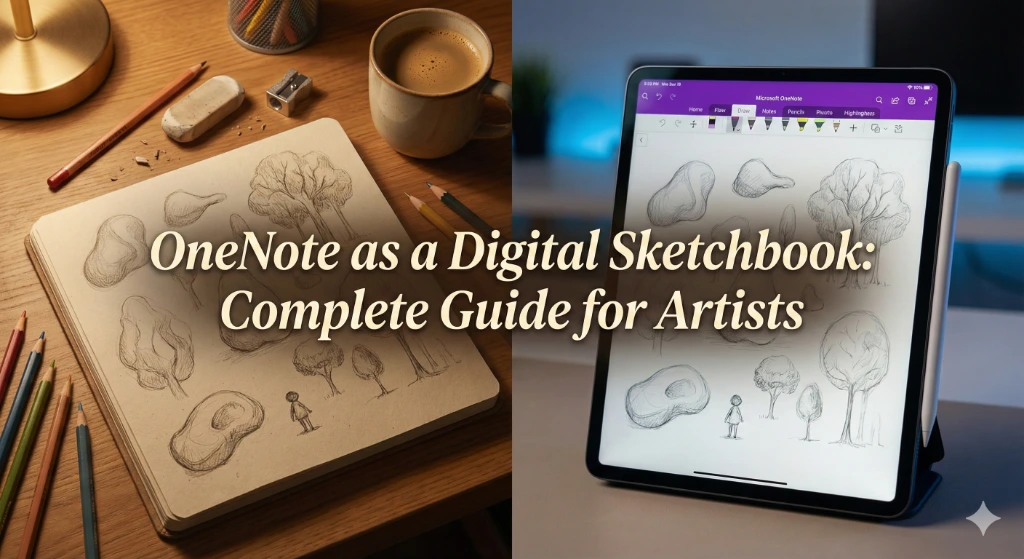
Are you an artist or creative looking for a versatile digital sketchbook without breaking the bank? Microsoft OneNote might be hiding in plain sight on your device, ready to transform into your next creative companion. While most people think of OneNote as just another note-taking app, it’s actually a powerful digital sketchbook that offers an infinite canvas, robust drawing tools, and seamless organization—all for free.
Whether you’re a student sketching class notes, a designer brainstorming concepts, or a hobbyist artist exploring digital art, OneNote provides unique advantages that even premium apps like Procreate can’t match. From its cross-platform availability to real-time collaboration features, OneNote bridges the gap between creativity and productivity in ways specialized art apps simply don’t offer.
In this comprehensive guide, you’ll discover how to unlock OneNote’s creative potential, optimize your drawing settings, organize your artistic projects, and integrate it into your creative workflow. Ready to transform your approach to digital sketching?
Why Choose OneNote as Your Digital Sketchbook?
Before diving into the technical details, let’s address the elephant in the room: why would you choose a note-taking app over dedicated drawing software? The answer lies in OneNote’s unique positioning as a hybrid creative tool that offers advantages you won’t find elsewhere.
The Cost Advantage
Unlike Procreate ($12.99), Adobe Fresco (subscription-based), or Clip Studio Paint ($49.99), OneNote is completely free. It comes pre-installed on most Windows devices and is freely available for iPad, iPhone, Mac, and Android. For students, hobbyists, or professionals on a budget, this zero-cost entry point makes OneNote an incredibly attractive option.
Cross-Platform Accessibility
One of OneNote’s most significant advantages is its seamless cross-platform functionality. Start a sketch on your iPad during your morning commute, refine it on your Surface tablet at work, and add final touches on your Windows desktop at home. Your work automatically syncs across all devices via OneDrive, ensuring you never lose access to your creative projects.
Professional drawing apps like Procreate remain locked to the iPad ecosystem, while OneNote provides true device freedom. This flexibility is invaluable for creatives who work across multiple devices or collaborate with teams using different platforms.
Organization Meets Creativity
What truly sets OneNote apart is its organizational structure. The notebook-section-page hierarchy allows you to organize creative projects in ways drawing apps simply can’t match. Imagine having separate notebooks for different clients, sections for project phases, and pages for individual sketches—all searchable and interconnected.
Artists can create dedicated spaces for:
Inspiration boards with reference images and color palettes
Project workflows combining sketches, notes, and client feedback
Idea repositories where rough concepts live alongside polished work
Learning journals with tutorial notes and practice exercises
This integration of visual and textual content creates a holistic creative environment that pure drawing apps cannot replicate.
The Infinite Canvas Advantage
Unlike traditional sketchbooks with limited pages or drawing apps with canvas size restrictions, OneNote offers an infinite canvas. You can extend your workspace in any direction—horizontally and vertically—without worrying about running out of space. This feature is particularly valuable for:
Mind mapping and visual brainstorming sessions
Creating large-scale concept art or storyboards
Developing interconnected illustration series
Planning complex design projects with multiple components
The infinite canvas, combined with the ability to type anywhere on the page, provides unprecedented creative freedom.
Essential OneNote Drawing Features for Artists
Now that we understand why OneNote deserves consideration, let’s explore the specific features that make it functional as a digital sketchbook.
Drawing Tools and Customization
OneNote provides a comprehensive set of drawing tools accessible through the Draw tab. The basic toolkit includes:
Pen Options: Choose from multiple pen types, including ballpoint, fountain pen, and calligraphy styles. Each pen can be customized for color, thickness (ranging from 0.25mm to 3.5mm), and effect. The rainbow pen and glitter pen options add creative flair unavailable in most professional apps.
Pencil and Markers: While OneNote’s pencil tool isn’t as advanced as Notability’s pressure-sensitive version, it provides adequate functionality for sketching and shading. Marker tools function as highlighters, perfect for adding color accents or emphasizing elements.
Highlighters: Multiple highlighter colors and widths allow you to add transparent color layers or emphasize specific areas without obscuring underlying content.
Eraser Tools: OneNote offers three eraser options—small, medium, and large—plus a stroke eraser that removes entire drawn strokes with a single tap. This stroke eraser feature significantly speeds up editing compared to manually erasing mistakes.
To customize your drawing tools:
Tap the Draw tab in the ribbon
Select any pen, pencil, or highlighter
Tap the small arrow next to the tool
Choose your preferred thickness using the +/- controls
Select from preset colors or tap “More Ink Colors” for custom hues
Create and save custom pen configurations for quick access
Pressure Sensitivity and Stylus Support
A critical consideration for serious digital artists is pressure sensitivity support. OneNote does support pressure sensitivity with compatible styluses, including Apple Pencil, Surface Pen, and Wacom devices, but it requires proper configuration.
Enabling Pressure Sensitivity:
For Windows OneNote:
Go to File > Options > OneNote Options
Select “Advanced” from the left menu
Find the “Pen” section
Check the box for “Use pen pressure sensitivity”
Click OK and restart OneNote if needed
For iPad/iPhone OneNote:
Open the Draw tab
Tap the Drawing Mode icon on the far right
Select “Stylus Orientation” based on how you hold your pen
Enable palm rejection to prevent accidental marks
Adjust pressure sensitivity through stylus settings
Important Note: Some users report that pressure sensitivity works better in OneNote 2016 than in OneNote for Windows 10. If you’re experiencing issues, try updating your stylus drivers or reinstalling the OneNote application.
The pressure sensitivity allows for dynamic line variation—press harder for thicker, darker lines and lighter for thin, delicate strokes. This responsiveness brings your digital sketching closer to traditional drawing experiences.
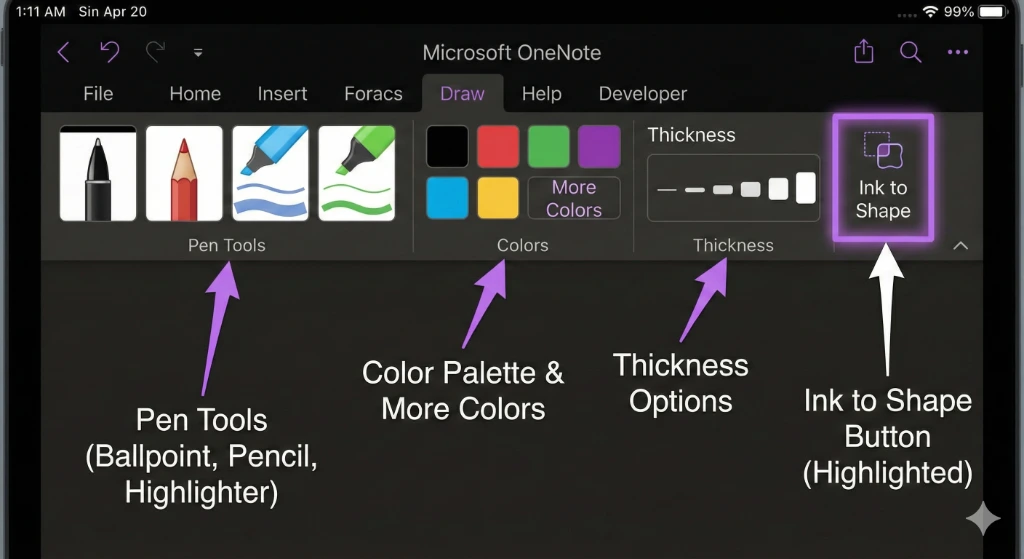
Ink to Shape: The Secret Weapon
One of OneNote’s most powerful features for artists is Ink to Shape. This tool automatically converts your hand-drawn shapes into perfect geometric forms, saving time and ensuring precision.
How to Use Ink to Shape:
On iPad:
Navigate to the Draw tab
Tap the “Ink to Shape” button (near the right side of the ribbon)
Select your preferred pen
Draw any shape freehand
Hold your stylus in place briefly after completing the shape
OneNote automatically converts it to a perfect geometric form
Drag to resize without lifting your stylus
On Windows:
Open the Draw tab
Click “Ink to Shape”
Draw shapes that OneNote will recognize, including circles, ovals, squares, rectangles, triangles, parallelograms, and trapezoids
The app instantly converts rough sketches to clean shapes
This feature is invaluable for technical drawings, diagrams, flowcharts, and architectural sketches. Design professionals can create quick mockups without switching to specialized software, while educators can draw perfect geometric illustrations for teaching materials.
The Ink to Shape tool recognizes shapes drawn in one continuous stroke (circles, ovals) or multiple strokes (rectangles, triangles). For best results, draw shapes deliberately and pause briefly after completing each form to allow recognition.
Rulers, Guides, and Grids
For artists who need precise alignment and measurements, OneNote provides helpful guides:
Ruler Tool: The digital ruler allows you to draw perfectly straight lines at any angle. Simply:
Click the Ruler button in the Draw tab
Rotate the ruler to your desired angle using two fingers or a mouse
Draw along the ruler edge for straight lines
Use it to create perspective guides or architectural elements
Background Grids: Add gridlines or ruled lines to guide your sketching:
Open the Draw tab
Click “Format Background”
Choose from gridline options (small, medium, large spacing)
Select ruled lines for horizontal guides
Customize grid color and spacing
Change page background color if desired
These guides are particularly useful for maintaining consistent proportions in character design, creating architectural drawings, or practicing perspective techniques.
Lasso Tool for Selection and Manipulation
The Lasso tool enables you to select and manipulate drawn elements:
Activate the Lasso tool from the Draw tab
Circle or draw around the elements you want to select
Move, resize, rotate, or delete the selection
Copy and paste selected elements to other areas
This tool is essential for reorganizing compositions, duplicating elements, or creating pattern designs. Unlike traditional drawing where mistakes require starting over, the Lasso tool provides flexibility to adjust your artwork non-destructively.
Shapes Gallery and Lock Drawing Mode
For artists who need to create multiple shapes in succession, OneNote offers a Shapes gallery with lock drawing mode:
Click the Draw tab
Select the Shapes button
Choose from preset shapes (circles, squares, triangles, arrows, etc.)
Click “Lock Drawing Mode”
Draw multiple shapes without reselecting the tool
Press Esc or click the tool again to exit
This feature streamlines diagramming, comic panel creation, and repetitive design work. You can rapidly create flowcharts, storyboard panels, or pattern elements without constantly switching tools.
Setting Up OneNote for Optimal Drawing Experience
To maximize OneNote’s potential as your digital sketchbook, proper setup is crucial. Here’s how to configure it for the best creative experience.
Choosing the Right OneNote Version
Microsoft offers several OneNote versions, and choosing the right one matters for artists:
OneNote for Windows 10 (UWP App):
Modern interface optimized for touch devices
Better stylus support on Surface devices
Infinite canvas with smooth scrolling
Simplified ribbon interface
Best for: Tablet users, touch-first workflows
OneNote 2016 (Desktop Version):
More robust feature set
Better pressure sensitivity for some devices
More extensive macro support via Onetastic add-in
Desktop-class features
Best for: Advanced users, desktop workflows
OneNote for iPad:
Optimized for Apple Pencil
Touch-friendly interface
Excellent palm rejection
Seamless iCloud integration
Best for: iPad Pro users, Apple ecosystem artists
For most artists, OneNote for Windows 10 or OneNote for iPad provide the best drawing experience with modern interfaces and excellent stylus support.
Customizing Your Workspace
Create an optimal drawing environment by customizing OneNote’s interface:
Minimize Distractions:
Click View > Hide Page Title for more canvas space
Toggle off section tabs when sketching
Use Full Screen mode (F11) for immersive drawing
Pin frequently used tools to the Quick Access Toolbar
Optimize the Draw Tab:
Add your most-used pens to the ribbon
Remove unnecessary tools to reduce clutter
Create custom pen configurations matching your workflow
Save favorite pen settings for quick access
Adjust Page Settings:
Choose paper style (blank, ruled, grid) based on project needs
Select appropriate page color (white for bright displays, cream for eye strain reduction)
Set default template for new pages
Configure page size if printing is anticipated
Creating an Artist-Friendly Notebook Structure
Organize your creative work efficiently with a thoughtful notebook structure:
Recommended Hierarchy:
Level 1 – Notebooks: Create separate notebooks for different purposes
“Concept Sketches” for rough ideas and brainstorming
“Client Projects” organized by client name
“Personal Art” for hobby and practice work
“Reference Library” for inspiration and tutorials
Level 2 – Sections: Within each notebook, create logical sections
By project name or client
By date or time period
By art style or medium
By project phase (ideation, sketches, finals)
Level 3 – Pages: Individual pages for specific works
Each sketch or illustration gets its own page
Pages can include multiple versions or iterations
Add descriptive titles for easy searching
This structure enables powerful search functionality across all your creative work. Search for keywords, colors mentioned in notes, or even text within images to instantly find relevant sketches.
Recommended Templates for Artists
While OneNote includes basic templates, artists benefit from creating custom templates:
Storyboard Template:
Grid layout with 6-9 panels per page
Space for scene descriptions and dialogue notes
Consistent panel sizing for easy scanning
Character Design Sheet:
Multiple views (front, side, back, three-quarter)
Space for color palette swatches
Notes section for personality traits and backstory
Daily Sketch Page:
Dated header with automatic timestamp
Warm-up exercise area
Main sketch space with reference image area
Reflection notes section
Project Brief Template:
Client information and project requirements
Mood board area for reference images
Color scheme section
Timeline and milestone checkers
To create and save custom templates:
Design your ideal page layout
Click Insert > Page Templates
Select “Save current page as a template”
Name your template
Access it anytime from the Templates panel
Creative Workflows and Practical Applications
Understanding features is one thing; applying them effectively is another. Let’s explore practical workflows that demonstrate OneNote’s versatility for artists and creatives.
Workflow 1: Visual Brainstorming and Mind Mapping
OneNote’s infinite canvas makes it exceptional for visual brainstorming sessions:
Process:
Create a new page with a blank background
Place your central concept in the middle
Use Ink to Shape to create circles or boxes around ideas
Draw connecting lines showing relationships
Add text notes explaining concepts
Insert reference images or web clippings for inspiration
Use different pen colors to categorize idea types
Zoom out to see the complete mind map structure
This workflow is perfect for planning illustration series, developing character worlds, or organizing design projects. The combination of visual and textual elements creates richer ideation than either medium alone.
Workflow 2: Reference Collection and Inspiration Boards
Build comprehensive reference libraries without leaving OneNote:
Setup:
Create a “Reference Library” notebook
Add sections for different categories (color palettes, poses, environments, styles)
Use OneNote Web Clipper to save inspiring artwork from online
Drag and drop images directly onto pages
Annotate images with notes about what you find inspiring
Link related reference pages together
Tag pages with relevant keywords for easy retrieval
The ability to combine visual references with written analysis helps internalize artistic concepts more effectively than simple image collections. You can sketch directly over reference images to practice techniques or analyze compositional elements.
Workflow 3: Project Development from Concept to Completion
Track entire creative projects within OneNote’s organizational structure:
Structure:
Project Overview Page: Client brief, timeline, deliverables list, contact information
Research Section: Reference images, competitor analysis, inspiration sources
Concept Sketches: Multiple pages with rough ideation, annotated with notes
Development: Refined sketches with client feedback comments
Finals: Polished artwork with version history
Project Wrap-up: Lessons learned, techniques discovered, follow-up tasks
This comprehensive approach keeps all project elements centralized and searchable. Share the project notebook with clients for transparent collaboration, allowing them to view progress and leave feedback directly on sketch pages.
Workflow 4: Skill Building and Practice Journal
Document your artistic journey and track improvement over time:
Daily Practice Structure:
Create dated pages for each practice session
Note your practice goals and focus areas
Complete warm-up exercises and sketches
Photograph or scan traditional sketches and insert them
Analyze what worked and what needs improvement
Link to tutorial resources or technique notes
Monthly review pages comparing progress
The searchable handwriting recognition means you can find specific practice sessions by searching for technique names or concepts you were exploring. This creates a valuable reference archive of your artistic development.
Workflow 5: Collaborative Creative Projects
Leverage OneNote’s real-time collaboration for team projects:
Team Setup:
Create a shared project notebook accessible to all team members
Assign sections to different team members (concept artist, illustrator, designer)
Use @mentions to draw attention to specific feedback requests
Create a “Feedback” section where team members comment on sketches
Track version history to see the evolution of designs
Schedule regular review meetings with the notebook open for live annotation
This workflow is invaluable for design teams, illustration studios, or creative agencies where multiple people contribute to visual projects. Unlike file-based collaboration requiring constant emailing of attachments, OneNote provides a living workspace where everyone sees updates in real-time.
Advanced Tips and Techniques
Take your OneNote sketching to the next level with these advanced techniques.
Combining Handwriting and Typing
OneNote’s strength lies in seamlessly blending handwritten and typed content:
Sketch rough concepts by hand, then add typed specifications and measurements
Create illustrated tutorial notes with handwritten diagrams and typed explanations
Develop comic scripts with typed dialogue and sketched panel layouts
Build design presentations combining sketches with formatted text sections
This hybrid approach matches how creative professionals actually work—fluidly moving between visual and verbal thinking.
Using Ink to Text for Annotations
Convert handwritten notes to searchable, editable text:
Write annotations or labels near your sketches
Select the handwriting with the Lasso tool
Right-click and choose “Ink to Text”
OneNote converts handwriting to typed text
Edit, format, or move the text as needed
This feature is particularly useful for adding last-minute labels to diagrams, converting messy idea sketches into clean notes, or making handwritten content searchable.
Integrating with Other Creative Tools
OneNote works beautifully alongside specialized creative software:
Adobe Creative Cloud Integration:
Export OneNote sketches as images
Import them into Photoshop or Illustrator for refinement
Return final artwork to OneNote for project documentation
Procreate Workflow:
Use OneNote for project planning and reference collection
Switch to Procreate for detailed illustration work
Import finished art back to OneNote for client presentations
Photography Integration:
Link OneNote to your digital photo library
Create contact sheets of photo references
Sketch composition studies directly over photographs
This ecosystem approach leverages each tool’s strengths—OneNote for organization and ideation, specialized software for execution.
Voice Notes for Capturing Ideas
Don’t let fleeting inspiration escape while drawing:
Click Insert > Audio Recording while sketching
Describe your concept, intended mood, or technical approach
OneNote timestamps the recording
Play back audio while viewing the associated sketch
Transcribe important insights to text later
This multimodal capture ensures no creative thought is lost, even when your hands are busy drawing.
Using Tags for Visual Organization
Apply tags to pages for powerful content categorization:
“To Do” tag: Marks’ sketches needing further refinement
“Important” tag: Highlights client favorites or portfolio pieces
“Question” tag: Notes areas requiring feedback or research
Custom tags: Create tags like “Color Study,” “Character Design,” or “Environment Art”
Search and filter by tags to instantly gather all sketches of a specific type or status, creating dynamic portfolios or project reports.
Troubleshooting Common Issues
Even the best tools have occasional hiccups. Here’s how to solve common problems artists encounter with OneNote.
Issue 1: Pressure Sensitivity Not Working
Symptoms: Lines remain uniform in thickness regardless of stylus pressure
Solutions:
Verify pressure sensitivity is enabled in OneNote settings
Update stylus/pen drivers to the latest version
Check that pressure sensitivity works in other apps (confirms hardware functionality)
Try reinstalling the OneNote application
Switch between OneNote 2016 and OneNote for Windows 10—some users report better results with one version
Issue 2: Lag or Slow Performance
Symptoms: Delayed response when drawing; strokes appear seconds after penning
Solutions:
Reduce notebook size by archiving old sections
Avoid excessively large page counts (keep sections under 5,000 pages)
Optimize embedded images—compress before inserting
Close unnecessary notebooks
Ensure adequate device RAM and processing power
Move large attachments to linked cloud storage rather than embedding
Issue 3: Sync Problems Across Devices
Symptoms: Sketches on one device don’t appear on others; version conflicts
Solutions:
Check the internet connection on all devices
Manually trigger sync: File > Info > Sync Status > Sync Now
Verify sufficient OneDrive storage space (free tier provides 5GB)
Allow time for large notebooks to sync (initial sync can take hours)
Avoid working on the same page simultaneously on multiple devices
Issue 4: Accidental Palm Marks
Symptoms: Unwanted marks when the hand rests on the screen while drawing
Solutions:
Enable palm rejection in Drawing Mode settings
Configure stylus orientation settings properly
Use a drawing glove to reduce screen contact
Adjust hand position to minimize palm contact
Use the stroke eraser to quickly remove accidental marks
Issue 5: Exported Sketches Look Different
Symptoms: Colors or line quality changes when exporting from OneNote
Solutions:
Export at higher resolution settings
Use “Print to PDF” for the highest quality exports
Consider screenshotting at high DPI rather than using the export function
For critical work, use OneNote as a planning tool and recreate finals in specialized software
Comparing OneNote to Other Digital Sketchbook Options
To make an informed decision about whether OneNote suits your needs, let’s compare it objectively to popular alternatives.
OneNote vs. Procreate
Procreate Advantages:
Superior brush engine with hundreds of realistic brushes
Advanced layer system with blend modes
Professional-grade color management
Purpose-built for illustration
Better pressure sensitivity and pen dynamics
Animation features
OneNote Advantages:
Completely free (Procreate costs $12.99)
Cross-platform availability (Procreate is iPad-only)
Superior organizational structure
Real-time collaboration
Integrated note-taking with sketches
Infinite canvas without size restrictions
Best Use Cases:
Choose Procreate for: Professional illustration work, detailed digital painting, portfolio pieces
Choose OneNote for: Concept sketching, visual note-taking, collaborative projects, organizing creative work, and budget-conscious creatives
OneNote vs. Notability
Notability Advantages:
Superior handwriting experience
Advanced audio recording synced with notes
Pressure-sensitive pencil tool with a realistic feel
Cleaner, more minimalist interface
Better for pure note-taking
OneNote Advantages:
Free (Notability requires purchase)
Infinite canvas vs. fixed page sizes
Type anywhere flexibility
Better collaboration features
More robust organizational hierarchy
Cross-platform support
Best Use Cases:
Choose Notability for: Students taking handwritten notes, audio-synced lecture notes, and clean note organization
Choose OneNote for: Visual thinkers, creative professionals, team collaboration, multi-platform workflows
OneNote vs. Concepts/Autodesk Sketchbook
Dedicated Sketch Apps Advantages:
Designed specifically for drawing
More sophisticated brush engines
Better vector capabilities (Concepts)
Professional toolsets
Streamlined drawing-focused interfaces
OneNote Advantages:
Integrates creativity with productivity
Superior text and annotation capabilities
Better project organization
Collaboration features
Free with extensive features
Best Use Cases:
Choose Dedicated Apps for: Professional sketching, technical drawing, serious hobby artists
Choose OneNote for: Creative professionals who need organization, educators, designers integrating sketches with notes, collaborative teams
The verdict? OneNote isn’t trying to replace professional drawing software—it’s creating a unique space where creativity and organization coexist. For pure illustration work, dedicated apps excel. For creative workflows requiring organization, annotation, and collaboration, OneNote offers unmatched value.
Conclusion: Embracing OneNote as Your Creative Companion
Microsoft OneNote may not be the first tool that comes to mind when you think “digital sketchbook,” but that’s precisely what makes it such a valuable addition to any creative’s toolkit. Its unique combination of drawing capabilities, organizational power, and collaborative features creates possibilities that specialized art apps simply cannot match.
Throughout this guide, we’ve explored how OneNote transforms from a simple note-taking app into a comprehensive creative workspace. From the infinite canvas that adapts to your artistic vision, to the Ink to Shape feature that brings precision to rough sketches, to the cross-platform accessibility that keeps your work at your fingertips—OneNote offers artists a compelling alternative to expensive dedicated apps.
Key Takeaways:
OneNote provides professional-grade drawing tools at zero cost, making it accessible to students, hobbyists, and professionals alike
The infinite canvas and flexible organizational structure support creative workflows that blend visual and textual thinking
Cross-platform synchronization ensures your creative work follows you across all devices
Real-time collaboration features make OneNote ideal for team-based creative projects
While not replacing specialized illustration software, OneNote excels at concept development, visual brainstorming, and creative organization
Next Steps to Transform Your OneNote Experience:
Start Small: Create your first artist notebook today with sections for different project types
Experiment: Spend 30 minutes exploring the Draw tab features and customizing your preferred pens
Develop a Workflow: Choose one of the workflows from this guide and implement it in your next creative project
Join the Community: Connect with other OneNote artists through forums and social media to share tips and templates
Integrate Gradually: Don’t abandon your current tools—add OneNote strategically where its strengths shine
The beauty of OneNote as a digital sketchbook lies not in replacing specialized tools, but in complementing them while adding organizational superpowers to your creative process. Whether you’re a professional designer managing multiple client projects, a student visual note-taker, or a hobbyist artist exploring digital creativity, OneNote offers a free, powerful platform to capture, develop, and share your visual ideas.
Ready to unlock your creative potential? Open OneNote, select the Draw tab, and start sketching. Your infinite digital canvas awaits—and the only limit is your imagination.
Have you discovered unique ways to use OneNote for creative work? Share your tips and workflows in the comments below! Let’s build a community of OneNote artists together.
FAQ Section
Can I use OneNote as a professional digital sketchbook?
Yes, OneNote can serve as a professional digital sketchbook, particularly for concept development, client presentations, and project organization. While it lacks some advanced features of dedicated illustration software like Procreate or Adobe Fresco, OneNote excels at combining sketches with notes, annotations, and project documentation. Many professional designers use OneNote for initial ideation and brainstorming, then move to specialized software for final execution. Its infinite canvas, pressure sensitivity support, and collaborative features make it valuable for professional workflows where organization and communication matter as much as artistic execution.
Does OneNote support Apple Pencil and pressure sensitivity?
Yes, OneNote fully supports Apple Pencil on iPad devices with excellent pressure sensitivity for dynamic line variation. You can adjust pen thickness, color, and effect, with the Apple Pencil providing natural, responsive drawing that mimics traditional drawing tools. OneNote also supports stylus pressure sensitivity on Windows devices with Surface Pen and compatible Wacom tablets. However, you must enable pressure sensitivity in OneNote settings (Options > Advanced > Pen > “Use pen pressure sensitivity”). Some users report better pressure sensitivity performance with OneNote 2016 compared to the Windows 10 version, so experiment with both if experiencing issues.
How do I convert my hand-drawn shapes into perfect geometric shapes in OneNote?
Use OneNote’s Ink to Shape feature to automatically convert hand-drawn shapes into perfect geometric forms. On iPad, tap the Draw tab, select “Ink to Shape,” choose your pen, and draw any shape freehand (circles, squares, rectangles, triangles, etc.). Hold your stylus in place briefly after completing the shape, and OneNote converts it to a perfect geometric form that you can resize by dragging. On Windows, click the “Ink to Shape” button in the Draw tab before drawing. This feature recognizes shapes drawn in one continuous stroke (circles, ovals) or multiple strokes (rectangles, triangles), making it invaluable for creating diagrams, flowcharts, technical drawings, and architectural sketches.
What are the best OneNote alternatives for digital sketching?
Popular OneNote alternatives for digital sketching include Procreate ($12.99, iPad only) for professional illustration with advanced brushes and layer systems; Notability ($14.99, iOS/Mac) for handwriting-focused note-taking with excellent Apple Pencil support; Autodesk SketchBook (free) for straightforward sketching with minimalist interface; Adobe Fresco (free/subscription) for realistic brush simulation; Concepts (free/pro) for infinite canvas vector illustration; and Krita (free, open-source) for professional-grade digital painting on desktop. Each excels at different aspects—Procreate for polished artwork, Notability for educational notes, OneNote for organizational workflows. The best choice depends on whether you prioritize pure artistic capabilities (Procreate, Fresco), note-taking integration (Notability, OneNote), or cross-platform flexibility (OneNote, SketchBook).
Can I collaborate with other artists in OneNote in real-time?
Yes, OneNote offers robust real-time collaboration features perfect for creative teams. Share notebooks with collaborators via email invitation or shareable links, setting permissions for view-only or full editing access. Multiple users can work simultaneously on the same notebook, section, or page, with changes syncing in real-time across all devices. Collaborators can add sketches, leave comments, annotate artwork, and use @mentions to request feedback. Version history tracks all changes, allowing restoration of previous versions if needed. This makes OneNote excellent for design teams, illustration studios, creative agencies, and educational settings where multiple people contribute to visual projects. Unlike file-based collaboration requiring constant emailing, OneNote provides a living workspace where everyone sees updates instantly.
How can I organize my artwork and sketches in OneNote effectively?
Organize artwork using OneNote’s hierarchical structure of notebooks, sections, and pages. Create separate notebooks for different purposes (client projects, personal art, reference libraries), sections within each notebook for logical groupings (by client, project phase, or art style), and individual pages for specific sketches. Add descriptive titles to pages for powerful search functionality. Use tags like “Important,” “To Do,” or custom tags (“Character Design,” “Color Study”) to categorize content. Create section groups to manage multiple related sections together. Link related pages using hyperlinks for easy navigation. This structure enables instant searching across all creative work—find sketches by keyword, date, client name, or tag. Regularly archive completed projects to maintain performance, and create templates for recurring page types like storyboards or character sheets.
Does OneNote work offline for sketching without internet connection?
Yes, OneNote works fully offline for sketching and note-taking without requiring an internet connection. You can create new notebooks, draw sketches, add content, and edit existing pages completely offline. Changes save locally to your device and automatically sync to the cloud when you reconnect to the internet. This offline capability makes OneNote reliable for fieldwork, travel, or areas with poor connectivity. However, initial notebook downloads require internet connection—ensure you open notebooks while online at least once so they cache locally. Collaborative features and real-time co-editing naturally require internet connectivity, but solo creative work functions seamlessly offline. OneNote automatically resolves any sync conflicts if you edit the same content offline on multiple devices