

Are you tired of messy formatting and inconsistent styles in your Microsoft Word documents? Managing styles with the Styles Pane can change the way your documents look, making them neat and easy to read.
In this guide, we’ll explore how to use the Styles Pane to make your Word documents look more professional. Learn how to organize your content, save time, and keep a polished look throughout.
What is the Styles Pane in MS Word?
The Styles Pane in Microsoft Word is a helpful tool that lets you apply the same formatting throughout your document. You might also want to explore more about different formatting options available in Word, like Adjusting Page Margins for various document types.
It helps you manage headings, paragraphs, lists, and other styles, so everything matches. Whether you are working on a report, proposal, or school project, the Styles Pane makes formatting easier and saves you from doing everything by hand.
In short, the Styles Pane is your secret tool for keeping your Word documents looking sharp and organized.
Why Use the Styles Pane?
1. Save Time with Consistent Formatting
Formatting each part of your document by hand takes a lot of time. The Styles Pane lets you apply the same look in just a few clicks. For example, if you want all your headings to be bold, blue, and size 16 font, you can create a style and apply it across the whole document easily.
2. Professional and Polished Look
Documents that use the same styles look polished and professional. The Styles Pane helps you make sure that headings, subheadings, and paragraphs all match, which makes your document easy to read and look well put together.
3. Easier Navigation
Using the Styles Pane also helps you move around your document more easily. When you use styles for headings, you can create a table of contents or use the Navigation Pane to quickly jump between sections. This is especially helpful in long documents like manuals or research papers. If you’re interested in making your documents even more polished, consider learning about How to Create Custom Styles in Word for a unique touch.
How to Access the Styles Pane
Getting started with the Styles Pane is easy. Here’s a simple guide to help you find it:
- Open Your Document: Start by opening the Word document you want to work on.
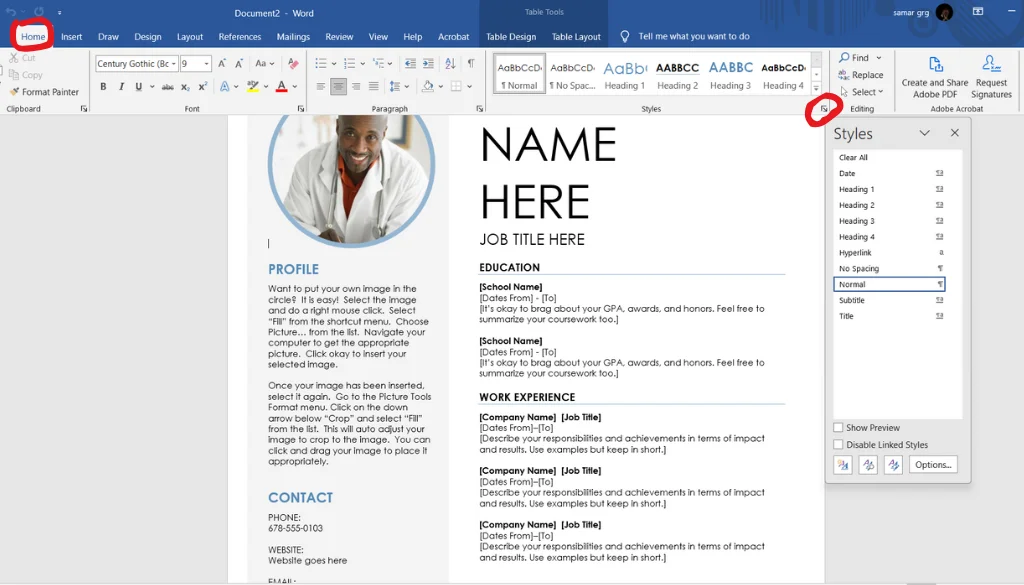
- Go to the Home Tab: Click on the Home tab at the top.
- Find the Styles Group: On the right side of the Home tab, you’ll see the Styles group.
- Open the Styles Pane: Click on the small arrow at the bottom right corner of the Styles group to open the Styles Pane.
Once the Styles Pane is open, you can see all available styles, change them, or create new ones as you need.
How to Use the Styles Pane Effectively
1. Apply Existing Styles
The easiest way to use the Styles Pane is to apply styles that are already there. Highlight the text you want to format, and then click on the style you want in the Styles Pane. For example, use “Heading 1” for chapter titles or “Normal” for regular paragraphs.
2. Modify a Style
Sometimes, the default styles don’t look the way you want. You can change an existing style to make it fit your needs:
- Right-click on the style you want to change in the Styles Pane.
- Select Modify.
- Change the font, size, color, or other settings, and click OK.
This will automatically update all the places where that style is used, saving you time and keeping everything looking the same.
3. Create Custom Styles
Creating custom styles is really useful, especially if you have specific formatting rules:
- Click on the Styles Pane and select Create a Style.
- Name your style, and click Modify to customize it.
- Set your preferred font, color, alignment, and other details, then save it. To further enhance your document’s look, you can also check out our guide on Personalizing Microsoft Word Themes for more customization.
Your new style will now show up in the Styles Pane, ready to be used throughout your document.
Frequently Asked Questions About the Styles Pane
1. How Do I Remove a Style from Text?
To remove a style, highlight the text and click on Clear Formatting in the Styles Pane. This will remove any styles and go back to the default formatting.
2. Can I Transfer Styles Between Documents?
Yes! You can use the Organizer tool to copy styles between different Word documents. This is helpful if you want to keep a consistent look across several documents, like reports or presentations.
3. What If I Don’t See the Style I Need?
If you don’t see the style you need, you can either change an existing style or create a new one. The Styles Pane is flexible, so you can make styles that match exactly what you need.
Best Practices for Managing Styles
1. Use Descriptive Names for Custom Styles
When creating custom styles, use clear names like “Report Heading” or “Quote Style” instead of general names. This makes it easier to remember and use the correct style throughout your document.
2. Stick to a Consistent Theme
Consistency is important. If you use different styles for headings, subheadings, and body text, make sure they follow the same theme—same fonts, colors, and spacing. This makes your document easy to read and look professional.
3. Take Advantage of Keyboard Shortcuts
Using shortcuts can make applying styles faster. For example, press Ctrl + Alt + 1 to apply “Heading 1” to the selected text. You can also set shortcuts for your custom styles to save time.
Advanced Tips: Unlock the Full Potential of the Styles Pane
1. Create a Style Set
A Style Set is a group of styles that you can use to give your document a unified look. To create a Style Set, format your document using different styles, then save these settings by selecting Change Styles > Style Set > Save as a New Style Set.
2. Use Styles for Automation
Styles can help automate tasks like creating a table of contents. By applying heading styles to section titles, you can easily create a table of contents that updates automatically as you make changes.
3. Link Styles to Specific Templates
If you often make documents with similar formatting, link your styles to a specific Word template. This way, every new document based on that template will include your custom styles, saving you time.
Common Mistakes to Avoid When Using the Styles Pane
1. Overusing Direct Formatting
Direct formatting—like changing font size or color by hand—can make your document messy and inconsistent. Stick to using the Styles Pane for all your formatting to keep everything the same.
2. Not Updating Styles Globally
If you change the formatting of each heading manually instead of updating the style, your document will be harder to manage. Always modify the style itself to make changes—this way, the changes apply everywhere that style is used.
3. Ignoring the Importance of Style Hierarchies
Using the correct heading levels (like Heading 1, Heading 2) helps keep your document organized. For more information on organizing your content effectively, you might find our Glossary of Essential Microsoft Word Terms useful. This is not only good for readability but also important if you want to create a table of contents or use the navigation pane.
Conclusion: Master the Styles Pane for Easy Document Formatting
The Styles Pane in Microsoft Word is a powerful tool that can make your document formatting much easier. By using styles, you keep everything consistent, save time, and make documents that look professional and are easy to navigate. Whether you are making a simple report or a long manual, learning to use styles will make your work better.
Start using the Styles Pane today and see how much easier it makes formatting your documents. Ready to make your documents look great? Open Word and give it a try!