Creating professional documents in Microsoft Word doesn’t have to be a repetitive, time-consuming task. Custom styles allow you to define formatting rules once and apply them consistently throughout any document—whether you’re drafting a formal business report, an academic research paper, or a legal brief. According to recent data, Microsoft Word is used by over 200 million licensed users globally, yet many users spend unnecessary time manually formatting text instead of leveraging the powerful Styles feature.
This comprehensive guide walks you through creating custom styles tailored for different document types, helping you achieve professional results while significantly reducing formatting time.
What Are Custom Styles in Microsoft Word?
Custom styles in Microsoft Word are predefined sets of formatting attributes—including font type, size, color, paragraph spacing, alignment, and more—that you can apply to text with a single click. Instead of manually selecting Times New Roman, 12pt, double-spaced for every paragraph, you create a style once and reuse it throughout your document. When you modify the style, Word automatically updates all text using that style across your entire document.
“Styles are bundles of formatting choices all tied together so they can be easily applied to a chunk of text.”
This feature is particularly valuable for lengthy documents or when you need consistent formatting across multiple files.
Understanding Style Types
Microsoft Word provides five types of styles, each serving a specific purpose:
| Style Type | Description | Best Use Case |
|---|---|---|
| Paragraph styles | Affect entire paragraphs, including character and paragraph formatting | Body text, headings, quotations |
| Character styles | Apply only to selected text within a paragraph | Emphasis, bold keywords, special terms |
| Linked styles | Act as paragraph or character styles depending on selection | Headings that sometimes appear inline |
| Table styles | Format tables with consistent borders, shading, and attributes | Data tables, comparison charts |
| List styles | Apply consistent formatting to numbered or bulleted lists | Procedures, feature lists |
Understanding these distinctions helps you choose the right style type for each document element.
Benefits of Using Custom Styles
Using custom styles provides several significant advantages for document creation:
Time Savings: Studies indicate that AI-assisted document tools reduce initial drafting time by up to 50%, and styles offer similar efficiency gains through manual automation. Once configured, applying formatting takes one click instead of multiple formatting steps.
Formatting Consistency: Well-formatted documents enhance readability and comprehension while conveying professionalism. Custom styles ensure every heading, paragraph, and list follows identical formatting rules.
Easy Global Updates: Need to change all your headings from 14pt to 16pt? Modify the style once, and Word updates every instance automatically.
Document Navigation: Heading styles integrate with the Navigation Pane, enabling you to view document structure and jump between sections instantly.
Automatic Table of Contents: When you use heading styles, Word can generate and customize a table of contents automatically.
Step-by-Step Guide to Creating Custom Styles
Creating custom styles in Word involves straightforward steps that become second nature with practice. This section covers the essential methods for building your style library.
Opening the Styles Pane
Before creating custom styles, you need access to the Styles Pane—the central hub for style management:
- Open your Word document and navigate to the Home tab
- In the Styles group, click the small diagonal arrow (dialog box launcher) in the bottom-right corner
- The Styles Pane appears, displaying available styles and providing access to creation and modification tools
You can also press Ctrl+Alt+Shift+S to open the Styles Pane quickly.
The Styles Pane shows all styles currently available in your document. Click the Options link at the bottom to choose which styles to display—you can view only styles in use, recommended styles, or all available styles.
Creating a New Style from Scratch
To create a completely new style with your specified formatting:
- In the Styles Pane, click the New Style button at the bottom (the leftmost button)
- The Create New Style from Formatting dialog box opens
- Enter a Name for your style—choose something descriptive like “Report Body Text” or “Chapter Heading”
- Select the Style type from the dropdown (Paragraph, Character, Linked, Table, or List)
- Choose the Style based on the setting to inherit formatting from an existing style
- Set the Style for the following paragraph if you want Word to automatically switch to a different style when you press Enter
- Configure your formatting options:
- Font: Select typeface, size, color, and effects (bold, italic, underline)
- Paragraph: Set alignment, indentation, and line spacing
- Click Format at the bottom for advanced options, including borders, tabs, and language settings
- Choose whether to save the style only in this document or in new documents based on this template
- Click OK to save
Your new custom style now appears in the Styles Pane and Styles gallery, ready for use.
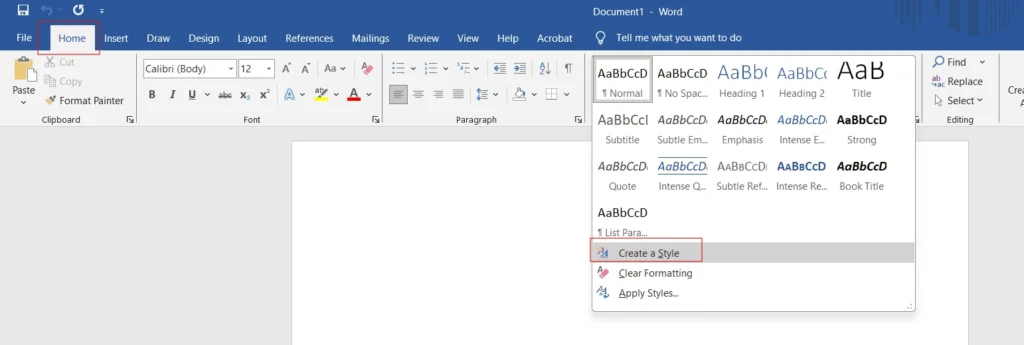
Creating a Style from Formatted Text
An alternative approach lets you create a style based on text you’ve already formatted:
- Select text in your document that has the formatting you want to capture
- Right-click the selected text
- In the mini toolbar, click Styles, then select Create a Style
- Enter a name for your new style
- Click OK for basic creation, or click Modify to adjust additional settings before saving
This method is particularly useful when you’ve spent time perfecting formatting and want to preserve it as a reusable style.
Modifying Existing Styles
You don’t always need to create styles from scratch. Modifying built-in styles like Heading 1, Heading 2, or Normal often provides a faster starting point:
Method 1: Update to Match Selection
- Format text in your document with your desired appearance
- Select the formatted text
- Right-click the style you want to update in the Styles gallery
- Click Update [Style Name] to Match Selection
- All text using that style updates automatically
Method 2: Manual Modification
- Right-click any style in the Styles gallery or Styles Pane
- Select Modify
- Adjust formatting settings in the Modify Style dialog box
- Click OK to apply changes
When you modify a built-in style, you can choose to save changes only to the current document or to all new documents based on the current template.
Custom Styles for Different Document Types
Different types of documents require different formatting approaches. This section provides specific style recommendations for common document types you’ll encounter in professional and academic settings.
Styles for Business Reports
Business reports demand professionalism, readability, and clear hierarchy. Your style set for reports should include:
Report Title Style:
- Font: Arial or Calibri, 24pt, Bold
- Alignment: Centered
- Color: Company brand color or dark blue
- Space after: 24pt
Section Heading (Heading 1):
- Font: Arial, 16pt, Bold
- Color: Dark blue (#1F4E79)
- Space before: 18pt, Space after: 6pt
- Keep with next paragraph: Enabled
Subsection Heading (Heading 2):
- Font: Arial, 14pt, Bold
- Color: Medium blue (#2E75B6)
- Space before: 12pt, Space after: 6pt
Report Body Text:
- Font: Calibri or Times New Roman, 11pt
- Line spacing: 1.15 or 1.5 lines
- Space after paragraph: 10pt
- Alignment: Left or Justified
Executive Summary Style:
- Font: Calibri, 11pt, Italic
- Indentation: 0.5″ left and right
- Border: Left border, 3pt, accent color
For comprehensive report formatting guidance, see our guide on crafting a well-structured report in MS Word.
Styles for Academic Papers
Academic documents typically follow strict formatting guidelines from style guides like APA, MLA, or Chicago. Here are universal academic styles you can customize:
Paper Title:
- Font: Times New Roman, 12pt, Bold
- Alignment: Centered
- Position: One-third down the page (for title pages)
Section Heading (Level 1):
- Font: Times New Roman, 12pt, Bold, Centered
- Capitalization: Title Case
- No numbering (unless required)
Subsection Heading (Level 2):
- Font: Times New Roman, 12pt, Bold, Left-aligned
- Space before: 12pt
Body Text (Normal):
- Font: Times New Roman, 12pt
- Line spacing: Double (2.0)
- First line indent: 0.5″
- No space between paragraphs
Block Quote:
- Font: Times New Roman, 12pt
- Indentation: 0.5″ left margin
- Line spacing: Double
- No quotation marks
Academic papers benefit from consistent heading styles that integrate with effective use of headings and subheadings.
Styles for Business Letters
Professional correspondence requires clean, formal formatting that adheres to business letter conventions:
Sender Address Style:
- Font: Arial or Times New Roman, 11pt
- Alignment: Left or Right (depending on letterhead style)
- No space between address lines
Date Style:
- Font: Same as body text
- Space before: 24pt, Space after: 24pt
Recipient Address Style:
- Font: Same as body text
- Space after: 12pt
Salutation:
- Font: Same as body text
- Style: “Dear [Name]:” followed by one blank line
Letter Body:
- Font: Arial or Times New Roman, 11pt
- Line spacing: Single
- Space between paragraphs: 12pt
- First line indent: None (block style) or 0.5″ (indented style)
Closing Style:
- Font: Same as body text
- Space before: 24pt
- Text: “Sincerely,” or similar
Styles for Legal Documents
Legal documents have precise formatting requirements that vary by jurisdiction. Common style specifications include:
Document Title:
- Font: Times New Roman or Century Schoolbook, 14pt, Bold, Centered
- All caps for formal titles
Section Heading:
- Font: Times New Roman, 12pt, Bold
- Numbering: Roman numerals (I, II, III) or Arabic (1, 2, 3)
- Capitalization: Title Case or ALL CAPS
Subsection:
- Font: Times New Roman, 12pt
- Numbering: Letters (A, B, C) or numbers (1, 2, 3)
- Indentation: 0.5″ from parent level
Legal Body Text:
- Font: Times New Roman, Century, or Court-approved font, 12pt
- Line spacing: Double (courts often require this)
- Margins: 1″ all sides (or per court rules)
- Paragraph numbering: Sequential throughout document
Pro Tip: Always verify font and formatting requirements with your specific court. The U.S. Supreme Court requires Century Family fonts, while Florida courts mandate Arial or Bookman Old Style at 14pt.
Styles for Resumes and CVs
Resume styles prioritize scannability and professional appearance:
Name Header:
- Font: Arial, Helvetica, or Calibri, 18-24pt, Bold
- Alignment: Centered or Left
- Color: Black or dark accent color
Section Headers (Experience, Education, Skills):
- Font: Same family as name, 12-14pt, Bold
- Border: Bottom border, 1pt
- All caps or Title Case
Job Title/Degree:
- Font: Same as body, 11pt, Bold
Company/Institution:
- Font: Same as body, 11pt, Italic
Body Text/Bullets:
- Font: Arial, Calibri, or Garamond, 10-11pt
- Line spacing: 1.0 to 1.15
- Bullet style: Small circles or squares
Creating and Managing Style Sets
When you’ve perfected styles for a particular document type, save them as a Style Set to apply across multiple documents instantly.
Saving a Custom Style Set
To save your current document’s styles as a reusable style set:
- Format a document with all the styles you want to include
- Navigate to the Design tab on the ribbon
- In the Document Formatting group, click the More button (dropdown arrow)
- Select Save as a New Style Set
- Enter a descriptive name (e.g., “Corporate Report Styles” or “APA Academic”)
- Click Save
Your custom style set is saved to the Quick Styles folder and appears in the Document Formatting gallery under the Custom section.
Applying Style Sets to New Documents
To apply a saved style set to any document:
- Open the document you want to format
- Go to the Design tab
- Click the More button in the Document Formatting group
- Browse the style sets and click your custom set to apply it
All built-in style names (Heading 1, Heading 2, Normal, etc.) in your document update to match the formatting defined in your style set.
Saving Custom Styles for Future Use
Beyond style sets, you can ensure your custom styles are available in every new document by saving them to templates.
Saving to the Normal.dotm Template
The Normal.dotm file is Word’s default template used for blank documents. Adding styles to this template makes them available whenever you create a new document:
Method 1: During Style Creation
- When creating or modifying a style, look for the option at the bottom of the dialog
- Select New documents based on this template
- Click OK
Method 2: Using the Organizer
- Press Ctrl+Alt+Shift+S to open the Styles Pane
- Click the Manage Styles button (third button at the bottom)
- Click Import/Export to open the Organizer
- On the left, you’ll see your current document; on the right, Normal.dotm
- Select the styles you want to copy and click Copy to add them to Normal.dotm
Caution: Be careful when modifying Normal.dotm, as changes affect all new blank documents. Consider creating a separate template instead for specialized styles.
Creating a Custom Template
For document-type-specific styles, create dedicated templates:
- Create a new document and configure all your desired styles
- Go to File > Save As
- In the Save as type dropdown, select Word Template (.dotx)
- Name your template descriptively (e.g., “Business_Report_Template.dotx”)
- Save to your Templates folder for easy access
To use the template:
- Go to File > New
- Click Personal or Custom to see your templates
- Select your template to create a new document with all styles ready
For more on template creation, visit our guide on creating custom templates in Microsoft Word.
Troubleshooting Common Style Issues
Even experienced Word users encounter style problems. Here are solutions to the most common issues:
Styles Not Applying Correctly
When styles don’t appear as expected, the text may have direct formatting overriding the style. Solution:
- Select the problematic text
- Press Ctrl+Spacebar to clear character formatting
- Press Ctrl+Q to clear paragraph formatting
- Reapply the style
Styles Changing Unexpectedly
If styles update without your input, automatic style updating may be enabled:
- Right-click the style and select Modify
- Uncheck Automatically update
- Click OK
Styles Not Available in New Documents
If custom styles don’t appear in new documents:
- Ensure you select New documents based on this template when creating the style
- Alternatively, use the Organizer to copy styles to Normal.dotm
Numbered Headings Out of Order
When heading numbers don’t follow sequence, the multilevel list may be disconnected:
- Select a heading with incorrect numbering
- Go to Home > Multilevel List
- Choose Define New Multilevel List
- Link each list level to the appropriate heading style
For additional troubleshooting, see our resource on Microsoft Word custom styles not working.
Integrating Styles with Other Word Features
Custom styles unlock powerful Word features that improve document organization and navigation.
Navigation Pane Integration
When you apply heading styles, the Navigation Pane displays your document structure:
- Go to View > Navigation Pane (or press Ctrl+F)
- Click the Headings tab
- View all headings in hierarchical order
- Click any heading to jump directly to that section
- Drag headings to reorganize entire sections
This feature transforms long documents into easily navigable structures. Learn more in our guide on how to navigate long documents with the Navigation Pane.
Table of Contents Generation
Heading styles enable automatic table of contents creation:
- Place your cursor where you want the table of contents
- Go to References > Table of Contents
- Select a built-in style or customize formatting
- Word generates the TOC based on your heading styles
Update the TOC after making changes by right-clicking it and selecting Update Field.
Headers and Footers
Styles ensure consistent formatting in headers and footers. Create a Header style with:
- Smaller font size (9-10pt)
- Alignment matching your document design
- Border (optional bottom border)
Best Practices for Custom Styles
Follow these expert recommendations to maximize your style efficiency:
Name Styles Descriptively
Use clear, purpose-based names like “Chapter Heading” or “Code Block” instead of generic names like “Style1”.
Limit Font Variety
Professional documents typically use no more than two font families—one for headings and one for body text.
Use Style Inheritance
Base new styles on existing ones using the “Style based on” setting. Changes to the parent style cascade to child styles, simplifying updates.
Document Your Styles
For team projects, create a style guide documenting each style’s purpose and settings.
Test Before Deploying
Before saving styles to templates, test them in a sample document to ensure they work as expected.
Frequently Asked Questions
Can I use custom styles across multiple Word documents?
Yes, you can share custom styles between documents in several ways. Save styles to the Normal.dotm template to make them available in all new blank documents. Alternatively, use the Organizer (access via Manage Styles > Import/Export) to copy specific styles between any two documents or templates. You can also save your document as a .dotx template file and create new documents based on that template.
How do I create different styles for headings in the same document?
Word allows unlimited custom heading styles. Create styles for each heading level (Heading 1, Heading 2, Heading 3, etc.) with different formatting. In the Create New Style dialog, set the Outline level under Format > Paragraph to define the heading hierarchy. This ensures your headings appear correctly in the Navigation Pane and Table of Contents.
Why aren’t my custom styles appearing in the Styles gallery?
By default, styles appear in the Styles gallery only if the Add to the Styles gallery option is checked during creation. To add an existing style: right-click it in the Styles Pane, select Modify, and check Add to Styles gallery. Also, verify in the Styles Pane Options that you’re viewing All styles rather than just In current document or Recommended.
How do I reset styles to Word’s default settings?
To reset a document’s styles to defaults: go to the Design tab, click the More button in Document Formatting, and select Reset to the Default Style Set. To reset a specific style, modify it and change settings back to defaults, or delete your custom style so Word reverts to the built-in version.
Can I export my custom styles to share with colleagues?
Yes, export styles by saving your styled document as a Word Template (.dotx) and sharing that file. Colleagues can then use the Organizer to import styles from your template into their documents, or they can create new documents directly from your template.
What’s the difference between a style and a template?
A style defines formatting for specific text elements (headings, body text, lists). A template is a document file (.dotx) that contains styles, along with page layouts, content placeholders, macros, and other settings. Templates provide a complete starting point for new documents, while styles are individual formatting definitions within documents or templates.
How do I apply different styles to different sections of the same document?
Use section breaks combined with different style sets, or create additional custom styles for each section’s needs. For example, you might have “Chapter1 Heading” and “Appendix Heading” styles with different formatting. To adjust page margins for different document sections, insert section breaks and apply unique page setup settings to each section.
Conclusion
Mastering custom styles in Microsoft Word transforms your document creation process from tedious manual formatting to efficient, professional output. By creating purpose-built styles for reports, academic papers, business letters, legal documents, and resumes, you ensure consistent formatting while saving significant time on every document you create.
Your next steps:
- Open Word and explore the Styles Pane
- Create one custom style for a document type you use frequently
- Save it to a template or style set for future use
- Practice applying and modifying styles until the workflow becomes automatic
The investment in learning custom styles pays dividends across every document you create. Start with one document type, perfect your styles, then expand to others as you grow more comfortable with the tools.